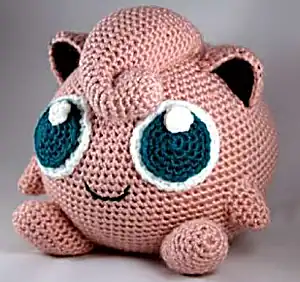
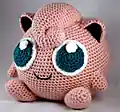
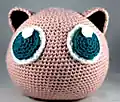
Create your very own adorable Jigglypuff from the beloved Pokémon series with this detailed amigurumi pattern. Standing at six inches tall, this charming pink balloon Pokémon features intricate details including teal eyes, black inner ears, and the signature curly poof on top. Perfect for Pokémon fans and crochet enthusiasts alike, this pattern includes step-by-step instructions for creating every component from the round body to the distinctive triangular ears.
Progress Tracker
0% Complete
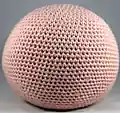
— Body :
Round 1 :
Magic ring 6 [6]
Round 3 :
(inc, sc 1) x 5, inc, inc [19]
Round 4 :
(inc, sc 2) x 6, sc 1 [25]
Round 5 :
sc 1, (inc, sc 3) x 6 [31]
Round 6 :
sc 3, (inc, sc 4) x 5, inc, sc 2 [37]
Round 7 :
sc 6, (inc, sc 7, inc, sc 6) x 2, inc [42]
Round 8 :
sc 3, inc, (sc 6, inc) x 5, sc 3 [48]
Round 9 :
sc 5, inc, (sc 8, inc, sc 9, inc) x 2, sc 4 [53]
Round 10 :
sc 8, inc, (sc 9, inc, sc 10, inc) x 2, sc 2 [58]
Round 11 :
sc 3, inc, (sc 10, inc, sc 11, inc) x 2, sc 8 [63]
Round 12 :
(sc 12, inc, sc 11, inc) x 2, sc 12, inc [68]
Round 13 :
sc 6, inc, (sc 16, inc) x 3, sc 10 [72]
Round 14 :
sc 11, inc, (sc 17, inc) x 3, sc 6 [76]
Round 15 :
sc 3, inc, (sc 24, inc) x 2, sc 22 [79]
Round 16 :
sc 18, inc, (sc 25, inc) x 2, sc 8 [82]
Round 17 :
sc 6, inc, (sc 26, inc) x 2, sc 21 [85]
Round 18 :
sc 14, inc, (sc 27, inc) x 2, sc 14 [88]
Round 19 :
(sc 43, inc) x 2 [90]
Round 20 :
sc 20, inc, sc 69 [91]
Round 21 :
sc 3, inc, sc 44, inc, sc 42 [93]
Round 22 :
sc 92, inc [94]
Round 26 :
dec, sc 92 [93]
Round 27 :
sc 42, dec, sc 44, dec, sc 3 [91]
Round 28 :
sc 69, dec, sc 20 [90]
Round 29 :
(dec, sc 43) x 2 [88]
Round 30 :
sc 14, (dec, sc 27) x 2, dec, sc 14 [85]
Round 31 :
sc 21, (dec, sc 26) x 2, dec, sc 6 [82]
Round 32 :
sc 8, (dec, sc 25) x 2, dec, sc 18 [79]
Round 33 :
sc 22, (dec, sc 24) x 2, dec, sc 3 [76]
Round 34 :
sc 6, (dec, sc 17) x 3, dec, sc 11 [72]
Round 35 :
sc 10, (dec, sc 16) x 3, dec, sc 6 [68]
Round 36 :
dec, sc 12, (dec, sc 11, dec, sc 12) x 2 [63]
Round 37 :
sc 8, (dec, sc 11, dec, sc 10) x 2, dec, sc 3 [58]
Round 38 :
sc 2, (dec, sc 10, dec, sc 9) x 2, dec, sc 8 [53]
Round 39 :
sc 4, (dec, sc 9, dec, sc 8) x 2, dec, sc 5 [48]
Round 40 :
sc 3, (dec, sc 6) x 5, dec, sc 3 [42]
Round 41 :
dec, (sc 6, dec, sc 7, dec) x 2, sc 6 [37]
Round 42 :
sc 2, dec, (sc 4, dec) x 5, sc 3 [31]
Round 43 :
(sc 3, dec) x 6, sc 1 [25]
Round 44 :
sc 1, (sc 2, dec) x 6 [19]
Round 45 :
dec, dec, (sc 1, dec) x 5 [12]
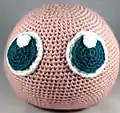
— Eyes :
Round 1 :
Magic ring 6 [6]
Round 3 :
(inc, sc 1) x 6 [18]
Round 4 :
(sc 1, inc, sc 1) x 6 [24]
Round 5 :
(sc 3, inc) x 6 [30]
Round 1 :
Magic ring 6 [6]
Round 3 :
(inc, sc 1) x 6 [18]
Round 4 :
(sc 1, inc, sc 1) x 6 [24]
Round 1 :
Magic ring 6 [6]
— Ears :
Row 2 :
sc in second ch, sc 5, ch 1, turn [6]
Row 3 :
dec, sc 4, ch 1, turn [5]
Row 4 :
dec, sc 3, ch 1, turn [4]
Row 2 :
sc in second ch, sc 11, ch 1, turn [12]
Row 3 :
dec, sc 3, dec, sc 3, dec, ch 1, turn [9]
Row 4 :
dec, sc 1, dec, sc 2, dec, ch 1, turn [6]
— Feet :
Round 1 :
Magic ring 7 [7]
Round 2 :
inc, (inc, sc 1) x 3 [11]
Round 3 :
inc, sc 1, inc, sc 4, inc, sc 3 [14]
Round 5 :
sc 8, inc, sc 3, inc, sc 2 [17]
Round 7 :
sc 5, inc, sc 4, dec, sc 5 [17]
Round 9 :
dec, sc 9, inc, sc 5 [17]
Round 10 :
sc 9, dec, sc 6 [16]
Round 11 :
sc 12, dec, sc 2 [15]
Round 12 :
sc 4, dec, sc 3, dec, sc 4 [13]
Round 13 :
dec, sc 6, dec, sc 3 [11]
Round 14 :
(dec) x 4, sc 1, dec [6]
— Arms :
Round 1 :
Magic ring 5 [5]
Round 2 :
(inc, sc 1) x 2, inc [8]
Round 3 :
sc 3, inc, sc 4 [9]
Round 4 :
pr 2: sc 2, inc, sc 3 [7]
— Poof :
Round 1 :
Magic ring 6 [6]
Round 2 :
(inc) x 5, sc 1 [11]
Round 3 :
(sc 2, inc) x 3, sc 1, inc [15]
Round 4 :
sc 3, inc, sc 7, inc, sc 3 [17]
Round 5 :
sc 8, dec, sc 7 [16]
Round 6 :
dec, sc 3, dec, sc 4, dec, sc 3 [13]
Round 7 :
dec, sc 1, dec, dec, sc 1, dec, sc 1, dec [8]
Round 8 :
pr 3: inc, sc 2, inc [6]
Round 12 :
sc 4, inc, sc 5 [11]
Round 13 :
inc, sc 10 [12]
Round 15 :
sc 3, inc, sc 5, inc [14]
Round 17 :
sc 1, inc, sc 6, inc, sc 5 [16]
Round 18 :
sc 6, inc, sc 6, inc, sc 1 [18]
Round 19 :
sc 3, inc, sc 8, inc, sc 5 [20]
Round 20 :
pr 3: sc 18 [18]
Round 21 :
pr 1: sc 8, inc, sc 9 [19]
Round 22 :
pr 1: sc 4, inc, sc 14 [20]
Round 23 :
pr 1: sc 20 [20]
Round 24 :
pr 1: sc 20 [20]
Round 25 :
pr 1: sc 20 [20]
Round 26 :
pr 1: sc 8, dec, sc 10 [19]
Round 27 :
pr 1: sc 12, dec, sc 5 [18]
Round 28 :
pr 1: sc 5, dec, sc 11 [17]
Round 29 :
pr 1: sc 4, dec, sc 5, dec, sc 4 [15]
Round 30 :
pr 1: sc 6, dec, sc 7 [14]
Round 31 :
pr 1: sc 8, dec, sc 4 [13]
Round 32 :
pr 1: sc 3, dec, sc 3, dec, sc 3 [11]
Round 33 :
pr 1: sc 5, dec, sc 4 [10]
Round 34 :
pr 1: sc 2, dec, sc 2, dec, sc 2 [8]
This delightful Jigglypuff pattern captures the essence of everyone's favorite singing Pokémon in soft, huggable form. The detailed instructions guide you through creating the iconic round body, pointed ears, and signature curly poof that makes Jigglypuff so instantly recognizable. With its charming teal eyes and perfect pink proportions, this amigurumi makes a wonderful gift for Pokémon fans of all ages. 🧶 Happy crocheting! 🎵✨