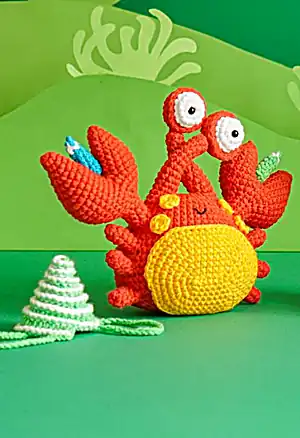
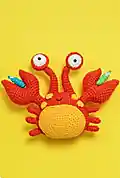
Create a delightful crab with moveable eyes, colorful claws, and a removable shell backpack! This charming crustacean features poseable eyes on stalks, different sized claws, and six little legs. The pattern includes a beautiful striped shell that doubles as a storage compartment for tiny crayons. Perfect for beach lovers and anyone who enjoys interactive amigurumi toys.
Progress Tracker
0% Complete
— Body (yarn A) :
Round 1 :
sc 6 into a magic loop (6)
Round 2-6 :
sc 6 (5 rnds) (6)
Info :
Make the 2nd piece the same way but do not break the yarn, ch 3 and join with the 1st piece
Round 13 :
sc 9 (on the 1st piece), sc 3 (on the 3 chs), sc 9 (on the 2nd piece), sc 3 (on the 3 chs) (24)
Round 14 :
[sc 3, inc] 6x (30)
Round 16 :
[sc 2, inc, sc 2] 6x (36)
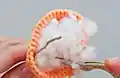
Info :
If you want the eyes can be bendable, stuff slightly the eyes, use a plastic coated wire-about 7-8cm, push the wire into the eyes and then continue to stuff firmly, and make a knot to fix the wire
Round 18 :
[sc 5, inc] 6x (42)
Round 20 :
sc 5, [sc 1, inc] 3x, sc 15, [inc, sc 1] 3x, sc 10 (48)
Round 22 :
sc 5, [sc 1, inc, sc 1] 3x, sc 15, [sc 1, inc, sc 1] 3x, sc 10 (54)
Round 24 :
sc 5, [sc 3, inc] 3x, sc 15, [inc, sc 3] 3x, sc 10 (60)
Round 25-31 :
sc 60 (7 rnds) (60)
Round 32 :
sc 5, [sc 3, dec] 3x, sc 15, [dec, sc 3] 3x, sc 10 (54)
Round 33 :
sc 5, [sc 1, dec, sc 1] 3x, sc 15, [sc 1, dec, sc 1] 3x, sc 10 (48)
Round 34 :
sc 5, [sc 1, dec] 3x, sc 15, [dec, sc 1] 3x, sc 10 (42)
Round 35 :
[sc 4, dec] 7x (35)
Round 36 :
[sc 3, dec] 7x, stuff firmly (28)
Round 37 :
[sc 2, dec] 7x (21)
Round 38 :
[sc 1, dec] 7x (14)
— Eyes (yarn B, X2) :
Round 1 :
sc 5 into a magic loop (5)
Round 3 :
[sc 1, inc] 5x (15)
Round 4-5 :
sc 15 (2 rnds) (15)
— Eyes Cover (yarn A, X2) :
Round 1 :
sc 6 into a magic loop (6)
Round 3 :
[sc 1, inc] 6x (18)
Round 4 :
[sc 5, inc] 3x (21)
— Small Claw (yarn A, X2) :
Round 1 :
sc 4 into a magic loop (4)
Round 2 :
sc 1, inc 2, sc 1 (6)
Round 3 :
sc 2, inc 2, sc 2 (8)
Round 4 :
sc 3, inc 2, sc 3 (10)
Round 5 :
sc 4, inc 2, sc 4 (12)
Round 6 :
sc 5, inc 2, sc 5 (14)
Round 7-8 :
sc 14 (2 rnds) (14)
— Big Claw (yarn A, X2) :
Round 1-6 :
Repeat rnd 1-6 of the Small Claw (14)
Round 7 :
sc 6, inc 2, sc 6 (16)
Round 8 :
sc 7, inc 2, sc 7 (18)
Round 9 :
sc 8, inc 2, sc 8 (20)
Round 10-11 :
sc 20 (2 rnds) (20)
Info :
Join with the Small Claw and continue to crochet the following rnds
Round 12 :
sc 14 (on the small claw), sc 20 (on the big claw) (34)
Round 13 :
[sc 15, dec] 2x (32)
Round 14 :
[sc 7, dec, sc 7] 2x (30)
Round 15 :
[sc 3, dec] 6x, stuff firmly (24)
Round 16 :
[sc 2, dec] 6x (18)
Round 17 :
[sc 1, dec] 6x (12)
Round 18 :
[sc 2, dec] 3x (9)
Round 19-21 :
sc 9 (3 rnds) (9)
— Legs (yarn A, X6) :
Round 1 :
sc 6 into a magic loop (6)
Round 2-5 :
sc 6 (4 rnds) (6)
— Belly (yarn C) :
Round 1 :
ch 7, start on the 2nd st from the hook, sc 5, (sc 3) on the last st, continue to crochet on the other side, sc 4, inc (14)
Round 2 :
inc, sc 4, inc 3, sc 4, inc 2 (20)
Round 3 :
sc 1, inc, sc 4, [sc 1, inc] 3x, sc 4, [sc 1, inc] 2x (26)
Round 4 :
sc 1, inc, sc 5, [sc 1, inc, sc 1] 3x, sc 4, [sc 1, inc, sc 1] 2x (32)
Round 5 :
sc 3, inc, sc 4, [sc 3, inc] 3x, sc 4, [sc 3, inc] 2x (38)
Round 6 :
sc 2, inc, sc 6, [sc 2, inc, sc 2] 3x, sc 4, [sc 2, inc, sc 2] 2x (44)
Round 7 :
sc 5, inc, sc 4, [sc 5, inc] 3x, sc 4, [sc 5, inc] 2x (50)
Round 8 :
sc 3, inc, sc 7, [sc 3, inc, sc 3] 3x, sc 4, [sc 3, inc, sc 3] 2x (56)
— Cheeks (yarn C, X4) :
Round 1 :
sc 6 into a magic loop (6)
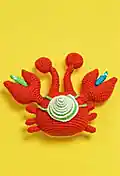
— Sea Shell (yarn D) :
Round 1 :
sc 6 into a magic loop (6)
Round 2 :
(blo) [sc 1, inc] 3x (9)
Round 3 :
(blo) [sc 2, inc] 3x (12)
Round 4 :
(blo) [hdc 2, hdc inc] 4x (16)
Round 5 :
(blo) [hdc 3, hdc inc] 4x (20)
Round 6 :
(blo) [hdc 4, hdc inc] 4x (24)
Round 7 :
(blo) [dc 3, dc inc] 6x (30)
Round 8 :
(blo) [dc 2, dc inc, dc 2] 6x (36)
Info :
Join yarn B on rnd 2, slst on the flo sts from rnd 2-8. Place 2 markers at the 34th st & the 5th st of rnd 8 on the shell
Straps :
Join yarn D on the marked st, crochet 28 chs and slst on the next 3 sts from the marked st. Continue to crochet 28 chs on the other marked st
— Crayons (yarn D, X2) :
Round 1 :
sc 6 into a magic loop (6)
Round 3-6 :
sc 6 (4 rnds), change to yarn B (6)
Round 7 :
[sc 1, dec] 2x, break yarn B, change to yarn D (4)
This delightful crab pattern is packed with personality and interactive features! The poseable wire eyes give your crab character, while the asymmetrical claws add realistic charm. The removable shell backpack with tiny crayons makes this both a toy and storage solution. Perfect for beach lovers and anyone who enjoys amigurumi with multiple components and advanced techniques. This little crustacean will bring smiles and spark imagination! 🧶 Happy crocheting! 🦀🏖️✨