🧢 Beautiful ✨ Detailed πŸ’ Adorable

Adorable Cat Amigurumi Pattern

Adorable Cat Amigurumi Pattern
4.3β˜… Rating
6-8 Hours Time Needed
1.4K Made This
βœ‚οΈ

Intermediate Level

Ideal for those with basic knitting experience, featuring slightly more advanced stitches and techniques to expand your skills.

⏱️

Weekend Treat

Takes 5-7 hours, making it an enjoyable project to finish over a couple of days.

🧸

Cute Companion

An adorable friend to cherish, handcrafted with love to bring comfort and joy for years to come.

About This Adorable Cat Amigurumi Pattern

This charming cat amigurumi pattern combines classic techniques with adorable details to create a truly special handmade friend. The pattern includes comprehensive instructions for creating a sitting cat with realistic proportions and sweet facial features. You'll work through creating each component separately before assembling them into your finished feline companion.

Adorable Cat Amigurumi Pattern crochet pattern - detailed view of completed project

The finished cat features a lovely grey and cream color scheme with a pop of red from the decorative bow collar. Safety eyes give your kitty a lifelike appearance while remaining secure for all ages.

Why You'll Love This Adorable Cat Amigurumi Pattern

I absolutely love how this pattern brings together simple stitches to create such an expressive little character! The way the ears are positioned and the subtle color changes in the body create a realistic cat silhouette that's incredibly satisfying to complete. The addition of the sweet bow collar adds just the right touch of personality, making each finished cat feel unique and special.

Adorable Cat Amigurumi Pattern step 1 - construction progress Adorable Cat Amigurumi Pattern step 2 - assembly progress Adorable Cat Amigurumi Pattern step 3 - details and accessories Adorable Cat Amigurumi Pattern step 4 - final assembly and finishing

Switch Things Up

I love how versatile this cat pattern can be with just a few simple modifications! You could easily create a whole family of cats by adjusting the colors - imagine a sleek black cat with a silver bow, or a calico version using multiple yarn colors in the body sections. For a more playful approach, try making the bow in different colors or even add small patches to create a unique spotted pattern.

The ears could be customized too - slightly elongate them for a more elegant look, or keep them shorter and rounder for a kitten appearance. I've even seen crafters add small embroidered details like whiskers using black thread, or create closed sleepy eyes instead of safety eyes for a peaceful sleeping cat.

You could also modify the tail length or add subtle stripes by changing colors every few rounds. The possibilities are endless, and each small change creates a completely different personality for your finished feline friend!

Common Mistakes & How to Fix Them

βœ— Forgetting to stuff the head firmly before closing, resulting in a floppy or misshapen appearance βœ— Placing safety eyes too close together or at wrong rounds, affecting the cat's facial expression βœ— Not maintaining consistent tension throughout, causing uneven stitching and visible gaps between rounds βœ— Rushing through color changes without securing yarn properly, leading to loose ends and potential unraveling

Adorable Cat Amigurumi Pattern

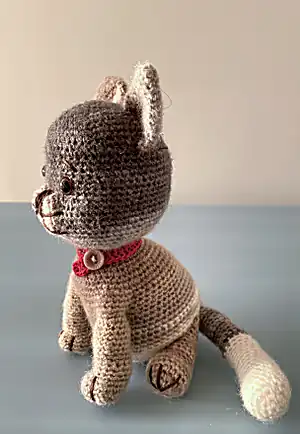
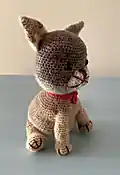
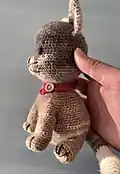
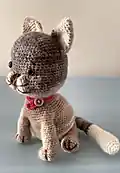
Create your own charming little feline friend with this delightful cat amigurumi pattern! This sweet kitty features adorable pointed ears, expressive safety eyes, and a cute embroidered nose and mouth. Complete with a stylish red bow collar, this pattern creates a perfect companion that's approximately 20cm in circumference and 10cm in length. The detailed instructions guide you through creating the head, body, legs, tail, ears, and finishing touches to bring your adorable cat to life.

Intermediate 6-8 Hours

Materials Needed for Adorable Cat Amigurumi Pattern

β€” Main Fabric

  • 01
    Yarn in grey (mixed colours) for main body and head
  • 02
    Yarn in dark brown for accent details
  • 03
    Yarn in red for the decorative bow collar

β€” Tools Required

  • 01
    2.5mm crochet hook or size that fits your yarn
  • 02
    Safety eyes
  • 03
    Scissors
  • 04
    Stuffing
  • 05
    Tapestry needle
  • 06
    Stitch marker
  • 07
    Pins for assembly

Progress Tracker

0% Complete

β€” HEAD :

Round 1 :

6 sc in magic ring (6)

Round 2 :

6 inc (12)

Round 3 :

(6 times) 1 sc into sc next inc (18)

Round 4 :

(6 times) 2 sc into sc next inc (24)

Round 5 :

(6 times) 3 sc into sc next inc (30)

Round 6 :

(6 times) 4 sc into sc next inc (36)

Round 7 :

(6 times) 5 sc into sc next inc (42)

Round 8 :

(6 times) 6 sc into sc next inc (48)

Round 9 :

(6 times) 7 sc into sc next inc (54)

Round 10-18 :

(9 ring) sc into sc (54)

Round 19 :

19 sc into sc (6 sc inc) 4 sc into sc (6 sc inc) 19 sc into sc (66)

Round 20-25 :

(6 ring) sc into sc (66)

Round 26 :

(6 times) 9 sc into sc next dec (60)

Info :

Place the safe eyes between Round 17-18. There will be 8 sc between them.

Round 27 :

(6 times) 8 sc into sc next dec (54)

Round 28 :

(6 times) 7 sc into sc next dec (48)

Round 29 :

(6 times) 6 sc into sc next dec (42)

Info :

Stuff the head tightly, keep filling as you go.

Round 30 :

(6 times) 5 sc into sc next dec (36)

Round 31 :

(6 times) 4 sc into sc next dec (30)

Round 32 :

(6 times) 3 sc into sc next dec (24)

Round 33-36 :

(4 ring) sc into sc (24)

Round 37 :

24 sc inc (48)

Round 38 :

(6 times) 6 sc into sc next inc (54)

Round 39-40 :

(2 ring) sc into sc (54)

Round 41 :

(6 times) 7 sc into sc next inc (60)

Round 42 :

(6 times) 8 sc into sc next inc (66)

Round 43-46 :

(4 ring) sc into sc (66)

Round 47 :

30 sc into sc turn (12 sc skip) sink the needle into sc 43

β€” FIRST FRONT LEG & BODY :

Round 1 :

14 sc into sc (14)

Round 2-13 :

(11 ring) sc into sc (14)

Round 14 :

4 sc into sc (6 sc inc) 4 sc into sc (20)

Round 15-17 :

(3 ring) sc into sc (20)

Round 18 :

4 sc into sc (6 sc dec) 4 sc into sc (14)

Round 19 :

2 sc into sc (6 sc dec) 2 sc into sc (8)

Round 20 :

8 sc dec fo. Switch to body

Round 47-18 :

sc into sc turn (12 sc skip) sink the needle into sc 13

β€” SECOND FRONT LEG & BODY :

Round 1 :

sc into sc (12)

Round 2 :

2 sc inc (14)

Round 3-13 :

(11 ring) sc into sc (14)

Round 14 :

4 sc into sc (6 sc inc) 4 sc into sc (20)

Round 15-17 :

(3 ring) sc into sc (20)

Round 18 :

4 sc into sc (6 sc dec) 4 sc into sc (14)

Round 19 :

2 sc into sc (6 sc dec) 2 sc into sc (8)

Round 20 :

8 sc dec fo. Stuff the legs. Go to the body. leave the front legs out

Round 48 :

sc into sc (40)

Round 49 :

(8 times) 6 sc into sc next inc (48)

Round 50 :

(6 times) 7 sc into sc next inc (54)

Round 51-62 :

(12 ring) sc into sc (54)

Round 63 :

(6 times) 6 sc into sc next dec (48)

Round 64 :

(6 times) 5 sc into sc next dec (42)

Round 65 :

(6 times) 4 sc into sc next dec (36)

Round 66 :

(6 times) 3 sc into sc next dec (30)

Round 67 :

(6 times) 2 sc into sc next dec (24)

Info :

Tightly fill the body

Round 68 :

(6 times) 2 sc into sc next dec (18)

Round 69 :

(6 times) 1 sc into sc next dec (12)

Round 70 :

6 sc dec fo.

β€” TAIL :

Round 1 :

6 sc in magic ring (6)

Round 2 :

6 sc inc (12)

Round 3 :

(6 times) 1 sc into sc next inc (18)

Round 4-9 :

(6 ring) sc into sc (18)

Round 10 :

(2 times) 8 sc into sc next dec (16)

Round 11-12 :

(2 ring) sc into sc (16)

Round 13 :

(2 times) 7 sc into sc next dec (14)

Info :

Fill the tail, keep filling as you go

Round 14-33 :

(20 ring) sc into sc (14)

Round 34 :

Straighten it. sink the needle into both layers. 7 sc fo.

β€” EARS :

Info :

MAKE 2

Round 1 :

6 sc in magic ring (6)

Round 2 :

6 sc inc (12)

Round 3 :

(2 times) 3 sc into sc next inc (8)

Round 4 :

(2 times) 4 sc into sc next inc (10)

Round 5 :

2 times) 5 sc into sc next inc (12)

Round 6 :

(2 times) 6 sc into sc next inc (14)

Round 7 :

(2 times) 7 sc into sc next inc (16)

Round 8 :

(2 times) 8 sc into sc next inc (18)

Round 9 :

(2 times) 9 sc into sc next inc (20)

Round 10 :

(2 times) 10 sc into sc next inc (22)

Round 11 :

(2 times) 11 sc into sc next inc (24)

Round 12 :

Straighten it. sink the needle into both layers. 12 sc fo.

β€” HIND LEGS :

Info :

MAKE 2

Round 1 :

6 sc in magic ring (6)

Round 2 :

6 sc inc (12)

Round 3 :

(6times) 1 sc into sc next inc (18)

Round 4-6 :

(3 ring) sc into sc (18)

Round 7 :

6 sc into sc (4 sc dec) 6 sc into sc (14)

Round 8-16 :

(9 ring) sc into sc (14)

Round 17 :

Straighten it. sink the needle into both layers. 7 sc fo.

Info :

Leave a long thread to sew on.

β€” BOW :

Round 1 :

40 ch.

Round 2 :

40 ch into cr (40 cr) fo.

Info :

Burun-Ana color

Round 1 :

6 sc in magic ring (6)

Round 2 :

6 sc inc (12)

Round 3 :

(6 times) 1 sc into sc next inc (18)

Round 4-6 :

(3 ring) sc into sc (18) fo.

Info :

Leave a long thread to sew on. Fill the nose less

Assembly Instructions

  • Sew the ears between the sides at rounds 6-12 on the head
  • Attach the legs between the sides at rounds 24-48 on the body
  • Sew the tail from the back to the middle of the body at rounds 24-48 between the legs
  • Sew the nose under the two eyes and stuff it lightly for dimension
  • Wrap the red bow chain around the neck area and secure with the small bow piece in center

Important Notes

  • πŸ’‘Use stitch markers to keep track of your rounds, especially during shaping
  • πŸ’‘Stuff each piece firmly but not overly tight for best shape retention
  • πŸ’‘Place safety eyes before stuffing the head completely for easier positioning
  • πŸ’‘Leave long tails on all pieces for easier assembly and secure sewing
  • πŸ’‘Pin all parts in place before final sewing to ensure proper positioning
  • πŸ’‘Work with consistent tension throughout to maintain even stitch appearance

This delightful cat amigurumi pattern creates the perfect feline companion with realistic proportions and charming details. The combination of grey and cream colors with the pop of red from the bow collar makes this kitty irresistibly adorable. Whether you're making it as a gift or keeping it for yourself, this sweet cat will bring joy and comfort for years to come. The detailed instructions ensure success for crocheters ready to take on this rewarding intermediate project. 🐱 Happy crocheting! 🧢✨

You ask,

we answer.

FAQs

What size will my finished cat be?

The finished cat measures approximately 20cm in circumference and about 10cm in length when worked with the recommended yarn and hook size.

Can I use different colors for this pattern?

Absolutely! While the pattern shows grey and cream with a red bow, you can customize the colors to create your own unique cat. Consider tabby patterns, solid colors, or even fantasy colors.

What yarn weight works best for this pattern?

This pattern works best with worsted weight yarn (weight 4) using a 2.5mm hook, but you can adjust hook size based on your yarn choice and desired tension.

Is this pattern suitable for beginners?

This is an intermediate pattern that requires familiarity with basic crochet stitches, working in rounds, and color changes. Beginners should master basic amigurumi techniques first.

How do I make the bow collar stay in place?

The bow collar is created by making a long chain that wraps around the neck, then secured with a small crocheted bow piece sewn in the center for a decorative finish.