🧢 Beautiful ✨ Detailed πŸ’ Adorable

Zig-Zag Blanket Crochet Pattern

Zig-Zag Blanket Crochet Pattern
4.7β˜… Rating
12-15 Hours Time Needed
2.2K Made This
βœ‚οΈ

Beginner Friendly Level

Perfect for those just starting their sewing journey, with clear instructions and simple techniques

⏱️

Slow & Steady

A 10-12 hour projectβ€”great for savoring the process over several sessions.

🏑

Cozy Accent

A warm touch for your space that transforms ordinary corners into inviting nooks filled with handmade charm.

About This Zig-Zag Blanket Crochet Pattern

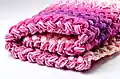
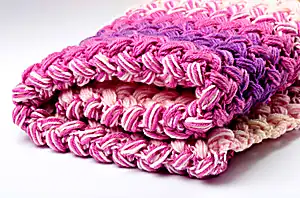
This zigzag blanket pattern combines the beauty of puff stitches with an elegant color-changing technique to create stunning visual depth. The pattern includes three different sizes to suit your needs: newborn, crib, and adult throw sizes. Each row builds upon the previous one using simple double crochet and puff stitch combinations, making it perfect for beginners who want to create something truly special. The gradient effect is achieved by holding yarn double and gradually transitioning between colors.

Zig-Zag Blanket Crochet Pattern crochet pattern - detailed view of completed project

What makes this pattern special is its versatility and forgiving nature. The puff stitch technique is clearly explained with step-by-step photos, and the color placement chart ensures perfect results every time.

Why You'll Love This Zig-Zag Blanket Crochet Pattern

I absolutely love how this pattern transforms simple stitches into something magical! The way the colors blend together reminds me of a beautiful sunset, and I find the repetitive nature of the puff stitches incredibly soothing to work. What excites me most is how this pattern is a fantastic stash-buster - you can use up all those leftover yarns while creating something gorgeous. I also appreciate that it's beginner-friendly yet produces professional-looking results that everyone will admire.

Zig-Zag Blanket Crochet Pattern step 1 - construction progress Zig-Zag Blanket Crochet Pattern step 2 - assembly progress Zig-Zag Blanket Crochet Pattern step 3 - details and accessories Zig-Zag Blanket Crochet Pattern step 4 - final assembly and finishing

Switch Things Up

I love experimenting with this versatile zigzag pattern! Sometimes I switch up the color palette completely - imagine this in ocean blues and greens for a coastal vibe, or warm autumn tones for a cozy fall feeling. I've also tried using variegated yarns alongside solid colors, which creates the most incredible depth and movement in the zigzag pattern.

For a more modern twist, I sometimes work this pattern in just two contrasting colors, alternating every few rows for bold stripes instead of gradual transitions. I've even made a stunning monochrome version using different shades of the same color family - it's subtle but so sophisticated!

One of my favorite modifications is adding a simple border around the finished blanket. A few rounds of single crochet in the main color really frames the zigzag beautifully and gives it a more polished finish. I encourage you to make this pattern your own!

Common Mistakes & How to Fix Them

βœ— Not maintaining consistent tension when holding yarn double - practice holding both strands evenly to avoid loose or tight stitches βœ— Forgetting to chain 1 after each puff stitch which can cause the blanket to pull and distort the zigzag pattern βœ— Miscounting spaces when working Row 2 - always count the spaces between dc and puff stitches carefully for proper alignment βœ— Cutting both yarn strands when changing colors instead of one at a time which creates unnecessary bulk and waste

Zig-Zag Blanket Crochet Pattern

Create a stunning zigzag blanket perfect for any nursery or living space with this beginner-friendly pattern. This versatile design works up beautifully in multiple sizes from newborn to adult throw. The unique puff stitch technique creates gorgeous texture while the color-changing method produces eye-catching gradients. Whether you're making a cozy baby blanket or an elegant throw, this pattern delivers professional-looking results every time.

Beginner Friendly 12-15 Hours

Materials Needed for Zig-Zag Blanket Crochet Pattern

β€” Main Fabric

  • 01
    Sport weight yarn in 4 colors: Blush, Cream, Freesia, and Lady Slipper
  • 02
    Knit Picks Brava Sport recommended colors: Blush, Cream, Freesia, Lady Slipper
  • 03
    Yarn quantities: 1140 yards for newborn, 2890 yards for crib, 6600 yards for throw blanket

β€” Tools Required

  • 01
    Crochet hook 5.5mm
  • 02
    Yarn needle for weaving in ends
  • 03
    Scissors
  • 04
    Stitch markers (optional but recommended)

Progress Tracker

0% Complete

β€” Foundation :

Step 1 :

Hold yarn double. Ch 83 (128 for crib blanket, 146 for throw blanket)

β€” Row 1 :

Step 2 :

Dc into 7th ch from hook

Step 3 :

Make a puff st in ch before dc

Puff Stitch Instructions :

Yo, insert hook into the loop, pull loop through. (Yo, insert hook into the loop, pull loop through) 2 more times. Yo, pull loop through all loops on the hook

Step 4 :

Make ch 1 to tighten the top of the puff st

Step 5 :

*Sk 2 ch, dc into 3rd ch. Make a puff st into ch before dc. Repeat from * until you reach the end of the row

Step 6 :

Dc into last ch

β€” Row 2 and Beyond :

Row 2 :

Ch 4, turn

Pattern Repeat :

*Dc into next space between dc and puff st of the previous row. Make a puff st into the space under ch st of the previous row. Ch 1. Repeat from * until you reach the end of the row

Row End :

Dc into ch. Puff st into ch before dc of the previous row. Dc into ch

Continue :

Repeat Row 2 until you reach 38 (60, 120) rows for baby blanket (crib blanket, throw blanket)

β€” Color Changes :

Color Change Method :

Replace one yarn thread at a time. Cut one thread leaving long yarn end, hold new color together with remaining thread

Color Sequence (14 rows) :

Rows 1-2: Cream held double, Rows 3-4: Cream + Blush, Rows 5-6: Blush held double, Rows 7-8: Blush + Freesia, Rows 9-10: Freesia held double, Rows 11-12: Freesia + Lady Slipper, Rows 13-14: Lady Slipper held double

Finishing :

Weave in ends by making tight knots close to fabric, then use yarn needle to weave both ends together

Assembly Instructions

  • This is a one-piece blanket that requires no assembly - work continuously from foundation to final row
  • Weave in all yarn ends securely by making tight knots close to the fabric before using the yarn needle
  • Block the finished blanket gently to even out stitches and enhance the zigzag pattern
  • For best results, lay flat to dry after blocking to maintain the blanket's shape and drape

Important Notes

  • πŸ’‘Always hold yarn double throughout the entire project for proper gauge and coverage
  • πŸ’‘Count your stitches carefully in each row to maintain the zigzag pattern alignment
  • πŸ’‘When changing colors, cut only one strand at a time to reduce bulk at color transitions
  • πŸ’‘Use stitch markers to mark the beginning of each row if needed for tracking progress
  • πŸ’‘This pattern is a yarn eater - plan accordingly and stock up on yarn before starting

This gorgeous zigzag blanket pattern brings together the best of texture and color in one stunning design! The combination of puff stitches and gradual color changes creates a blanket that's both cozy and visually striking. Whether you're crafting for a new baby or adding warmth to your own home, this pattern delivers beautiful results that will be treasured for years. The clear instructions and helpful photos make it perfect for building your crochet confidence. 🧢 Happy crocheting! 🌈✨

You ask,

we answer.

FAQs

Can I use a different yarn weight for this pattern?

Yes! You can use any yarn weight, but you'll need to adjust your hook size accordingly and the finished dimensions will vary. The designer mentions following the same color-changing principles regardless of yarn choice.

How do I know if I'm holding the yarn double correctly?

Both strands should be held together evenly with consistent tension. Practice a few stitches first - your work should feel substantial but not overly thick or difficult to work with.

What if I want to make a different size blanket?

You can adjust the size by changing your foundation chain length and number of rows. Remember that the pattern repeat works in multiples, so maintain the mathematical relationship for proper alignment.

Can I use fewer colors or just one color throughout?

Absolutely! This pattern works beautifully in a single color or with fewer color changes. Just continue holding the yarn double and follow the same stitch pattern.

How do I fix a mistake in the puff stitch?

If you notice a puff stitch looks different, carefully unravel it and redo the yo-pull sequence three times before drawing through all loops. The ch 1 at the top helps secure and define each puff.