๐Ÿงถ Beautiful โœจ Detailed ๐Ÿ’ Adorable

Lucky Cat Amigurumi Pattern

Lucky Cat Amigurumi Pattern
4.5โ˜… Rating
6-8 Hours Time Needed
2.8K Made This
โœ‚๏ธ

Intermediate Level

Ideal for those with basic knitting experience, featuring slightly more advanced stitches and techniques to expand your skills.

โฑ๏ธ

Weekend Treat

Takes 5-7 hours, making it an enjoyable project to finish over a couple of days.

๐Ÿงธ

Cute Companion

An adorable friend to cherish, handcrafted with love to bring comfort and joy for years to come.

About This Lucky Cat Amigurumi Pattern

This Lucky Cat pattern brings the traditional Japanese Maneki-neko to life in soft, cuddly form. Working from head to tail, you'll create each piece using simple rounds and basic stitches, building up this charming cat with its distinctive raised paw pose. The pattern includes detailed instructions for the decorative pillow base, complete with corner tassels, and a traditional red collar with wooden button and bell. Every element comes together to create an authentic lucky cat that's perfect for gifting or adding a touch of good fortune to your home.

Lucky Cat Amigurumi Pattern crochet pattern - detailed view of completed project

The finished Lucky Cat measures approximately 4 inches tall and features beautiful color transitions between white, honey, and red elements. This pattern showcases classic amigurumi construction with clear photo references to guide you through each step of the assembly process.

Why You'll Love This Lucky Cat Amigurumi Pattern

I absolutely love how this pattern captures the peaceful, serene expression of traditional lucky cats while maintaining that soft, huggable amigurumi charm. The way the honey-colored stripes flow across the white body creates such beautiful visual interest, and I find the process of building up each component incredibly satisfying. What really makes me smile is how the little details come together - from the pink inner ears to the tiny bell on the collar - each element adds personality and authenticity to this sweet creation.

Lucky Cat Amigurumi Pattern step 1 - construction progress Lucky Cat Amigurumi Pattern step 2 - assembly progress Lucky Cat Amigurumi Pattern step 3 - details and accessories Lucky Cat Amigurumi Pattern step 4 - final assembly and finishing

Switch Things Up

I love how versatile this Lucky Cat pattern can be with just a few creative modifications! You could easily transform this into a calico cat by adding patches of brown and black throughout the white body, or create a tabby version by working all the honey stripes in gray instead.

For a more modern twist, I often suggest using metallic gold thread for the collar and stripes to give it an elegant shimmer. You could also experiment with the pillow design - try making it in different colors or adding embroidered patterns for seasonal variations.

If you want to make it extra special, consider adding a small embroidered kanji symbol on the collar or chest area. I've seen crafters create entire families of lucky cats in different sizes by adjusting the hook size - smaller hooks create miniature versions perfect for keychains, while larger hooks make impressive display pieces.

Common Mistakes & How to Fix Them

โœ— Forgetting to mark stitch markers during color changes can lead to uneven stripe placement โœ— Not stuffing the head firmly enough before attaching safety eyes will create a loose, saggy appearance โœ— Skipping the invisible decrease technique will leave visible holes when decreasing rounds in the body โœ— Placing safety eyes too close together or too far apart will affect the cat's facial expression significantly

Lucky Cat Amigurumi Pattern

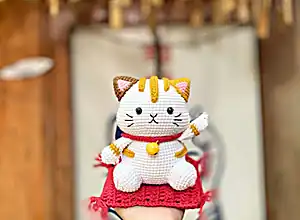
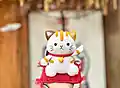
Create your very own adorable Lucky Cat (Maneki-neko) with this charming amigurumi pattern! This delightful white cat sits peacefully on a decorative red pillow, complete with traditional honey-colored stripes, a festive red collar with bell, and sweet pink inner ears. Perfect for bringing good fortune and handmade charm to any space, this pattern combines classic amigurumi techniques with beautiful color details that capture the essence of traditional Japanese lucky cats.

Intermediate 6-8 Hours

Materials Needed for Lucky Cat Amigurumi Pattern

โ€” Main Fabric

  • 01
    Yarnart Jeans yarn (160m/50gr) in White (01), Black (53), Red (51), Pink (36), Honey (84), Brown (40)
  • 02
    Cotton or acrylic yarn in white, black, red, pink, honey, and brown colors

โ€” Tools Required

  • 01
    Crochet hook size 2.3mm
  • 02
    Safety ocean blue eyes 7mm (1 pair)
  • 03
    Bell 12mm (1 piece)
  • 04
    Wooden button 10mm (1 piece)
  • 05
    Fiberfill stuffing
  • 06
    Yarn needle
  • 07
    Scissors
  • 08
    Stitch markers

Progress Tracker

0% Complete

โ€” Head :

Round 1 :

8sc into magic ring (8)

Round 2 :

8inc (16)

Round 3 :

(sc, inc)*8 (24)

Round 4 :

(2sc, inc)*8 (32)

Round 5 :

(3sc, inc)*8 (40)

Round 6 :

(4sc, inc)*8 (48)

Round 7 :

(5sc, inc)*8 (56)

Round 8 :

56sc (56)

Round 9 :

(6sc, inc)*8 (64)

Round 10-16 :

64sc (64)

Round 17 :

9sc, (sc, inc)*8, 3sc, mark the point, 9sc, mark the point, 2sc, (sc, inc)*8, 9sc (80)

Round 18-22 :

80sc (80)

Round 23 :

(8sc, dec)*8 (72)

Round 24 :

(7sc, dec)*8 (64)

Round 25 :

(6sc, dec)*8 (56)

Round 26 :

BLO (2sc, dec)*14 (42)

Info :

Insert safety eyes between round 16-17 with 7 sts apart. Stuff the head. Use black yarn to sew mouth between round 18-20 and sew whiskers between round 18-21. Use pink yarn to sew nose.

โ€” Body :

Info :

Make a chain of 11ch. Start in the second chain from hook.

Round 1 :

9sc, 3sc into the last stitch, work on along the other side: 8sc, inc (22)

Round 2 :

inc, 8sc, 3inc, 8sc, 2inc (28)

Round 3 :

sc, inc, 8sc, (inc, sc)*3, 8sc, (inc, sc)*2 (34)

Round 4 :

inc, 10sc, (2sc, inc)*3, 8sc, (2sc, inc)*2 (40)

Round 5 :

(4sc, inc)*8 (48)

Round 6 :

48sc (48)

Round 7 :

(5sc, inc)*8 (56)

Round 8 :

56sc (56)

Round 9 :

(13sc, inc)*4 (60)

Round 10-18 :

60sc (60)

Round 19 :

(13sc, dec)*4 (56)

Round 20 :

56sc (56)

Round 21 :

(12sc, dec)*4 (52)

Round 22 :

(11sc, dec)*4 (48)

Round 23 :

(6sc, dec)*6 (42)

Info :

Stuff the body.

โ€” Arms (2) :

Round 1 :

8sc into magic ring (8)

Round 2 :

8inc (16)

Round 3-4 :

16sc (16)

Round 5 :

(6sc, dec)*2 (14)

Round 6-7 :

3sc, 8sc, 3sc (14)

Round 8 :

(5sc, dec)*2 (12)

Round 9-12 :

12sc (12)

Info :

Stuff the arms. Flatten and fold the top of the arm, join and sc together the 2 opposing stitches (6sc).

โ€” Ears (2) :

Round 1 :

4sc into magic ring (4)

Round 2 :

4inc (8)

Round 3 :

(sc, inc)*4 (12)

Round 4 :

2sc, inc, 2sc, inc, (2sc, inc)*2 (16)

Round 5 :

3sc, inc, 2sc, sc, inc, (3sc, inc)*2 (20)

Round 6 :

4sc, inc, 2sc, 2sc, inc, (4sc, inc)*2 (24)

Round 7 :

5sc, inc, 2sc, 3sc, inc, (5sc, inc)*2 (28)
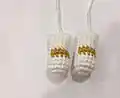
Round 8 :

28sc (28)

Info :

Stuff the ears.

โ€” Legs (2) :

Round 1 :

6sc into magic ring (6)

Round 2 :

6inc (12)

Round 3 :

(sc, inc)*6 (18)

Round 4 :

(2sc, inc)*6 (24)

Round 5 :

(3sc, inc)*6 (30)

Round 6-8 :

30sc (30)

Round 9 :

(3sc, dec)*6 (24)

Info :

Stuff the legs.

โ€” Big Stripe :

Round 1 :

Ch20, start in the 2nd chain from hook: sc, 17hdc, sc (19)

โ€” Small Stripes (4) :

Round 1 :

Ch16, start in the 2nd chain from hook: 15sc (15)

โ€” Collar :

Round 1 :

Make a chain of 62ch. Start in the 7nd chain from hook 55sc (55)

Info :

Sew the button and the bell through the collar. Wear collar for the cat.

โ€” Tail :

Round 1 :

6sc into magic ring (6)

Round 2 :

6inc (12)

Round 3-9 :

12sc (12)

Info :

Don't stuff the tail. Flatten and fold the top of the tail, join and sc together the 2 opposing stitches (6sc). Sew tail to body on round 6.
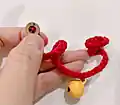
โ€” Pillow :

Round 1 :

Make a chain of 40ch. Start in the 3rd chain from hook 38dc, turn (38)

Round 2-13 :

Ch2, 38dc, turn (38)

Round 14 :

Ch2, 38dc (38)

Info :

Stuff some fiberfill in the pillow.

Tassels (4) :

Cut 20 equal yarns about 10cm. Take 5 yarns and thread needle. Thread the needle through one corner of the pillow. Knot. Separate the yarns into small yarns. Repeat for remaining 3 corners.

Assembly Instructions

  • Sew head to body using the long tail left from the head construction
  • Attach ears to head between rounds 4-11, positioning them symmetrically on either side
  • Use pins to fix honey-colored stripes to head and body in desired pattern, then sew securely
  • Sew legs to body between rounds 6-13, spacing them 10 stitches apart for proper positioning
  • Attach arms to the sides of the body at appropriate height for sitting pose
  • Use pink yarn to sew decorative lines on the legs for added detail
  • Place the completed cat on the finished pillow for display

Important Notes

  • ๐Ÿ’กUse invisible decrease technique throughout for cleaner, more professional-looking decreases
  • ๐Ÿ’กSeparate yarn into smaller strands when embroidering facial features for finer detail work
  • ๐Ÿ’กMark important points during construction as indicated in round 17 of the head
  • ๐Ÿ’กStuff all pieces firmly but not overly tight to maintain proper shape and proportions
  • ๐Ÿ’กTake care when attaching safety eyes - position them between rounds 16-17 with exactly 7 stitches apart
  • ๐Ÿ’กUse stitch markers consistently during color changes to maintain even stripe placement

This enchanting Lucky Cat pattern brings traditional Japanese good fortune charm into your hands through the magic of amigurumi. Every stitch builds toward creating a serene, peaceful companion complete with authentic details like honey stripes, red collar with bell, and a decorative tasseled pillow. The pattern combines fundamental crochet techniques with beautiful color work that makes this project both enjoyable to create and stunning to display. ๐Ÿงถ Happy crocheting! ๐Ÿงตโœจ

You ask,

we answer.

FAQs

What size will my finished Lucky Cat be?

The completed Lucky Cat measures approximately 4 inches tall, making it perfect for desk display or as a small gift.

Can I use different colors than specified in the pattern?

Absolutely! While the traditional colors create an authentic look, feel free to customize with your favorite color combinations.

Is the pillow necessary or can I make just the cat?

The pillow is optional but adds to the authentic Lucky Cat presentation. The cat can sit independently without it.

What if I can't find safety eyes in the exact size?

6mm or 8mm safety eyes will work fine as alternatives to the 7mm specified, just adjust spacing slightly if needed.

How do I achieve clean invisible decreases?

Insert your hook through the front loops only of both stitches, yarn over and pull through both loops, then yarn over and pull through remaining loops.