🧢 Beautiful ✨ Detailed πŸ’ Adorable

Frog Prince Amigurumi Pattern

Frog Prince Amigurumi Pattern
4.9β˜… Rating
8-10 Hours Time Needed
1.5K Made This
βœ‚οΈ

Intermediate Level

Ideal for those with basic knitting experience, featuring slightly more advanced stitches and techniques to expand your skills.

⏱️

All-Day Adventure

Requires 8-10 hours, ideal for a full day of immersive knitting.

🐸

Charming Critter

Delightful animal designs with sweet details that capture the essence of your favorite woodland and farmyard friends.

About This Frog Prince Amigurumi Pattern

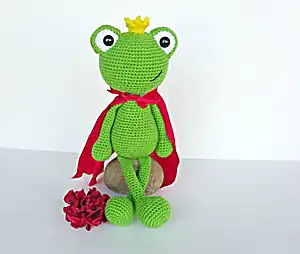
This enchanting Frog Prince pattern brings beloved fairy tale magic to your crochet hook. Standing at an impressive 17 inches tall, this regal amphibian features carefully crafted details including white eye highlights, a golden crown, and optional cape accessories. The pattern combines traditional amigurumi techniques with creative assembly methods to create a truly special character that will become a treasured keepsake.

Frog Prince Amigurumi Pattern crochet pattern - detailed view of completed project

Perfect for intermediate crocheters, this pattern requires patience and precision during assembly but rewards you with a stunning finished piece. The detailed instructions guide you through creating each component, from the distinctive bulging eyes to the royal crown that makes this frog truly princely.

Why You'll Love This Frog Prince Amigurumi Pattern

I absolutely love how this pattern transforms simple green yarn into such a charismatic character! The way the oversized head and bulging eyes come together creates an irresistibly cute expression that captures the essence of a fairytale prince. What makes this pattern special is the attention to detail - the separate eyelids that give depth to the eyes, the perfectly proportioned crown, and the satisfying assembly process that brings everything together. Every time I work on this pattern, I'm amazed by how the basic stitches create such personality and charm in the finished piece.

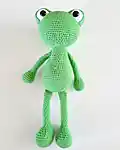
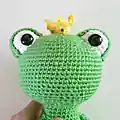
Frog Prince Amigurumi Pattern step 1 - construction progress Frog Prince Amigurumi Pattern step 2 - assembly progress Frog Prince Amigurumi Pattern step 3 - details and accessories Frog Prince Amigurumi Pattern step 4 - final assembly and finishing

Switch Things Up

I love experimenting with this pattern by changing up the color combinations to create different fairy tale moods. Sometimes I use deeper forest greens with metallic gold thread for the crown to give it a more luxurious royal feel. Other times I've tried soft pastels for a gentler, nursery-friendly version that still maintains all the charm.

What really makes this pattern special is how you can personalize the facial expression by adjusting the eye placement slightly. I've discovered that positioning the eyes just a millimeter higher or lower can completely change the frog's personality from sweet and innocent to wise and knowing.

The crown is another area where I love to get creative - adding small beads or using variegated yellow yarn creates beautiful texture and catches the light differently. I've even experimented with making tiny fabric flowers to attach to the crown for a more whimsical garden party theme.

Common Mistakes & How to Fix Them

βœ— Forgetting to stuff body parts firmly enough before decreasing rounds, causing flat or misshapen pieces βœ— Not using stitch markers consistently, leading to lost round beginnings and uneven stitch counts throughout βœ— Placing safety eyes incorrectly between rounds, resulting in asymmetrical or poorly positioned eye placement on finished head βœ— Skipping the gradual decrease rounds and trying to close openings too quickly, creating puckered or pointed endings

Frog Prince Amigurumi Pattern

Transform your yarn into a charming fairytale character with this adorable Frog Prince amigurumi pattern. This delightful project creates a 17-inch tall royal amphibian complete with a golden crown and optional cape, perfect for bringing storybook magic to life. Whether you're crafting for a fairy tale enthusiast or adding whimsy to your home decor, this loveable frog prince will hop straight into hearts with his endearing expression and regal accessories.

Intermediate 8-10 Hours

Materials Needed for Frog Prince Amigurumi Pattern

β€” Main Fabric

  • 01
    Worsted Weight #4 yarn, approximately 150g of green main color
  • 02
    50g of accent colors in white and yellow for eyes and crown details

β€” Tools Required

  • 01
    Crochet hook size F or 3.75mm
  • 02
    18mm safety eyes
  • 03
    Scissors
  • 04
    Sewing needle
  • 05
    Stitch marker
  • 06
    Fiberfill stuffing
  • 07
    Black embroidery thread

Progress Tracker

0% Complete

β€” Head :

Round 1 :

Make 6 sc into a magic ring= 6

Round 2 :

Increase in each st around= 12

Round 3 :

(sc, inc) x 6= 18

Round 4 :

sc, inc, (2 sc, inc) x 5, sc= 24

Round 5 :

(3 sc, inc) x 6= 30

Round 6 :

2 sc, inc, (4 sc, inc) x 5, 2 sc= 36

Round 7 :

(5 sc, inc) x 6= 42

Round 8 :

3 sc, inc, (6 sc, inc) x 5, 4 sc= 48

Round 9 :

(7 sc, inc) x 6= 54

Round 10 :

4 sc, inc, (8 sc, inc) x 5, 4 sc= 60

Round 11 :

(9 sc, inc) x 6= 66

Round 12-19 :

sc in each st around

Round 20 :

(9 sc, dec) x 6= 60

Round 21 :

4 sc, dec, (8 sc, dec) x 5, 4 sc= 54

Round 22 :

(7 sc, dec) x 6= 48

Round 23 :

3 sc, dec, (6 sc, dec) x 5, 3 sc= 42

Round 24 :

(5 sc, dec) x 6= 36

Round 25 :

2 sc, dec, (4 sc, dec) x 5, 2 sc= 30

Round 26 :

(3 sc, dec) x 6= 24

Round 27 :

(2 sc, dec) x 6= 18

Info :

F/O

β€” Body :

Round 1 :

Make 6 sc into a magic ring= 6

Round 2 :

Increase in each st around= 12

Round 3 :

(sc, inc) x 6= 18

Round 4 :

(2 sc, inc) x 6= 24

Round 5 :

(3 sc, inc) x 6= 30

Round 6 :

(4 sc, inc) x 6= 36

Round 7 :

(5 sc, inc) x 6= 42

Round 8 :

(6 sc, inc) x 6= 48

Round 9-15 :

Sc in each st around

Round 16 :

(6 sc, dec) x 6= 42

Round 17-18 :

Sc in each st around

Info :

Start stuffing the body

Round 19 :

(5 sc, dec) x 6= 36

Round 20-21 :

Sc in each st around

Round 22 :

(4 sc, dec) x 6= 30

Round 23-25 :

Sc in each st around

Round 26 :

(3 sc, dec) x 6= 24

Round 27-29 :

Sc in each st around

Round 30 :

(2 sc, dec) x 6= 18

Round 31-32 :

Sc in each st around

Info :

F/O and leave a long tail for sewing

β€” Eyes (Make 2) :

Round 1 :

Make 6 sc into a magic ring= 6

Round 2 :

Increase in each st around= 12

Round 3 :

(sc, inc) x 6= 18

Round 4-6 :

sc in each st around

Info :

Place the safety eyes between rounds 5 and 6. F/O and leave a long tail for sewing

β€” Eyelids (Make 2) :

Round 1 :

Make 6 sc into a magic ring= 6

Round 2 :

Increase in each st around= 12

Round 3 :

(sc, inc) x 6= 18

Round 4 :

(2 sc, inc) x 6= 24

Round 5 :

(3 sc, inc) x 6= 30

Round 6-9 :

Sc in each st around

Info :

Fold the eyelid in half and sc it closed. F/O and leave a long tail for sewing

β€” Arms (Make 2) :

Round 1 :

Make 6 sc into a magic ring= 6

Round 2 :

Increase in each st around= 12

Round 3 :

(sc, inc) x 6= 18

Round 4-6 :

sc in each st around

Info :

Start stuffing the arms

Round 7 :

(4 sc, dec) x 3= 15

Round 8 :

(3 sc, dec) x 3= 12

Round 9 :

(2 sc, dec) x 3= 9

Round 10-27 :

sc in each st around

Info :

Fold the arms in half and sc the opening closed. F/O and leave a long tail for sewing

β€” Legs (Make 2) :

Round 1 :

Make 6 sc into a magic ring= 6

Round 2 :

Increase in each st around= 12

Round 3 :

(sc, inc) x 6= 18

Round 4 :

(2 sc, inc) x 6= 24

Round 5 :

(3 sc, inc) x 6= 30

Round 6-9 :

Sc in each st around

Info :

Start stuffing the legs

Round 10 :

(2 sc, dec) x 4, 14 sc= 26

Round 11 :

(sc, dec) x 4, 14 sc= 22

Round 12 :

Dec x 4, 14 sc= 18

Round 13 :

(sc, dec) x 6= 12

Round 14 :

(2 sc, dec) x 3= 9

Info :

Stop stuffing the legs

Round 15-35 :

sc in each st around

Info :

Fold the legs in half and sc the opening closed. F/O and leave a long tail for sewing

β€” Crown :

Setup :

Ch 12

Round 1 :

sl to to 1st ch to make a ring

Round 2-3 :

sc in each st around

Round 4 :

ch 3, sl st in 2nd ch from hook, sc in next chain, sc in next st on crown. Repeat 5 more times to have 6 points

Info :

F/O and leave a long tail for sewing

Assembly Instructions

  • Sew the eyes onto the head first, positioning them carefully for the desired expression
  • Attach the eyelids around the eyes, ensuring they frame the safety eyes properly for a natural look
  • Sew the completed head securely onto the body, making sure it's centered and firmly attached
  • Attach the arms to the sides of the body at an appropriate height for balanced proportions
  • Sew the legs to the bottom of the body, ensuring they're positioned evenly for stability
  • Position and sew the crown between the eyes on top of the head for the royal finishing touch

Important Notes

  • πŸ’‘Use stitch markers consistently to track round beginnings and maintain accurate stitch counts throughout the pattern
  • πŸ’‘Stuff all body parts firmly but not overly tight to maintain proper shape and prevent distortion
  • πŸ’‘Place safety eyes between rounds 5 and 6 of the eye pieces for the most natural and appealing expression
  • πŸ’‘Take time to position all parts before final sewing to ensure balanced proportions and proper alignment
  • πŸ’‘Work in continuous spirals without joining rounds unless specifically instructed in the pattern

This enchanting Frog Prince pattern transforms ordinary yarn into a magical fairytale character that will capture hearts and imaginations. Standing tall at 17 inches with his golden crown and charming expression, this royal amphibian makes the perfect gift for fairy tale lovers or a delightful addition to any nursery. The combination of traditional amigurumi techniques with creative details creates a truly special piece that showcases your crochet skills. 🐸 Happy crocheting! 🧢✨

You ask,

we answer.

FAQs

What size will my finished Frog Prince be?

The completed Frog Prince measures approximately 17 inches from bottom to top of head when made with worsted weight yarn and a 3.75mm hook.

Can I use different colors for this pattern?

Absolutely! While the pattern calls for green, white, and yellow, you can customize the colors to create your own unique version. Just maintain the same yarn weight for consistent results.

Do I need to join rounds or work in continuous spirals?

Work in continuous spirals without joining rounds unless specifically instructed. Use a stitch marker to track the beginning of each round for accuracy.

Is the cape included in this pattern?

The cape is optional and the pattern references a no-sew tutorial from another source. The main pattern focuses on the crocheted components of the Frog Prince himself.

How do I get the eyes to look right?

Place the 18mm safety eyes between rounds 5 and 6 of the white eye pieces, then sew the completed eyelids around them to create the distinctive bulging frog eye appearance.