๐Ÿงถ Beautiful โœจ Detailed ๐Ÿ’ Adorable

Cute Plushies Ghost Amigurumi Pattern

Cute Plushies Ghost Amigurumi Pattern
4.0โ˜… Rating
4-5 Hours Time Needed
1.4K Made This
โœ‚๏ธ

Beginner Friendly Level

Perfect for those just starting their sewing journey, with clear instructions and simple techniques

โฑ๏ธ

Weekend Treat

Takes 5-7 hours, making it an enjoyable project to finish over a couple of days.

๐Ÿงธ

Cute Companion

An adorable friend to cherish, handcrafted with love to bring comfort and joy for years to come.

About This Cute Plushies Ghost Amigurumi Pattern

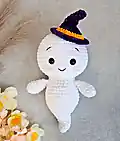
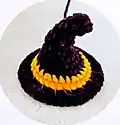
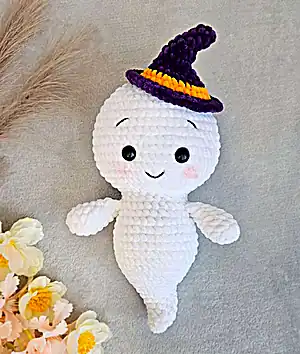
This delightful ghost amigurumi pattern brings together classic crochet techniques with charming Halloween-inspired details. The pattern features a continuous construction method where the body flows seamlessly into the head, creating that perfect ghostly silhouette. The embroidered facial features give this little spirit so much personality, while the detachable witch hat adds a playful seasonal touch that makes it perfect for Halloween or year-round display.

Cute Plushies Ghost Amigurumi Pattern crochet pattern - detailed view of completed project

Working with soft plush yarn creates the most huggable texture, and the straightforward stitch combinations make this an ideal project for building confidence with amigurumi construction. The finished ghost stands beautifully on its own and makes a wonderful addition to any Halloween decor collection.

Why You'll Love This Cute Plushies Ghost Amigurumi Pattern

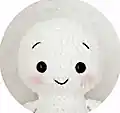
I absolutely love how this pattern combines simplicity with so much character! The way the body and head work together in one continuous piece makes the construction feel magical, just like our little ghost friend. I'm particularly fond of how the embroidered details bring the face to life - those sweet eyebrows and gentle smile never fail to make me smile. The witch hat is such a delightful touch that transforms this from a simple ghost into a whimsical character with personality. Plus, working with the plush yarn feels incredibly satisfying under your fingers, making every stitch a pleasure to create.

Cute Plushies Ghost Amigurumi Pattern step 1 - construction progress Cute Plushies Ghost Amigurumi Pattern step 2 - assembly progress Cute Plushies Ghost Amigurumi Pattern step 3 - details and accessories Cute Plushies Ghost Amigurumi Pattern step 4 - final assembly and finishing

Switch Things Up

I love experimenting with different color combinations for this ghost pattern! Instead of the traditional white ghost, try making yours in soft pastels like lavender or mint green for a dreamy, ethereal look. You could even create a whole family of colorful spirits in rainbow hues.

For the hat, consider swapping the Halloween colors for seasonal variations - perhaps red and green for Christmas, or soft blues and silvers for a winter theme. I've also made versions without the hat entirely, adding a simple flower crown or tiny bow instead for a more gentle, year-round decoration.

The embroidered face is another area where you can really let your creativity shine. Try different eyebrow shapes to change the expression - arched brows for surprise, or angled ones for a mischievous look. I sometimes add little rosy cheeks with embroidery thread instead of blush for a more permanent finish.

For advanced crocheters, consider adding small details like a tiny crocheted heart on the chest or miniature accessories. I've even experimented with creating different textures by using bobble stitches in certain sections for added visual interest.

Common Mistakes & How to Fix Them

โœ— Forgetting to stuff as you go - stuff the body and head continuously to maintain proper shape and avoid difficulty later โœ— Placing safety eyes incorrectly - ensure they're positioned between rounds 6-7 with exactly 8 stitches between them for the perfect expression โœ— Not maintaining consistent tension when changing yarn colors for the hat - keep stitches even to prevent puckering at color transitions โœ— Overstuffing the arms - only stuff the lower half of each arm to allow proper positioning and natural drape when attached

Cute Plushies Ghost Amigurumi Pattern

Create your own adorable ghost companion with this charming amigurumi pattern! This sweet little spirit features embroidered facial details, a whimsical purple and orange witch hat, and the perfect ghostly silhouette. Standing at approximately 25cm tall, this friendly ghost is perfect for Halloween decorations, year-round cuddles, or as a delightful handmade gift. The pattern includes detailed step-by-step instructions for the body, head, arms, and adorable witch hat accessory.

Beginner Friendly 4-5 Hours

Materials Needed for Cute Plushies Ghost Amigurumi Pattern

โ€” Main Fabric

  • 01
    Plush yarn (100g/120m) in white, purple, and orange colors
  • 02
    Himalaya Dolphin Baby recommended - White (80301), Purple (80340), Orange (80316)

โ€” Tools Required

  • 01
    Crochet hook 4.00 mm
  • 02
    Safety eyes 14 mm
  • 03
    Black thread for embroidery (YarnArt Jeans 53 recommended)
  • 04
    Stuffing (Polyester fiber fill)
  • 05
    Scissors
  • 06
    Yarn needle
  • 07
    Stitch markers
  • 08
    Pink blush for cheeks

Progress Tracker

0% Complete

โ€” Arms (Make 2) :

Round 1 :

6 sc into a magic ring (6)

Round 2 :

6 inc (12)

Round 3-4 :

12 sc (2 rounds)

Round 5 :

(4 sc, dec)*2 (10)

Round 6 :

10 sc

Round 7 :

(3 sc, dec)*2 (8)

Round 8 :

8 sc

Round 9 :

Flatten the arm and crochet 4 sc through both sides

Info :

Fasten off and cut the yarn. Stuff only lower half of the arm.

โ€” Body :

Round 1 :

6 sc into a magic ring (6)

Round 2 :

6 sc (6)

Round 3 :

(sc, inc)*3 (9)

Round 4 :

(2 sc, inc)*3 (12)

Round 5 :

4 inc, 4 dec (12)

Round 6 :

(sc, inc)*6 (18)

Round 7 :

3 sc, 4 inc, 3 sc, 4 dec (18)

Round 8 :

(2 sc, inc)*6 (24)

Round 9 :

6 sc, 4 inc, 6 sc, 4 dec (24)

Round 10 :

(3 sc, inc)*6 (30)

Round 11 :

9 sc, 4 inc, 9 sc, 4 dec (30)

Round 12 :

(4 sc, inc)*6 (36)

Round 13 :

12 sc, 4 inc, 12 sc, 4 dec (36)

Round 14 :

(11 sc, inc)*3 (39)

Round 15-18 :

39 sc (4 rounds)

Round 19 :

(11 sc, dec)*3 (36)

Round 20 :

36 sc

Round 21 :

(4 sc, dec)*6 (30)

Round 22 :

7 sc, 4 sc through the first arm and the body, 10 sc, 4 sc through the second arm and the body, 5 sc (30)

Round 23 :

(3 sc, dec)*6 (24)

Round 24 :

24 sc

Info :

Don't cut the white yarn, we will continue with the head. Stuff as you go.

โ€” Head :

Round 1 :

(sc, inc)*12 (36)

Round 2 :

(2 sc, inc)*12 (48)

Round 3 :

(7 sc, inc)*6 (54)

Round 4 :

4 sc, inc, (8 sc, inc)*5, 4 sc (60)

Round 5-7 :

60 sc (3 rounds)

Round 8 :

4 sc, dec, (8 sc, dec)*5, 4 sc (54)

Round 9-11 :

54 sc (3 rounds)

Info :

Insert the safety eyes between rounds 6 and 7 with 8 stitches between them (6 stitches visible). The marker is in the back of the head.

Round 12 :

(7 sc, dec)*6 (48)

Round 13 :

3 sc, dec, (6 sc, dec)*5, 3 sc (42)

Round 14 :

(5 sc, dec)*6 (36)

Round 15 :

2 sc, dec, (4 sc, dec)*5, 2 sc (30)

Round 16 :

(3 sc, dec)*6 (24)

Round 17 :

sc, dec, (2 sc, dec)*5, sc (18)

Round 18 :

(sc, dec)*6 (12)

Round 19 :

6 dec (6)

Info :

Make sure that the head is stuffed firmly. Close the opening and hide the yarn inside.

โ€” Embroidering :

Eyebrows :

With a black thread embroider the eyebrows in round 10. They are 2 st wide and with 8 st between them.

Mouth :

Embroider the mouth in round 4. It's 3 st wide.

Cheeks :

Color the cheeks with pink blush.

โ€” Hat :

Round 1 :

6 sc into a magic ring (6)

Round 2-3 :

6 sc (2 rounds)

Round 4 :

(sc, inc)*3 (9)

Round 5-6 :

9 sc (2 rounds)

Round 7 :

6 sc, 3 inc (12)

Round 8 :

6 sc, (sc, inc)*3 (15)

Round 9 :

9 sc, (sc, inc)*3 (18)

Round 10 :

(2 sc, inc)*6 (24)

Info :

Change the yarn to orange color.

Round 11 :

(3 sc, inc)*6 (30)

Round 12 :

30 sc

Info :

Change the yarn to purple color.

Round 13 :

Front loops only: (sc, inc)*15 (45)

Round 14 :

45 sc

Info :

Make a sl st, fasten off and cut the yarn, leaving a tail for sewing. Sew the hat to the top of the head in the back loops of round 13. Stuff lightly and sew it tilted to one side.

Assembly Instructions

  • Start with the arms: make two arms following the pattern, stuffing only the lower half of each arm
  • Work the body continuously, joining the arms at round 22 by crocheting through both the arm and body
  • Continue directly from the body into the head without cutting yarn, maintaining consistent stuffing throughout
  • Insert safety eyes between rounds 6-7 of the head with 8 stitches between them before completing the head
  • Embroider facial features: eyebrows in round 10 (2 stitches wide), mouth in round 4 (3 stitches wide)
  • Create the witch hat separately, changing colors from purple to orange to purple as indicated
  • Attach the hat to the top of the head using the back loops, positioning it tilted to one side for character

Important Notes

  • ๐Ÿ’กUse plush yarn as specified to achieve the correct size and texture for this 25cm tall ghost
  • ๐Ÿ’กMaintain consistent tension throughout to ensure even stitches and proper shaping
  • ๐Ÿ’กStuff firmly but not too tightly to maintain the ghostly silhouette and prevent distortion
  • ๐Ÿ’กPosition safety eyes carefully between rounds 6-7 with exactly 8 stitches between them for proper expression
  • ๐Ÿ’กOnly stuff the lower half of the arms to allow natural positioning when attached to the body
  • ๐Ÿ’กUse US terminology throughout the pattern as specified in the original instructions

This adorable ghost amigurumi pattern captures the perfect balance of spooky and sweet! With its charming embroidered face and whimsical witch hat, this little spirit brings joy to any Halloween display or makes a delightful year-round companion. The continuous construction from body to head creates that authentic ghostly flow, while the plush yarn gives it the most huggable texture. Whether you're new to amigurumi or an experienced crocheter, this pattern offers a satisfying and rewarding project that's sure to become a cherished handmade treasure. ๐Ÿงถ Happy ghostly crocheting! ๐Ÿ‘ปโœจ

You ask,

we answer.

FAQs

What size will my finished ghost be?

Using the recommended Himalaya Dolphin Baby yarn and 4.00mm hook, your ghost will be approximately 25cm (10 inches) tall without the hat.

Can I use different yarn weights for this pattern?

The pattern is designed for plush yarn similar to Himalaya Dolphin Baby. Using different weights will change the finished size and may affect the overall appearance and texture.

How do I attach the arms properly?

The arms are joined during round 22 of the body by crocheting 4 stitches through both the flattened arm and the body. Make sure to stuff only the lower half of each arm before attaching.

Why does the hat need to be sewn tilted?

Sewing the hat at a slight tilt gives your ghost more personality and character, making it look more whimsical and playful rather than perfectly symmetrical.

What if I can't find safety eyes in 14mm?

You can substitute with 12mm or 15mm safety eyes, but this may slightly change the facial expression. Alternatively, you can embroider the eyes with black thread for a softer look.