🧢 Beautiful ✨ Detailed πŸ’ Adorable

Clownfish Nemo Amigurumi Pattern

Clownfish Nemo Amigurumi Pattern
4.6β˜… Rating
3-4 Hours Time Needed
3.9K Made This
βœ‚οΈ

Intermediate Level

Ideal for those with basic knitting experience, featuring slightly more advanced stitches and techniques to expand your skills.

⏱️

Bite-Sized Project

Complete in under 2 hoursβ€”quick, fun, and perfect for a little creative escape.

🐠

Charming Critter

Delightful animal designs with sweet details that capture the essence of your favorite woodland and farmyard friends.

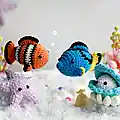
About This Clownfish Nemo Amigurumi Pattern

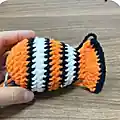
This delightful Clownfish pattern brings the beloved Nemo character to life with authentic orange, black, and white striping. The design features a unique no-sew construction method that creates the body and tail in one continuous piece, making assembly easier than traditional amigurumi patterns. The pattern includes detailed instructions for creating realistic dorsal fins that give your clownfish that perfect underwater swimming pose.

Clownfish Nemo Amigurumi Pattern crochet pattern - detailed view of completed project

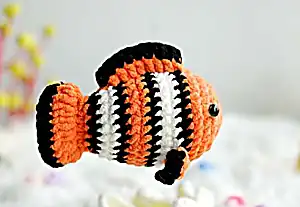
Perfect for Disney fans and ocean lovers alike, this pattern combines beginner-friendly techniques with impressive results. The finished clownfish measures approximately 4-5 inches and makes an excellent gift or decoration.

Why You'll Love This Clownfish Nemo Amigurumi Pattern

I absolutely love how this pattern captures Nemo's playful spirit in such a compact design! The seamless construction technique means less sewing and more fun creating, while the vibrant color changes make every row exciting to work. What really makes me smile is how the distinctive stripe pattern emerges naturally as you crochet, creating that instant recognition factor that makes everyone say 'It's Nemo!' The finished piece is perfectly sized for little hands to hold and treasure.

Clownfish Nemo Amigurumi Pattern step 1 - construction progress Clownfish Nemo Amigurumi Pattern step 2 - assembly progress Clownfish Nemo Amigurumi Pattern step 3 - details and accessories Clownfish Nemo Amigurumi Pattern step 4 - final assembly and finishing

Switch Things Up

I love experimenting with different color combinations for this clownfish pattern! While the classic orange, black, and white creates the perfect Nemo, you could try making a blue tang version using blue, black, and yellow for a Dory-inspired fish. For a more whimsical approach, consider using pastel colors like soft pink, lavender, and cream for a dreamy underwater aesthetic.

Another fun variation I enjoy is adjusting the stripe width by changing colors every two rows instead of following the original pattern exactly. This creates bolder, more dramatic stripes that really make the fish pop. You could also experiment with metallic yarns for special occasion versions that shimmer like they're swimming through sunlit water.

For advanced crocheters, I recommend trying different fin shapes or adding extra details like embroidered gills or a tiny coral base. The beauty of this pattern lies in its adaptability – once you master the basic technique, the ocean is your oyster for creative variations!

Common Mistakes & How to Fix Them

βœ— Forgetting to stuff the body before closing - stuff firmly after row 17 to maintain the fish's rounded shape βœ— Placing safety eyes incorrectly - ensure they're positioned at rows 5-6, spaced 8 stitches apart for proper facial proportions βœ— Not maintaining proper tension during color changes - keep stitches consistent to avoid gaps in the striped pattern βœ— Rushing through the dorsal fin placement - take time to position fins correctly for the most realistic swimming appearance

Clownfish Nemo Amigurumi Pattern

Dive into the underwater world with this adorable Clownfish Nemo amigurumi pattern! Perfect for Disney lovers and ocean enthusiasts, this charming little fish features the iconic orange, black, and white stripes that make Nemo instantly recognizable. The pattern includes detailed instructions for creating the body, tail, and dorsal fins using a seamless construction method. With clear step-by-step guidance and helpful photos, you'll create a cuddly companion that brings the magic of Finding Nemo right into your hands.

Intermediate 3-4 Hours

Materials Needed for Clownfish Nemo Amigurumi Pattern

β€” Main Fabric

  • 01
    Super Bulky yarn (Category 6) in orange, black, and white colors
  • 02
    Approximately 50g orange yarn, 25g black yarn, and 25g white yarn

β€” Tools Required

  • 01
    3.5mm (E) crochet hook
  • 02
    Plastic safety eyes (8mm)
  • 03
    Stitch markers
  • 04
    Sewing needle
  • 05
    Scissors
  • 06
    Hot glue gun
  • 07
    Fiberfill stuffing

Progress Tracker

0% Complete

β€” Body and Tail (No Sew Method) :

Row 1 :

6 SC in an MR (6)

Row 2 :

6 INC (12)

Row 3 :

(SC, INC) 6 times (18)

Row 4 :

(2 SC, INC) 6 times (24)

Row 5 :

(3 SC, INC) 6 times (30)

Row 6 :

30SC (30)

Info :

Change to Black yarn

Row 7 :

30SC (30)

Info :

Change to White yarn

Row 8-9 :

30SC (30)

Info :

Change to Black yarn

Row 10 :

30SC (30)

Info :

Change to Orange yarn

Row 11 :

30SC (30)

Row 12 :

(3SC, DEC) 6 times (24)

Info :

Change to Black yarn

Row 13 :

24SC (24)

Info :

Change to White yarn

Row 14 :

24SC (24)

Row 15 :

(2SC, DEC) 6 times (18)

Info :

Change to Black yarn

Row 16 :

18SC (18)

Info :

Change to Orange yarn

Row 17 :

(SC, DEC) 6 times (12)

Info :

Stuffing

Row 18 :

Crochet 2 side together with 6SC

Row 19 :

Turn, 2CH, DC-INC 6 times (12)

Info :

Change to Black yarn

Row 20 :

Turn, CH, 12SC (12)

Info :

Weave in the yarn end and cut

β€” Dorsal Fins :

Part 1 (Make 2) :

Begin with Orange yarn, pick up yarn from row 8, apart 8 stitch

Row 1 :

(Chains 1, HDC, 3DC, HDC) in one stitch (5)

Info :

Change to Black yarn

Row 2 :

Turn, CH, 5SC (5)

Info :

Weave in the yarn end and cut

Part 2 :

Begin with Orange yarn, pick up yarn from R7 to R16, in the vertical line from head to tail

Row 1 :

(Chains 1, SC, 7DC, SC) in one stitch (9)

Info :

Change to Black yarn

Row 2 :

Turn, CH, 9SC (9)

Info :

Weave in the yarn end and cut

Final Step :

Attach the eyes at R5-R6, apart 8 stitch

Assembly Instructions

  • Attach safety eyes between rows 5-6, positioning them 8 stitches apart for proper facial proportions
  • Secure dorsal fin Part 1 pieces by picking up yarn from row 8, spacing them 8 stitches apart
  • Create the main dorsal fin (Part 2) by picking up yarn vertically from rows 7-16 along the back
  • Use hot glue gun to secure any loose fin edges if needed for extra stability

Important Notes

  • πŸ’‘Use stitch markers to keep track of color changes and maintain the stripe pattern accuracy
  • πŸ’‘Stuff firmly but not overly tight to maintain the fish's natural rounded body shape
  • πŸ’‘Take care when placing safety eyes to ensure they're secure and positioned symmetrically
  • πŸ’‘Change colors cleanly by completing the last stitch of the previous color with the new color
  • πŸ’‘The no-sew construction method means most assembly happens during crocheting rather than after

This enchanting Clownfish Nemo pattern brings Disney magic straight to your crochet hook! With its seamless construction technique and vibrant striped design, you'll create an instantly recognizable underwater friend that captures hearts. The perfect blend of beginner-friendly methods and impressive results makes this pattern a joy to work on. Whether you're making it for a Disney fan, ocean lover, or just want to add some aquatic charm to your collection, this little Nemo will swim right into everyone's hearts! 🐠 Happy crocheting! 🧢✨

You ask,

we answer.

FAQs

What size will my finished clownfish be?

The finished clownfish measures approximately 4-5 inches in length, making it perfect for display or as a cuddly toy for children.

Can I use different yarn weights for this pattern?

This pattern is specifically designed for Super Bulky (Category 6) yarn. Using different weights will significantly change the size and may affect the stripe proportions.

What's special about the no-sew construction method?

The no-sew method creates the body and tail in one continuous piece, reducing assembly time and creating seamless color transitions in the stripe pattern.

How do I ensure my stripes look even?

Maintain consistent tension throughout and change colors by completing the last stitch of each row with the new color to create clean, even stripe transitions.

Can children safely play with this amigurumi?

Yes, when made with securely attached safety eyes and proper finishing techniques. Always supervise very young children with small parts.