🧢 Beautiful ✨ Detailed πŸ’ Adorable

Baby Sunflower Amigurumi Pattern

Baby Sunflower Amigurumi Pattern
4.7β˜… Rating
6-8 Hours Time Needed
3.7K Made This
βœ‚οΈ

Intermediate Level

Ideal for those with basic knitting experience, featuring slightly more advanced stitches and techniques to expand your skills.

⏱️

Weekend Treat

Takes 5-7 hours, making it an enjoyable project to finish over a couple of days.

🧸

Cute Companion

An adorable friend to cherish, handcrafted with love to bring comfort and joy for years to come.

About This Baby Sunflower Amigurumi Pattern

This Baby Sunflower pattern combines the charm of nature with the cuteness of amigurumi design. The sunflower features a detailed brown center face with layered yellow petals that create depth and texture. The green body is perfectly proportioned with tiny arms and legs, while safety eyes give your sunflower a sweet, innocent expression that will melt hearts.

Baby Sunflower Amigurumi Pattern crochet pattern - detailed view of completed project

Perfect for beginners looking to advance their skills, this pattern teaches you petal construction and invisible decrease techniques. The finished sunflower makes an excellent gift for children or anyone who loves flowers and handmade treasures.

Why You'll Love This Baby Sunflower Amigurumi Pattern

I absolutely love how this pattern brings together so many wonderful techniques in one adorable project! The layered petal construction is so satisfying to create, and watching your sunflower come to life as you add each layer is pure magic. I love how the safety eyes give such personality to this little flower friend, and the way the tiny arms and legs make it so huggable and endearing.

Baby Sunflower Amigurumi Pattern step 1 - construction progress Baby Sunflower Amigurumi Pattern step 2 - assembly progress Baby Sunflower Amigurumi Pattern step 3 - details and accessories Baby Sunflower Amigurumi Pattern step 4 - final assembly and finishing

Switch Things Up

I love how versatile this pattern is for customization! You can easily switch up the petal colors to create different flower varieties - try soft pastels for a spring garden feel, or bold autumn colors for a fall-themed sunflower. I've experimented with adding small embroidered details like tiny bees or ladybugs on the petals, which adds such a whimsical touch.

Another fun variation I enjoy is making the sunflower slightly larger by using a bigger hook size and adding an extra round or two to each section. This creates a more substantial cuddle buddy that's perfect for little hands to hold.

I also love adding a light vanilla or lavender scent to the stuffing for a sensory element that makes the sunflower even more special. Consider making a whole garden family with different sized sunflowers - the tiny ones make perfect keychains or bag charms!

Common Mistakes & How to Fix Them

βœ— Forgetting to use stitch markers when working in continuous spirals can cause your rounds to shift βœ— Overstuffing the petals or leaves can make them lose their delicate, natural appearance βœ— Not maintaining consistent tension when switching between colors can create uneven stitches βœ— Placing safety eyes too close together or too far apart can affect the sunflower's sweet expression

Baby Sunflower Amigurumi Pattern

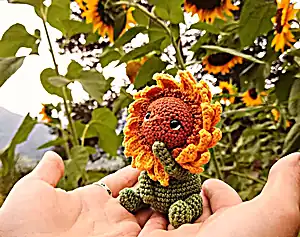
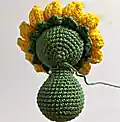
Create your own adorable miniature sunflower friend with this charming amigurumi pattern! This delightful baby sunflower features vibrant yellow petals, expressive safety eyes, and a sweet green body that's perfect for cuddling. Standing at approximately 12cm tall, this sunny companion brings joy and warmth to any space. The pattern includes detailed instructions for creating the characteristic sunflower face with beautiful layered petals, plus tiny arms and legs that give this little flower so much personality.

Intermediate 6-8 Hours

Materials Needed for Baby Sunflower Amigurumi Pattern

β€” Main Fabric

  • 01
    Sport weight yarn (Fine yarn) for cotton+acrylic yarn or Fingering (Super fine yarn) for 100% cotton yarn
  • 02
    Green yarn (approximately 30g), brown yarn (approximately 15g), yellow yarn (approximately 10g)
  • 03
    Optional blue yarn for Ukrainian sunflower variation (approximately 10g), mustard yarn (a few meters)
  • 04
    Black and white yarn (a few meters each for details)

β€” Tools Required

  • 01
    Crochet hook size 1.75mm (or suitable for your yarn)
  • 02
    Safety eyes 6mm
  • 03
    Scissors
  • 04
    Tapestry needle
  • 05
    Pins
  • 06
    Stitch marker (or piece of yarn)
  • 07
    Fiberfill stuffing
  • 08
    Stuffing tool (wooden skewers and tweezers recommended)
  • 09
    Strong thread for thread joining

Progress Tracker

0% Complete

β€” Arms (make 2) :

Round 1 :

6 sc in a MR (6)

Round 2-4 :

(3 rows) 6 sc (6)

Round 5 :

inc, 5 sc (7)

Round 6 :

3 sc in 1 stitch, 2 sc, dec, 2 sc (8)

Round 7 :

(inc, 1 sc) * 2, dec, 2 sc (9)

Round 8 :

(dec, 1 sc) * 2, 2 inc, 1 sc (9)

Round 9-11 :

(3 rows) 9 sc (9)

Round 12 :

(dec, 1 sc) * 3 (6)

Info :

Cut yarn leaving tail for closing. Insert needle, go under front loops of all 6 sc, tighten and weave in ends

β€” Legs (make 2) :

Setup :

Ch 5

Round 1 :

From 2nd ch from hook: inc, 2 sc, 4 sc in 1 stitch, 2 sc along other side, inc (12)

Round 2 :

inc, 4 sc, 2 inc, 4 sc, inc (16)

Round 3 :

16 sc (16)

Round 4 :

4 sc, 4 dec, 4 sc (12)

Round 5 :

3 sc, 3 dec, 3 sc (9)

Info :

Stuff the foot

Round 6 :

9 sc (9)

Round 7 :

(inc, 2 sc) * 3 (12)

Round 8 :

(inc, 3 sc) * 3 (15)

Round 9-10 :

(2 rows) 15 sc (15)

Round 11 :

(dec, 3 sc) * 3 (12)

Info :

Lightly stuff top part of leg so shape is almost flat
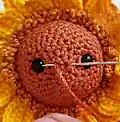
Round 12 :

6 dec (6)

β€” Head :

Round 1 :

6 sc in a MR (6)

Round 2 :

6 inc (12)

Round 3 :

(inc, 1 sc) * 6 (18)

Round 4 :

(inc, 2 sc) * 6 (24)

Round 5 :

(inc, 3 sc) * 6 (30)

Round 6 :

(inc, 4 sc) * 6 (36)

Round 7-8 :

(2 rows) 36 sc (36)

Round 9-10 :

(2 rows) FLO 36 sc (36)

Info :

Turn detail inside out, MR tail should be outside. Attach green yarn to back loop of last stitch

Round 11 :

BLO 36 sc (36)

Round 12 :

FLO: (in one stitch: sl st, ch 2, 1 hdc, 1 dc, ch 2, sl st into 2nd ch from hook, into next stitch: 1 dc, 1 hdc, ch 2, sl st, into next stitch: 1 sl st) * 12 (12 leaves)

Round 13 :

Work into BLO of 11th row: 36 sc (36)

Round 14-16 :

(3 rows) 36 sc (36)

Round 17 :

(dec, 4 sc) * 6 (30)

Round 18 :

(dec, 3 sc) * 6 (24)

Info :

Start stuffing head, add stuffing as you go

Round 19 :

(dec, 2 sc) * 6 (18)

Round 20 :

(dec, 1 sc) * 6 (12)

Round 21 :

6 dec (6)

β€” Petals :

Setup :

Attach yellow or blue yarn to front loop of last brown row

Step 1 :

1 sc, ch 6, turn, work on wrong side of chain

Step 2 :

From 2nd ch from hook: 5 sc, sl st into back loop of base sc, turn

Step 3 :

From 2nd stitch from hook: 1 sc, 3 hdc, 2 sc in 1 stitch, ch 3, sl st into 3rd loop from hook, 1 sc into same sc, work along other side: 1 sc, 3 hdc, 1 sc, sl st into front loop of base sc

Step 4 :

2 sl st into front loops on head

Info :

Repeat steps 1-4 eleven more times for first row of 12 petals

Info :

For second row: start with step 4 (2 sl st), then steps 1-3. Repeat 12 times

Finishing :

Attach mustard yarn: Ch 4, sl st into next stitch, repeat 35 more times

β€” Body :

Round 1 :

6 sc in a MR (6)

Round 2 :

6 inc (12)

Round 3 :

(inc, 1 sc) * 6 (18)

Round 4 :

(inc, 2 sc) * 6 (24)

Round 5 :

(inc, 3 sc) * 6 (30)

Round 6 :

(inc, 4 sc) * 6 (36)

Round 7-11 :

(5 rows) 36 sc (36)

Round 12 :

14 sc, (dec, 1 sc) * 3, 13 sc (33)

Round 13 :

12 sc, (dec, 1 sc) * 3, 12 sc (30)

Round 14 :

(dec, 3 sc) * 6 (24)

Round 15 :

24 sc (24)

Round 16 :

(dec, 2 sc) * 6 (18)

Round 17-19 :

(3 rows) 18 sc (18)

Info :

Stuff body firmly. Cut yarn leaving 20-30cm for sewing to head

Assembly Instructions

  • Embroider nose using brown yarn with 3-4 stitches over the magic ring center
  • Embroider eye whites with white yarn around the safety eyes for a more expressive look
  • Add black eyelashes using 4-ply yarn divided in half, following the detailed photo instructions
  • Insert safety eyes between rounds 4 and 5 of the head, making holes first with a wooden skewer
  • Pin head to body with face looking slightly upward, positioning close to the green leaves
  • Sew head to body using the remaining yarn tail from the body, adding neck stuffing before closing
  • Attach legs between rows 6-7 of body and arms between rows 13-14 using thread joining method

Important Notes

  • πŸ’‘Work all parts in continuous spirals unless noted otherwise, using stitch markers to track rounds
  • πŸ’‘Use invisible decrease technique by inserting hook only under front loops for cleaner shaping
  • πŸ’‘When working petals, watch the provided video tutorial before starting for best results
  • πŸ’‘Stuff firmly but not too tightly to maintain proper shape and allow for posing
  • πŸ’‘Turn the head detail inside out after round 10 so the magic ring tail is on the outside
  • πŸ’‘Use strong thread for attaching limbs and grab multiple stitches for secure connections

This delightful Baby Sunflower pattern captures all the joy and warmth of summer sunshine in a perfectly cuddly companion! With its layered petals, sweet expression, and tiny poseable limbs, this little flower friend brings smiles wherever it goes. The combination of detailed techniques and charming design makes this a truly rewarding project that you'll treasure forever. 🌻 Happy crocheting! 🧢✨

You ask,

we answer.

FAQs

What size will my finished sunflower be?

Using the recommended 1.75mm hook and sport weight yarn, your Baby Sunflower will be approximately 12cm (4.7 inches) tall. Different hook sizes will create different finished sizes.

Can I make this pattern with different colors?

Absolutely! The pattern includes instructions for both regular yellow sunflowers and Ukrainian blue and yellow sunflowers. You can also experiment with other color combinations to create your own unique flower friend.

Do I need to watch the video tutorials?

While not required, the QR code video tutorials for the petal construction are highly recommended as they show detailed hand movements that make the technique much clearer, especially for the complex petal layering.

What's the difference between working in front loops only (FLO) and back loops only (BLO)?

FLO creates a ridge effect and is used for the decorative green leaves around the face, while BLO creates a smooth transition and is used when attaching the green yarn to continue the head construction.

How do I make the invisible decrease properly?

Insert your hook only under the front loop of one stitch, then under the front loop of the next stitch, yarn over and pull through both front loops, then yarn over and complete the decrease normally.