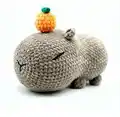
Create your very own cuddly capybara companion with this charming amigurumi pattern! This delightful project features a sweet capybara complete with an adorable tangerine on its head, making it perfect for animal lovers and crochet enthusiasts alike. The pattern uses simple stitches and clear instructions to guide you through creating this lovable South American rodent friend. With its plush texture and endearing features, this capybara will quickly become a treasured handmade keepsake for both children and adults.
Progress Tracker
0% Complete
— Leg (x 4) :
R1 :
crochet a MR with 6 Sc (6)
Info :
Fasten off. Leave a small tail.
— Ear (x 2) :
R1 :
crochet a MR with 6 Sc (6)
Info :
Don't close the ring, turn, Ch
Info :
Fasten off. Sew the corners together. Leave sewing tail.
— Head-body :
R1 :
crochet a MR with 8 Sc (8)
R8 :
Sc 19, Inc, Sc 8, Inc, Sc 19 (50)
R10 :
Sc 21, Inc, Sc 6, Inc, Sc 21 (52)
R11-R13 :
Sc around (52) 3 Rnds
R14 :
Sc 23, Inc, Sc 4, Inc, Sc 23 (54)
R15-R17 :
Sc around (54) 3 Rnds
Info :
In the next round we will mark the approximate position of the ears.
R18 :
Sc 6, Dec, Sc 4, Dec, Sc 9, Sc 1 (mark this St), Sc 9, Sc 1 (mark this St), Sc 10, Dec, Sc 4, Dec, Sc 2 (50)
R19 :
Sc 4, Dec, Sc 2, Dec, Sc 34, Dec, Sc 2, Dec (46)
Info :
Next, we will attach the legs. Start attaching from the stitch of the leg, as shown on the photo.
R20 :
Inc, Sc 2, Inc, Sc 2, Inc, Sc 33, Sc 6 together with 1st leg (49)
Info :
We shifted one stitch. Now from here we will count the beginning of the round. We continue to crochet.
R21 :
Sc, Inc, Sc, Sc 6 together with 2nd leg, Sc 13, Dec, Sc 4, Dec, Sc 13, Sc 6 of 1st leg (48)
Info :
And in the next round, we no longer take these 6 St into account, and we crochet the second half of the leg.
R22 :
Sc 4, Sc 6 of the 2nd leg, Sc 12, Dec, Sc 4, Dec, Sc 18 (46)
R23 :
Sc 9, Dec, Sc 28, Dec, Sc 5 (44)
R24 :
Sc 19, Dec, Sc 6, Dec, Sc 15 (42)
R26 :
(Sc 6, Inc) x 6 (48)
R27-R30 :
Sc around (48) 4 Rnds
R31 :
Sc 43, Sc 6 together with 3rd leg (48)
Info :
We shifted one stitch again. Now from here we will count the beginning of the round. We continue to crochet.
R32 :
Sc 4, Sc 6 together with 4th leg, Sc 32, Sc 6 of 3rd leg (48)
R33 :
Sc 4, Sc 6 of 4th leg, Sc 38 (48)
R34 :
(Sc 4, Dec) x 8 (40)
R35 :
(Sc 3, Dec) x 8 (32)
R36 :
(Sc 2, Dec) x 8 (24)
Info :
Tighten the hole, hide the thread inside. With threads from the legs, sew up the holes.
Info :
Sew the ears in place of the markers at a distance of approximately 10 stitches.
— Eyes and Nose Embroidery :
Left eye :
From the left ear down 3 rounds, then to the left 5 stitches - here is the 1st dot of the eye. From this dot down 5 stitches and to the left 1 stitch - here is the 2nd dot of the eye.
Right eye :
From the right ear down 3 rounds, then to the right 5 stitches - here is the 1st dot of the eye. From this dot down 5 stitches and to the right 1 stitch - here is the 2nd dot of the eye.
Info :
Embroider the eyes with a thin black thread connecting these two dots. Make 2 stitches to make the eye more expressive. Embroider the nose using the same technique.
— Tangerine :
R1 :
crochet a MR with 6 Sc (6)
R4-R6 :
Sc around (18) 3 Rnds
Info :
Fasten off, tighten the hole, leave the thread for sewing.
— Leaves :
Instructions :
Ch 4, Sl St in 1st Ch, Ch 4, Sl St in 1st Ch. Fasten off, wrap the center with thread and tie a knot.
Info :
Sew the leaves to the tangerine, hide the threads inside. Sew a tangerine to the head. Hide the threads inside.
This adorable Capybara pattern brings the internet's favorite chill animal to life in the most huggable way possible! With its unique construction method and charming tangerine accessory, this amigurumi captures the peaceful, zen-like nature that makes capybaras so beloved. The plush yarn creates an irresistibly soft texture that's perfect for cuddling. 🧶 Happy crocheting and enjoy your new capybara friend! 🍊✨