๐Ÿงถ Beautiful โœจ Detailed ๐Ÿ’ Adorable

Cupid Whale Amigurumi Pattern

Cupid Whale Amigurumi Pattern
4.7โ˜… Rating
4-5 Hours Time Needed
1.7K Made This
โœ‚๏ธ

Intermediate Level

Ideal for those with basic knitting experience, featuring slightly more advanced stitches and techniques to expand your skills.

โฑ๏ธ

Weekend Treat

Takes 5-7 hours, making it an enjoyable project to finish over a couple of days.

๐Ÿงธ

Cute Companion

An adorable friend to cherish, handcrafted with love to bring comfort and joy for years to come.

About This Cupid Whale Amigurumi Pattern

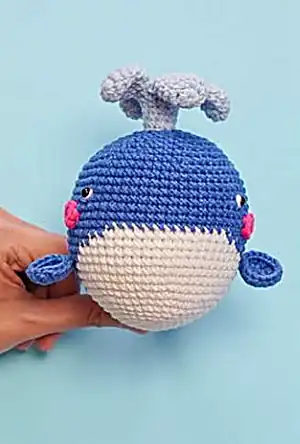
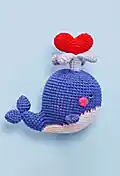
This delightful Cupid Whale pattern combines the magic of the ocean with romantic charm. The whale features a distinctive water fountain made from multiple pieces that create a beautiful spray effect. The red heart sits perfectly atop the fountain, making this piece truly special. Color changes throughout the pattern create visual interest and bring the design to life.

Cupid Whale Amigurumi Pattern crochet pattern - detailed view of completed project

The pattern uses basic amigurumi techniques with some intermediate elements like color changes and multi-piece construction. Perfect for crafters ready to take on a slightly more complex but rewarding project.

Why You'll Love This Cupid Whale Amigurumi Pattern

I absolutely love how this pattern brings together romance and whimsy in such a unique way! The water fountain effect is achieved through clever construction techniques that make the finished piece look incredibly realistic. The color combinations create such beautiful contrast, and watching the heart and fountain come together is truly satisfying. It's a pattern that challenges you just enough to feel accomplished while still being enjoyable to work.

Cupid Whale Amigurumi Pattern step 1 - construction progress Cupid Whale Amigurumi Pattern step 2 - assembly progress Cupid Whale Amigurumi Pattern step 3 - details and accessories Cupid Whale Amigurumi Pattern step 4 - final assembly and finishing

Switch Things Up

I absolutely love experimenting with different color combinations for this Cupid Whale! Instead of the traditional blue and white, I've tried creating pastel versions using soft pinks and purples that give it a dreamy, ethereal look. You could also make it more festive by using red and white for Christmas, or even try rainbow colors for a more playful approach.

Another fun variation I enjoy is changing the heart color to match different occasions - gold hearts for anniversaries, silver for winter themes, or even multiple small hearts in different colors cascading from the fountain. I've also experimented with adding small beads or sequins to the water fountain pieces to make them sparkle like real water droplets.

For a more advanced challenge, I sometimes add wire armature to the flippers to make them poseable, which adds so much personality to the finished whale. The pattern is versatile enough that you can really make it your own while keeping that adorable romantic charm that makes this whale so special.

Common Mistakes & How to Fix Them

โœ— Not stuffing the body firmly enough before closing, which can cause the whale to lose its shape over time โœ— Forgetting to change colors at the specified rounds, disrupting the whale's distinctive blue and white pattern โœ— Rushing through the water fountain assembly without proper alignment, making it appear unbalanced on the whale โœ— Over-stuffing the heart pieces, making them too rigid and losing their soft, romantic appearance

Cupid Whale Amigurumi Pattern

Create an adorable Cupid Whale that shoots hearts of love! This charming sea creature features a beautiful water fountain sprouting from its back, topped with a romantic red heart. Perfect for Valentine's Day gifts or anyone who loves whimsical ocean-themed amigurumi. The pattern includes detailed instructions for the whale body, decorative water fountain, and sweet heart topper.

Intermediate 4-5 Hours

Materials Needed for Cupid Whale Amigurumi Pattern

โ€” Main Fabric

  • 01
    Color A: white YarnArt Jeans 01 (50g, 160m)
  • 02
    Color B: blue YarnArt Jeans 17 (50g, 160m)
  • 03
    Color C: baby blue YarnArt Jeans 75 (50g, 160m)
  • 04
    Color D: red YarnArt Jeans 90 (50g, 160m)
  • 05
    Color E: fuchsia YarnArt Jeans 59 (50g, 160m)

โ€” Tools Required

  • 01
    Crochet hook size 2.5mm
  • 02
    1 pairs of safety eyes size 5mm
  • 03
    Tapestry needles
  • 04
    Brown thread
  • 05
    Pins
  • 06
    Stitch markers
  • 07
    Scissors
  • 08
    Polyester fiberfill

Progress Tracker

0% Complete

โ€” Body (yarn A) :

Round 1 :

sc 7 into a magic loop (7)

Round 2 :

inc 7 (14)

Round 3 :

[sc 1, inc] 7x (21)

Round 4 :

[sc 1, inc, sc 1] 7x (28)

Round 5 :

[sc 3, inc] 7x (35)

Round 6 :

[sc 2, inc, sc 2] 7x (42)

Round 7 :

[sc 5, inc] 7x, change to yarn B (49)

Round 8 :

sc 3, inc, sc 3, sc 3, inc, [sc 6, inc] 2x, sc 6, inc, [sc 6, inc] 2x, sc 3 (56)

Round 9 :

sc 7, inc, sc 1, sc 6, inc, [sc 7, inc] 2x, sc 1, sc 6, inc, [sc 7, inc] 2x (63)

Round 10 :

sc 4, inc, sc 6, sc 2, inc, [sc 8, inc] 2x, sc 4, sc 4, inc, [sc 8, inc] 2x, sc 4 (70)

Round 11 :

sc 13, sc 27, sc 30 (70)

Round 12 :

sc 14, sc 25, sc 31 (70)

Round 13 :

sc 15, sc 23, sc 16, we will divide the body & the tail from this rnd, skip the next 16 sts, continue to crochet the next rnd (54)

Round 14 :

sc 16, sc 21, sc 17 (54)

Round 15 :

sc 18, sc 17, sc 19 (54)

Round 16 :

sc 20, sc 13, sc 21, break yarn A (54)

Round 17-24 :

sc 54 (8 rnds), insert eyes between rnd 20&21, 17 sts apart (54)

Round 25 :

[sc 7, dec] 6x (48)

Round 26 :

[sc 6, dec] 6x (42)

Round 27 :

[sc 5, dec] 6x (36)

Round 28 :

[sc 4, dec] 6x, stuff firmly (30)

Round 29 :

[sc 3, dec] 6x (24)

Round 30 :

[sc 2, dec] 6x (18)

Round 31 :

[sc 1, dec] 6x (12)

Round 32 :

(blo) sc 12 (12)

Round 33-37 :

sc 12 (5 rnds), do not stuff this part (12)

Round 38 :

dec 6 (6)

โ€” Tail (yarn B) :

Round 1 :

sc 12, skip the next 2 sts, join with the 1st st of this rnd (12)

Round 2 :

[sc 4, dec] 2x (10)

Round 3 :

sc 10, stuff firmly (10)

Round 4 :

dec 5 (5)

โ€” Tail Fins (yarn B, X2) :

Round 1 :

sc 3 into a magic loop (3)

Round 2 :

inc 3 (6)

Round 3 :

[sc 1, inc] 3x (9)

Round 4 :

[sc 2, inc] 3x (12)

Round 5-6 :

sc 12 (2 rnds) (12)

Round 7 :

dec 6 (6)

โ€” Flippers (yarn B, X2) :

Round 1 :

sc 5 into a magic loop (5)

Round 2 :

inc 5 (10)

Round 3 :

sc, hdc, dc, [dc inc] 4x, dc, hdc, sc (14)

โ€” Cheeks (yarn E, X2) :

Round 1 :

sc 6 into a magic loop (6)

โ€” Water Fountain (yarn C, X4) :

Round 1 :

sc 6 into a magic loop (6)

Round 2 :

inc 6 (12)

Round 3-5 :

sc 12 (3 rnds) (12)

Round 6 :

[sc 4, dec] 2x (10)

Round 7 :

[sc 3, dec] 2x (8)

Round 8 :

sc 4 on the 4th piece, sc 4 on the 3th piece, sc 4 on the 2nd piece, sc 4 on the 1st piece = 16 sts, slst on the 1st st to make a ring (16)

Round 9 :

[sc 2, dec] 4x (12)

Round 10 :

[sc 4, dec] 2x (10)

Round 11 :

[sc 3, dec] 2x (8)

Round 12-17 :

sc 8 (6 rnds), stuff firmly (8)

โ€” Heart (yarn D) :

Round 1 :

sc 6 into a magic loop (6)

Round 2 :

inc 6 (12)

Round 3 :

[sc 1, inc] 6x (18)

Round 4-5 :

sc 18 (2 rnds) (18)

Round 6 :

sc 18 (on the 1st piece), sc 18 (on the 2nd piece) (36)

Round 7 :

sc 36 (36)

Round 8 :

[sc 4, dec] 6x (30)

Round 9 :

[sc 3, dec] 6x (24)

Round 10 :

[sc 2, dec] 6x, stuff firmly (18)

Round 11 :

[sc 1, dec] 3x (12)

Round 12 :

dec 6 (6)

Assembly Instructions

  • Use the tapestry needle to sew the remaining sts on the body and insert eyes between rnd 20&21, 17 sts apart
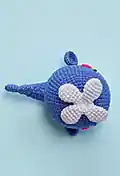
  • Break the yarn and weave in the last 5 sts of the tail, then sew the remaining sts on the body
  • Sew the Fins on the tail and attach the Flippers and Cheeks on both sides of the body
  • Create the water fountain by making 4 pieces and joining them together, stuff firmly along crocheting
  • Use tapestry needle to create a dent in the middle of the fountain and bend each piece with your finger
  • Make the 2nd heart piece and join with the 1st piece, stuff firmly and weave in the last 6 sts
  • Put the water fountain inside the hole on the whale's back and place the heart above the fountain

Important Notes

  • ๐Ÿ’กUse stitch markers to keep track of your rounds, especially during color changes from white to blue
  • ๐Ÿ’กStuff the body firmly but not too tightly to maintain the whale's natural rounded shape
  • ๐Ÿ’กWhen creating the water fountain, make sure all 4 pieces are evenly aligned before joining
  • ๐Ÿ’กInsert safety eyes between rounds 20-21 with exactly 17 stitches apart for proper facial proportions
  • ๐Ÿ’กThe heart should be stuffed firmly but remain soft enough to sit naturally atop the fountain
  • ๐Ÿ’กUse white thread to embroider a line under the eyes for added facial detail

This enchanting Cupid Whale pattern brings together the magic of the ocean with romantic Valentine's charm! The distinctive water fountain creates a stunning visual effect that makes this amigurumi truly special. Perfect for Valentine's Day gifts or anyone who loves whimsical sea creatures with a touch of romance. The color-changing technique and multi-piece construction will help you develop new skills while creating something absolutely adorable. ๐Ÿงถ Happy crocheting! ๐Ÿ‹๐Ÿ’•โœจ

You ask,

we answer.

FAQs

How do I achieve the smooth color transition from white to blue on the whale's body?

Change colors at the end of round 7 by completing the last stitch with the new blue yarn. This creates a clean transition line that mimics the natural coloring of a whale.

What's the best way to attach the water fountain pieces so they look realistic?

Make sure to align all 4 fountain pieces evenly before joining them in round 8. The key is to maintain consistent tension and stuff firmly as you crochet to create the proper fountain shape.

How can I make the heart sit properly on top of the water fountain?

The heart should be stuffed firmly enough to hold its shape but soft enough to nestle naturally into the fountain opening. Position it carefully and use small stitches to secure it invisibly.

Why does my whale look different from the pictures?

Check your tension and make sure you're changing colors at the correct rounds. Also ensure you're stuffing firmly enough - the whale should feel solid but not overstuffed. Eye placement is also crucial for the whale's expression.