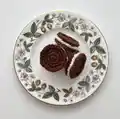
🧢 Beautiful ✨ Detailed πŸ’ Adorable

Adorable Crochet Biscuits Pattern

Adorable Crochet Biscuits Pattern
4.6β˜… Rating
3-4 Hours Time Needed
1.4K Made This
βœ‚οΈ

Beginner Friendly Level

Perfect for those just starting their crochet journey, with clear instructions and simple techniques

⏱️

Bite-Sized Project

Complete in under 2 hoursβ€”quick, fun, and perfect for a little creative escape.

🧸

Tiny Treasure

Small, sweet, and gift-worthy creations that fit perfectly in the palm of your hand with detailed charm.

About This Adorable Crochet Biscuits Pattern

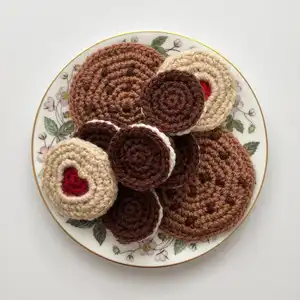
This delightful pattern brings together three iconic British biscuits in miniature crochet form. Each biscuit is worked in separate pieces and assembled to create realistic-looking treats. The Choc Chip Cookie features randomly placed chocolate chips, the Jammie Dodger showcases a beautiful heart-shaped jam window, and the Oreo Cookie captures the classic sandwich cookie design with cream filling. These charming pieces are perfect for imaginative play or as unique home dΓ©cor items.

Adorable Crochet Biscuits Pattern crochet pattern - detailed view of completed project

The pattern uses simple double crochet stitches worked in rounds, making it accessible for beginners while creating impressive results. Each biscuit varies in size and complexity, offering a progressive skill-building experience.

Why You'll Love This Adorable Crochet Biscuits Pattern

I absolutely love how this pattern transforms simple crochet techniques into something so recognizable and charming. The attention to detail in each biscuit design makes them incredibly realistic, and I find the process of creating these miniature treats both relaxing and rewarding. What excites me most is how versatile these pieces are - they work wonderfully as play food for children, conversation starters for tea time, or even as unique gifts for fellow craft lovers.

Adorable Crochet Biscuits Pattern step 1 - construction progress Adorable Crochet Biscuits Pattern step 2 - assembly progress Adorable Crochet Biscuits Pattern step 3 - details and accessories Adorable Crochet Biscuits Pattern step 4 - final assembly and finishing

Switch Things Up

I love how versatile this pattern can be once you master the basic techniques! You can easily create different cookie varieties by switching up your color combinations - imagine making sugar cookies with pastel yarns, or gingerbread cookies using warm brown tones.

I've experimented with adding different textures too, like using a slightly fuzzy yarn for a more realistic cookie appearance, or incorporating metallic threads for special occasion treats. The chocolate chip placement technique works perfectly for creating raisin cookies or even colorful candy-studded versions.

For seasonal variations, I particularly enjoy making Halloween versions with orange and black yarns, or Christmas cookies with festive red and green combinations. You could even create a whole bakery display by varying the sizes slightly or adding different 'frosting' details with contrasting yarns.

Common Mistakes & How to Fix Them

βœ— Forgetting to place chocolate chips in the outer rounds of the Choc Chip Cookie, concentrating them only in the center βœ— Sewing the Oreo Cookie layers too close to the edge, which squashes the cream center appearance βœ— Not leaving a long enough tail when starting the Jammie Dodger top piece for securing the heart shape βœ— Making uneven tension between top and base pieces, resulting in mismatched biscuit halves

Adorable Crochet Biscuits Pattern

Create charming miniature treats with this delightful crochet pattern featuring three beloved biscuits: chocolate chip cookies, Jammie Dodgers, and Oreo cookies. Perfect for play kitchens, tea parties, or as unique decorative pieces, these realistic-looking biscuits bring sweetness to any space. Each biscuit is carefully designed with authentic details - from chocolate chips scattered across golden cookies to the iconic heart-shaped jam center of Jammie Dodgers and the classic cream filling of Oreos.

Beginner Friendly 3-4 Hours

Materials Needed for Adorable Crochet Biscuits Pattern

β€” Main Fabric

  • 01
    Paintbox Yarns Simply DK (100% Acrylic) in Soft Fudge, 10g
  • 02
    Paintbox Yarns Simply DK in Coffee Bean, 10g
  • 03
    Paintbox Yarns Simply DK in Vanilla Cream, 10g
  • 04
    Paintbox Yarns Simply DK in Red Wine, 5g
  • 05
    Paintbox Yarns Simply DK in Champagne White, 5g

β€” Tools Required

  • 01
    Crochet hook size 4mm (G/6)
  • 02
    Tapestry needle for sewing in ends
  • 03
    Scissors

Progress Tracker

0% Complete

β€” Choc Chip Cookie :

Top and base (make two) :

Round 1 :

with A dc7 into magic circle, join with ss to 1st dc (7)

Round 2 :

ch1, 2dc into same st, 2dc into each st around, join with ss to 1st dc (14)

Round 3 :

ch1, dc into same st, 2dc in next st, *dc, 2dc in next st* repeat from * to * 6 times, join with ss to 1st dc (21)

Round 4 :

ch1, dc into same st, dc, 2dc in next st, *dc2, 2dc in next st* repeat from * to * 6 times, join with ss to 1st dc (28)

Round 5 :

ch1, dc into same st, dc2, 2dc in next st, *dc3, 2dc in next st* repeat from * to * 6 times, join with ss to 1st dc (35)

Round 6 :

ch1, dc into same st, dc3, 2dc in next st, *dc4, 2dc in next st* repeat from * to * 6 times, join with ss to 1st dc (42)

Round 7 :

ch1, dc into same st, dc4, 2dc in next st, *dc5, 2dc in next st* repeat from * to * 6 times, join with ss to 1st dc (49). Fasten off and sew in ends

Add choc chips :

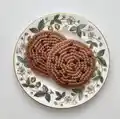
On right side of top piece, use B to stitch your choc chips randomly over the top. Make sure you put a couple in round 7 so that they are not concentrated in the centre of your cookie!

Join together :

With wrong sides together join A through both sides and ch1, dc the two pieces together making sure you hook through both sides as you go around, join with ss to 1st dc, fasten off and sew in ends

β€” Jammie Dodger :

Base :

Round 1 :

with C dc7 into magic circle, join with ss to 1st dc (7)

Round 2 :

ch1, 2dc into same st, 2dc into each st around, join with ss to 1st dc (14)

Round 3 :

ch1, dc into same st, 2dc in next st, *dc, 2dc in next st* repeat from * to * 6 times, join with ss to 1st dc (21)

Round 4 :

ch1, dc into same st, dc, 2dc in next st, *dc2, 2dc in next st* repeat from * to * 6 times, join with ss to 1st dc (28)

Round 5 :

ch1, dc into same st, dc2, 2dc in next st, *dc3, 2dc in next st* repeat from * to * 6 times, join with ss to 1st dc (35). Fasten off and sew in ends

Centre :

Round 1 :

with D dc7 into magic circle, join with ss to 1st dc (7)

Round 2 :

ch1, 2dc into same st, 2dc into each st around, join with ss to 1st dc (14)

Round 3 :

ch1, dc into same st, 2dc in next st, *dc, 2dc in next st* repeat from * to * 6 times, join with ss to 1st dc (21)

Round 4 :

ch1, dc into same st, dc, 2dc in next st, *dc2, 2dc in next st* repeat from * to * 6 times, join with ss to 1st dc (28). Fasten off and sew in ends

Top :

Round 1 :

with C ch14, join ends with ss, ch1 and dc21 into the circle, join with ss to 1st dc (21)

Info :

leave a long cast on tail so that you can use it later to secure the centre heart shape in place when sewing together

Round 2 :

ch1, dc into same st, dc, 2dc in next st, *dc2, 2dc in next st* repeat from * to * 6 times, join with ss to 1st dc (28)

Round 3 :

ch1, dc into same st, dc2, 2dc in next st, *dc3, 2dc in next st* repeat from * to * 6 times, join with ss to 1st dc (35). Fasten off and sew in end

Join together :

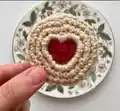
Using the long cast on tail from your top piece, join the top and centre together by stitching around the central hole, shaping it into a heart as you sew around. Add a couple of stitches into the centre, to make the v-shape at the top of the heart. With wrong sides together, using A, sew through top and base to join around the edge

β€” Oreo Cookie :

Top and base (make two) :

Round 1 :

with B dc7 into magic circle, join with ss to 1st dc (7)

Round 2 :

ch1, 2dc into same st, 2dc into each st around, join with ss to 1st dc (14)

Round 3 :

ch1, dc into same st, 2dc in next st, *dc, 2dc in next st* repeat from * to * 6 times, join with ss to 1st dc (21)

Round 4 :

ch1, dc into same st, dc, 2dc in next st, *dc2, 2dc in next st* repeat from * to * 6 times, join with ss to 1st dc (28). Fasten off and sew in ends

Centre :

Round 1 :

with E dc7 into magic circle, join with ss to 1st dc (7)

Round 2 :

ch1, 2dc into same st, 2dc into each st around, join with ss to 1st dc (14)

Round 3 :

ch1, dc into same st, 2dc in next st, *dc, 2dc in next st* repeat from * to * 6 times, join with ss to 1st dc (21)

Round 4 :

ch1, dc into same st, dc, 2dc in next st, *dc2, 2dc in next st* repeat from * to * 6 times, join with ss to 1st dc (28). Fasten off and sew in ends

Join together :

Stack pieces with base upside down, centre and top right side up. Using B sew the layers together, being careful not to sew too close to the edge or you'll squash the cream centre of your biscuit!

Assembly Instructions

  • For Choc Chip Cookie: Place wrong sides together and crochet around the edge using yarn A, ensuring you work through both layers
  • For Jammie Dodger: First attach the red center piece to the top by stitching around the heart shape opening, then sew top and base together around the edges
  • For Oreo Cookie: Stack base upside down, place cream center, then top right side up and carefully sew layers together avoiding the edges
  • Use the long tail left from the Jammie Dodger top piece to secure the heart shape properly while assembling
  • Add chocolate chips to the Choc Chip Cookie after completing the top piece but before final assembly
  • Ensure all yarn ends are properly sewn in and secured before final assembly of each biscuit

Important Notes

  • πŸ’‘Maintain consistent tension throughout to ensure top and base pieces match in size
  • πŸ’‘Leave long tails when specified, particularly for the Jammie Dodger top piece assembly
  • πŸ’‘Place chocolate chips randomly across the entire surface, including outer rounds for realistic appearance
  • πŸ’‘When sewing Oreo layers, avoid stitching too close to edges to preserve the cream filling effect
  • πŸ’‘UK crochet terminology is used throughout this pattern (dc = US single crochet)

These adorable miniature biscuits bring the charm of British teatime to your crochet collection! Perfect for imaginative play, home decoration, or as thoughtful handmade gifts, each biscuit captures the essence of the real treats we all know and love. The combination of simple stitches and clever construction techniques makes this project both enjoyable to create and delightful to display. 🧢 Happy crocheting! 🧡✨

You ask,

we answer.

FAQs

Can I use different yarn weights for this pattern?

While the pattern specifies DK weight yarn, you can use different weights but will need to adjust hook size accordingly and expect size variations. Heavier yarns will create larger biscuits.

Are these biscuits suitable as toys for young children?

Yes, but ensure all yarn ends are securely sewn in and consider the child's age. These are perfect for pretend play kitchens and tea parties.

How do I get the heart shape perfect on the Jammie Dodger?

Use the long tail left from the top piece and shape gradually as you stitch around the opening. Add extra stitches at the top to create the distinctive V-shape.

Can I make these biscuits in different colors?

Absolutely! Try different 'flavors' like strawberry cookies with pink yarn or double chocolate with darker browns. Be creative with your color combinations.