🧢 Beautiful ✨ Detailed πŸ’ Adorable

The Little Sheep Amigurumi Pattern

The Little Sheep Amigurumi Pattern
4.8β˜… Rating
2-3 Hours Time Needed
3.7K Made This
βœ‚οΈ

Beginner Friendly Level

Perfect for those just starting their sewing journey, with clear instructions and simple techniques

⏱️

Bite-Sized Project

Complete in under 2 hoursβ€”quick, fun, and perfect for a little creative escape.

🧸

Cute Companion

An adorable friend to cherish, handcrafted with love to bring comfort and joy for years to come.

About This The Little Sheep Amigurumi Pattern

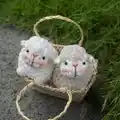
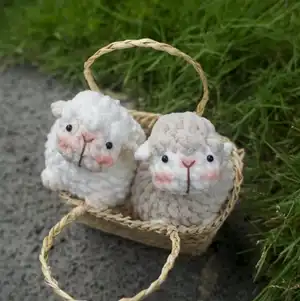
This charming little sheep pattern combines basic amigurumi techniques with special bobble stitches to create a fluffy, textured appearance. The pattern includes detailed instructions for color changes between cream and white yarn to achieve the perfect sheep look. With its compact 7cm size, this miniature sheep is perfect for small hands and makes an excellent beginner-friendly project.

The Little Sheep Amigurumi Pattern crochet pattern - detailed view of completed project

The pattern features easy-to-follow rounds with clear stitch counts and helpful notes throughout. Special techniques like bobble stitches add dimension while remaining simple enough for newcomers to amigurumi.

Why You'll Love This The Little Sheep Amigurumi Pattern

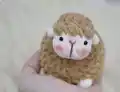
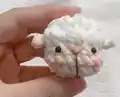
I absolutely love how this pattern teaches you bobble stitches in such a gentle way, creating that perfect fluffy sheep texture without overwhelming complexity. The size is just right for quick satisfaction, and watching the cute face come together with those safety eyes and embroidered nose brings such joy to the crafting process.

The Little Sheep Amigurumi Pattern step 1 - construction progress The Little Sheep Amigurumi Pattern step 2 - assembly progress The Little Sheep Amigurumi Pattern step 3 - details and accessories The Little Sheep Amigurumi Pattern step 4 - final assembly and finishing

Switch Things Up

I love experimenting with different yarn textures for this little sheep! You could try using a super soft velvet yarn for an ultra-plush feel, or even add some sparkly thread for a magical touch. For a rustic farmyard look, consider using natural wool in cream and beige tones. I've also seen beautiful variations where crafters add tiny ribbon bows around the neck or create a whole flock in different pastel colors. The bobble stitch technique opens up so many creative possibilities - you could adjust the bobble frequency for different wool density effects. Some makers even add small bells inside for a gentle tinkling sound that babies love. Consider making matching accessories like a tiny shepherd's crook or a miniature hay bale to create a complete farm scene. The beauty of this pattern is how adaptable it is to your personal style while maintaining that irresistible sheep charm!

Common Mistakes & How to Fix Them

βœ— Forgetting to maintain consistent tension when switching between yarn colors can create uneven texture βœ— Placing bobble stitches too close together instead of following the pattern spacing creates crowding βœ— Overstuffing the small body can distort the shape and stretch the stitches beyond recognition βœ— Rushing through the color change rounds without securing yarn tails properly leads to loose ends

The Little Sheep Amigurumi Pattern

Create your own adorable miniature sheep companion with this delightful amigurumi pattern! Perfect for beginners wanting to craft a charming farmyard friend, this pattern uses simple bobble stitches and color changes to create an incredibly cute 7cm sheep. The fluffy texture and sweet expression make this little sheep an irresistible gift for children or a wonderful addition to your amigurumi collection.

Beginner Friendly 2-3 Hours

Materials Needed for The Little Sheep Amigurumi Pattern

β€” Main Fabric

  • 01
    Chunky yarn size 4-5mm in cream/beige color for the body
  • 02
    Chunky yarn size 4-5mm in white color for the head section
  • 03
    Himalaya Velvet or Himalaya Dolphin Baby yarn recommended

β€” Tools Required

  • 01
    4mm crochet hook
  • 02
    4.5mm toy safety eyes
  • 03
    Needle for sewing
  • 04
    Toy stuffing (fiberfill)
  • 05
    Stitch marker
  • 06
    Scissors
  • 07
    Brown embroidery thread for nose
  • 08
    Powder blush for cheeks

Progress Tracker

0% Complete

β€” BODY :

Note :

Start in white yarn (Use cream yarn in pink word, white yarn in black word)

Rnd 1 :

8sc in MR [8]

Rnd 2 :

8inc [16]

Rnd 3 :

(sc, inc) x 8 [24]

Rnd 4 :

(3sc, inc) x 6 [30]

Rnd 5 :

11sc, bo4, 4sc, bo4, 13 sc [30]

Rnd 6-9 :

30sc [30] (4 rounds)

Rnd 10 :

11sc, bo4, 4sc, bo4, 13 sc [30]

Rnd 11 :

(3sc, dec) x 6 [24]

Rnd 12 :

(sc, dec) x 8 [16]

Info :

Stuff the body firmly with fiberfill

Rnd 13 :

8dec [8]

Info :

Fasten off, leaving the yarn tail. Using the yarn needle, weave the yarn tail through the front loop of each remaining stitch and pull it tight to close

β€” HEAD :

Note :

Start in cream yarn. Ch 4. Stitches are worked in both sides of the foundation chain

Rnd 1 :

Skip the first ch on the hook, inc in next ch, sc in next ch, 4sc in next ch. Continue on the other side of the foundation chain, sc in next ch, inc in next ch [10]

Rnd 2 :

2inc, sc, 4inc, sc, 2inc [18]

Rnd 3 :

18sc [18]

Rnd 4 :

(ch 4, skip 3 ch from the hook, slst in next ch), sc in next st of the base, dec, (sc, dec) x 2, (ch 4, skip 3 ch from the hook, slst in next ch), sc in next st of the base, dec, (sc, dec) x 2 [12]

Note :

Change to white yarn

Rnd 5 :

(sc, bo2) x 6 [12]

Info :

Stuff the head firmly with fiberfill

Rnd 6 :

6dc-dec [6]

Info :

Fasten off, leaving the yarn tail. Using the yarn needle, weave the yarn tail through the front loop of each remaining stitch and pull it tight to close

β€” ASSEMBLY :

Info :

Insert the 4.5mm safety eyes between rounds 3 and 4, 4 stitches apart

Info :

Use powder blush for the cheeks

Info :

Embroider the nose with brown threads

Info :

Sew the head to the body

Assembly Instructions

  • Insert 4.5mm safety eyes between rounds 3 and 4 of the head, spacing them 4 stitches apart
  • Apply powder blush gently to the cheek areas for a natural rosy look
  • Embroider a small triangular nose using brown embroidery thread in the center below the eyes
  • Attach the head securely to the body using the yarn tail and invisible stitching technique
  • Weave in all loose yarn ends carefully to ensure a clean finish

Important Notes

  • πŸ’‘Use invisible decrease stitches throughout the pattern for the best professional results
  • πŸ’‘Add toy stuffing according to each part's specific instructions to maintain proper shape
  • πŸ’‘Keep stitches close together so stuffing doesn't show through gaps when completed
  • πŸ’‘Master the bobble stitch technique before starting as it's essential for the fluffy texture
  • πŸ’‘The pattern includes color change techniques that require careful yarn management

This precious Little Sheep pattern brings farmyard charm to your amigurumi collection! With its compact size and fluffy bobble stitch texture, this pattern is perfect for practicing new techniques while creating an adorable companion. The sweet face and cream-colored wool make this sheep absolutely irresistible. πŸ‘ Happy crocheting! 🧢✨

You ask,

we answer.

FAQs

What yarn weight works best for this pattern?

The pattern calls for chunky yarn size 4-5mm like Himalaya Velvet or Himalaya Dolphin Baby for the best texture and size results.

How difficult are the bobble stitches for beginners?

The bobble stitches (bo2 and bo4) are beginner-friendly when you follow the clear instructions. Practice on a swatch first if you're new to this technique.

Can I make the sheep larger?

Yes! Use a larger hook and thicker yarn to increase the size, but keep the same stitch proportions for best results.

What if I can't find the exact yarn brands mentioned?

Any chunky weight yarn in cream and white colors will work perfectly. The key is maintaining consistent yarn weight throughout the project.

How do I prevent the stuffing from showing through?

Keep your stitches tight and close together, and stuff firmly but not so much that it stretches the fabric beyond its natural tension.