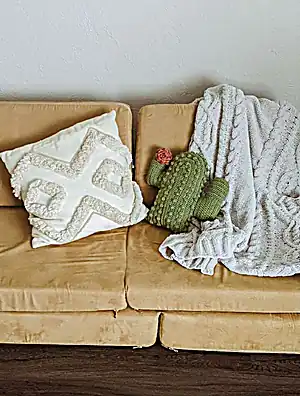
Transform your home into a desert oasis with this charming crochet cactus pillow! This delightful home decor project combines cozy comfort with whimsical style, featuring realistic bobble stitches that mimic actual cactus texture. Perfect for adding a touch of southwestern charm to any room, this 12-inch tall pillow makes an excellent conversation piece and brings nature indoors without the prickly complications. The pattern includes detailed instructions for creating both the main cactus body with its distinctive arms and a beautiful crocheted flower accent.
Progress Tracker
0% Complete
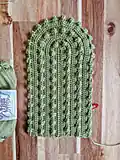
— Main body of the cactus :
Row 1 :
Ch 41, hdc in 2nd ch from the hook and in next 38 ch, hdc 6 in the last stitch, moving to work along that back side of the ch, hdc 39. Ch 1, turn.
Row 2 :
Hdc 39, 2 hdc in next 6 st, hdc 39. Ch1, turn.
Row 3 :
Bobble row: sc 2, bobble [sc 3, bobble] repeat around to last 3 st, sc 3. Ch1, turn.
Row 4 :
Hdc 39, [hdc 2 in next st, hdc 1] 6 times, hdc 39. Ch1, turn.
Row 5 :
Hdc 39, [hdc 2 in next st, hdc 2] 6 times, hdc 39. Ch1, turn.
Row 6 :
Hdc 39 [hdc 2 in next st, hdc 3] 6 times, hdc 39. Ch1, turn.
Row 7 :
Bobble row: sc 2, bobble [sc 3, bobble] repeat around to last 5 st, sc 3, bobble, sc 1. Ch1, turn.
Row 8 :
Hdc 39 [hdc 2 in next st, hdc 4] 6 times, hdc 39. Ch1, turn.
Row 9 :
Hdc 39 [hdc 2 in next st, hdc 5] 6 times, hdc 39. Ch1, turn.
Row 10 :
Hdc 39 [hdc 2 in next st, hdc 6] 6 times, hdc 39. Ch1, turn.
Row 11 :
Bobble row: sc 2, bobble [sc 3, bobble] repeat around to last 3 st, sc 3. Finish off.
— Front side Lower Arm :
Info :
With the right side facing, on the right side of the cacti, count 15 stitches up from the bottom, join your yarn in the 15th st.
Row 12 :
Turn the cacti to work along the row ends. Hdc 14 along the raw edge. Ch1, turn.
Row 13-20 :
Hdc 14. Ch1 turn.
Row 21 :
Hdc2tog, hdc 10, hdc2tog. Ch1, turn.
Row 22 :
Hdc2tog, hdc 8, hdc2tog. Ch1, turn.
Row 23 :
Hdc2tog, hdc 6, hdc2tog. Ch1, turn. Finish off.
— Front side upper Arm :
Info :
With the wrong side facing, on the right side, count 27 st up from the bottom, join your yarn in the 27th st.
Row 1 :
Ch1, Hdc 12. Ch1 turn.
Row 10 :
Turn the cacti to work along the row ends. Hdc 12 along the raw edge. Ch1, turn.
Row 11-15 :
Hdc 12. Ch1 turn.
Row 16 :
Hdc2tog, hdc 8, hdc2tog. Ch1, turn.
Row 17 :
Hdc2tog, hdc6, hdc2tog. Ch1, turn.
Row 18 :
Hdc2tog, hdc 4, hdc2tog. Ch1, turn. Finish off.
— Back side lower Arm :
Info :
With the wrong side facing, on the right hand side, count 15 st up from the bottom, join your yarn in the 15th st.
Row 12 :
Turn the cacti to work along the row ends. Hdc 14 along the raw edge. Ch1, turn.
Row 13-20 :
Hdc 14. Ch1 turn.
Row 21 :
Hdc2tog, hdc 10, hdc2tog. Ch1, turn.
Row 22 :
Hdc2tog, hdc 8, hdc2tog. Ch1, turn.
Row 23 :
Hdc2tog, hdc6, hdc2tog. Ch1, turn. Finish off.
— Back side upper Arm :
Info :
With the right side facing, on the right hand side, count 27 st up from the bottom, join your yarn in the 27th st.
Row 1 :
Ch1, Hdc 12. Ch1 turn.
Row 10 :
Turn the cacti to work along the row ends. Hdc 12 along the raw edge. Ch1, turn.
Row 11-15 :
Hdc 12. Ch1 turn.
Row 16 :
Hdc2tog, hdc 8, hdc2tog. Ch1, turn.
Row 17 :
Hdc2tog, hdc6, hdc2tog. Ch1, turn.
Row 18 :
Hdc2tog, hdc 4, hdc2tog. Ch1, turn. Finish off.
— Assembly :
Step 1 :
Place right sides together and slp stitch through both layers all the way around, starting on the bottom. Be sure to leave about a 3 inch gap while slp stitching the pieces together so that you can flip it right side out again and then stuff it.
Step 2 :
Stuff the cactus and sew up the hole on the bottom.
— Flower :
Step 1 :
Ch 50, sc in 2nd ch from the hook, 3 dc in the next ch, [sc, 3 dc in the next ch] to the end. Your flower will begin to twist on its own.
Step 2 :
Cut your yarn leaving a long tail to sew the flower together and attach it to the cactus.
Step 3 :
Roll your flower by gently wrapping the petals around each other starting at the center. Sew securely together by going through all the rows on the back a couple times.
Step 4 :
Sew the flower securely onto the top cactus arm. Weave in your ends!
This delightful crochet cactus pillow pattern brings desert charm right into your living space! Featuring authentic-looking bobble stitches and a sweet crocheted flower, this 12-inch decorative pillow adds personality to any room. The pattern teaches valuable techniques like strategic increases and piece mirroring while creating something both beautiful and functional. Perfect for crocheters ready to tackle their first home decor project, this cactus will definitely become a conversation starter in your home. 🌵 Happy crocheting! 🧶✨