🧢 Beautiful ✨ Detailed πŸ’ Adorable

Highline Wristlet Keychain Pattern

Highline Wristlet Keychain Pattern
4.7β˜… Rating
15-30 Minutes Time Needed
3.4K Made This
βœ‚οΈ

Beginner Friendly Level

Perfect for those just starting their sewing journey, with clear instructions and simple techniques

⏱️

Bite-Sized Project

Complete in under 2 hoursβ€”quick, fun, and perfect for a little creative escape.

πŸ”‘

Snug Essential

Everyday comfort with practical charm, designed for both functionality and style through changing seasons.

About This Highline Wristlet Keychain Pattern

The Highline Wristlet Keychain combines practicality with style in a quick and satisfying crochet project. Named after the beautiful stretch of train tracks between Durango and Silverton, Colorado, this pattern features a distinctive cone stitch that creates a texture reminiscent of old railroad tracks. Perfect for beginners and experienced crocheters alike, this versatile accessory can be customized with your favorite color combinations.

Highline Wristlet Keychain Pattern crochet pattern - detailed view of completed project

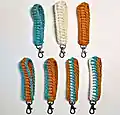
With options for both standard and leather-wrapped versions, you can create a simple everyday accessory or a more sophisticated piece with custom leather detailing. The pattern is designed to be both functional and fashionable, making it perfect for personal use or as thoughtful handmade gifts.

Why You'll Love This Highline Wristlet Keychain Pattern

I absolutely love this pattern because it's incredibly versatile and satisfying to make! The cone stitch creates such a beautiful texture that reminds me of adventure and travel, while the quick completion time means you can whip up several in different color combinations. I find it's the perfect project when I want to create something useful and beautiful without a huge time commitment. Plus, the fact that it only uses 10 yards of yarn makes it ideal for using up those precious yarn scraps we all have lying around!

Highline Wristlet Keychain Pattern step 1 - construction progress Highline Wristlet Keychain Pattern step 2 - assembly progress Highline Wristlet Keychain Pattern step 3 - details and accessories Highline Wristlet Keychain Pattern step 4 - final assembly and finishing

Switch Things Up

I love experimenting with different color combinations for this pattern - the possibilities are truly endless! Try using your favorite sports team colors for a personalized touch, or go with seasonal combinations like autumn oranges and browns, or fresh spring greens and yellows. You could even create a whole collection using different shades of the same color family for an ombrΓ© effect.

For a more luxurious feel, I sometimes use a cotton-bamboo blend yarn which gives the finished piece a beautiful drape and subtle sheen. The texture works wonderfully with the cone stitch pattern. Don't be afraid to try the leather-wrapped version either - it adds such a sophisticated, boutique-quality finish that makes these perfect for gifts or selling at craft fairs.

I've also discovered that these make fantastic zipper pulls for bags and purses when you skip the swivel hook and just attach them directly. The compact size and sturdy construction make them perfect for this alternative use!

Common Mistakes & How to Fix Them

βœ— Not maintaining consistent tension when working cone stitches can create uneven texture throughout the wristlet
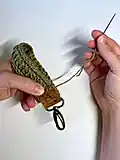
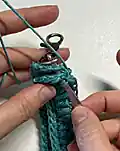
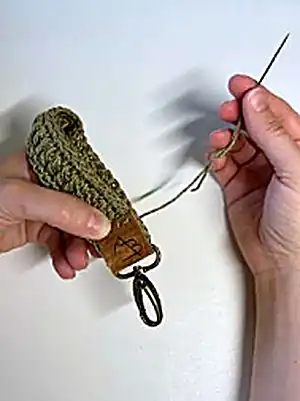
 βœ— Forgetting to work through both layers when seaming can result in loose or weak connections βœ— Making the foundation chain too tight which makes Row 1 difficult to work into properly βœ— Skipping the long tail foundation method can result in less stretch and durability at the base

Highline Wristlet Keychain Pattern

Create this trendy and practical wristlet keychain that's perfect for keeping your keys secure and stylish! This fast crochet project features a unique cone stitch texture reminiscent of old train tracks, and can be completed in just 15 minutes by experienced crocheters. Choose from solid colors or vibrant multi-color combinations, with options for standard or leather-wrapped versions. At only 10 yards per keychain, it's perfect for using up yarn scraps and makes an excellent last-minute gift or profitable market item.

Beginner Friendly 15-30 Minutes

Materials Needed for Highline Wristlet Keychain Pattern

β€” Main Fabric

  • 01
    Worsted weight (4) 100% cotton yarn in your choice of colors
  • 02
    Lion Brand 24/7 Cotton recommended in Amber, Ecru, Bay Leaf, and Jade colors
  • 03
    WeCrochet Dishie cotton yarn as alternative option
  • 04
    Approximately 10-11 yards (5.5-6g) per keychain

β€” Tools Required

  • 01
    Crochet hook size G6 (4.00mm)
  • 02
    Yarn needles
  • 03
    Tape measure
  • 04
    Scissors
  • 05
    Swivel hook with 1/2-inch ring (standard version)
  • 06
    Swivel hook with 1-inch ring (leather version)
  • 07
    2.5 x 1 inch leather tag (leather version)
  • 08
    Leather hole punch tool or awl (leather version)

Progress Tracker

0% Complete

β€” Foundation :

Long Tail Foundation Chain :

Create a Long Tail Foundation Ch for a total of 32 chs (see Special Stitches section). Alternatively, place a slip knot on hook leaving 3-4 inch tail and ch 32.

β€” Main Body :

Row 1 (RS) :

Ch 1. Flip the long tail foundation ch over so you will be working into the backside (under 2 loops) of each foundation st. Work 1 Sc into each st across row. Ch 1 and turn your work. (32)

Row 2 (WS) :

Sc in each st across row. Ch 1 and turn your work. (32)

Row 3 (RS) :

Work a Cone st into each st across row. Ch 1 and fasten off. Do not turn your work. (32)

Row 4 (RS) :

Place a slip knot on hook and join to first st with a standing Sc (counts as a st). Work a Sc into each remaining st in row. Do not fasten off. (32)

β€” Assembly (Standard Version) :

Preparation :

Turn work so RS of end of Row 4 is facing you. Fold wristlet under in half so WSs are together and ends are aligned at top.

First Seam St :

Work first half of Sc2tog by inserting hook into side of final st at end of Row 4 and in side of first st of Row 4 on other end, YO and pull up loop through both layers. Insert hook again into both layers between first insertion point and center, place swivel hook ring on hook with clasp hanging down, YO and pull up loop, YO and pull through all 3 loops.

Second Seam St :

Working into side of Cone sts at ends of Row 3, work 1 Sc through both layers and also through ring of swivel hook.

Third Seam St :

Work first half of Sc2tog by inserting hook into both layers between Second Seam St and end sts from Row 1 and also through swivel hook ring, YO and pull up loop. Insert hook into end sts of Row 1 on both layers (not through swivel hook ring), YO and pull through all 3 loops. Ch 1 and fasten off.

β€” Assembly (Leather Version) :

Seam Ends :

Complete seaming using same three-stitch method as standard version but without threading through swivel hook ring.

Attach Leather :

Use 2.5 x 1 inch leather strip with four holes punched across 1-inch ends. Thread leather through 1-inch swivel hook ring and wrap around seamed ends. Sew through holes working back and forth through all holes to attach securely.

Assembly Instructions

  • Fold the completed wristlet in half with wrong sides together, aligning the ends at the top
  • Work three seam stitches to join the ends, incorporating the swivel hook ring in the process
  • For standard version, thread the swivel hook ring onto your hook during the seaming process
  • For leather version, first seam the ends together, then attach the leather strip through the punched holes
  • Thread the leather strip through the 1-inch swivel hook ring before sewing to the wristlet
  • Weave in all yarn tails securely on the wrong side of the work
  • Work the final yarn tail through the ring before weaving in for a more polished appearance

Important Notes

  • πŸ’‘Maintain consistent tension throughout, especially when working cone stitches for even texture
  • πŸ’‘The long tail foundation chain provides better stretch and durability than regular chain foundation
  • πŸ’‘Work seaming stitches with slightly tighter tension than normal to ensure secure connections
  • πŸ’‘For multi-color versions, fasten off and weave ends between each color change for clean appearance
  • πŸ’‘Gauge is not critical for this project, but foundation chain should measure about 8 inches
  • πŸ’‘Both Row 3 and Row 4 are worked on the right side, making Row 1 and Row 4 visually identical

This practical and stylish Highline Wristlet Keychain brings together functionality and beauty in a quick, satisfying project. Named after the scenic railroad stretch in Colorado, the unique cone stitch pattern creates a distinctive texture that's both eye-catching and durable. Whether you choose the classic version or add leather detailing, you'll have a trendy accessory that keeps your keys secure while looking fabulous. Perfect for gifting or keeping for yourself! 🧢 Happy crocheting! πŸ”‘βœ¨

You ask,

we answer.

FAQs

Can I use a different weight of yarn for this pattern?

This pattern is specifically designed for worsted weight (4) cotton yarn. Using a different weight may affect the size and durability of the finished wristlet, and you may need to adjust your hook size accordingly.

How do I make the cone stitch if I'm a beginner?

The cone stitch combines a regular stitch with a spike stitch. YO and insert hook under both loops of the indicated stitch, YO and pull up a loop. Then YO and insert hook in the same stitch but 2 rows below, YO and pull up a loop. Adjust all 5 loops to the same height, then YO and pull through all 5 loops.

Can I make this pattern longer or shorter?

Yes! You can add or subtract chains when making the foundation chain. Any number of chains can be used, but note that changes will affect the yardage requirements. The foundation chain should measure approximately 8 inches for the standard size.

What's the difference between the standard and leather versions?

The standard version uses a 1/2-inch swivel hook ring attached during the seaming process. The leather version uses a 1-inch ring with a leather strip sewn over the seamed area for a more sophisticated look. The leather version will be about 1/2 inch shorter in circumference.

How much yarn do I need for multiple color combinations?

For 2-color combinations, you'll need about 5 yards of each color. For 3-color combinations, you'll need about 3-4 yards of each color. The total is still around 10 yards per keychain.