🧢 Beautiful ✨ Detailed πŸ’ Adorable

Adorable Kitten Amigurumi Pattern

Adorable Kitten Amigurumi Pattern
4.0β˜… Rating
4-6 Hours Time Needed
4.1K Made This
βœ‚οΈ

Beginner Friendly Level

Perfect for those just starting their sewing journey, with clear instructions and simple techniques

⏱️

Weekend Treat

Takes 5-7 hours, making it an enjoyable project to finish over a couple of days.

🧸

Cute Companion

An adorable friend to cherish, handcrafted with love to bring comfort and joy for years to come.

About This Adorable Kitten Amigurumi Pattern

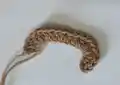
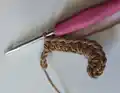
This sweet kitten pattern combines simple crochet techniques with charming embroidered details to create an irresistible feline friend. The pattern features a rounded head, plump body, and perfectly proportioned limbs that give this kitten its distinctive charm. With clear round-by-round instructions and helpful assembly guidance, you'll create a cuddly companion that captures the essence of a real kitten.

Adorable Kitten Amigurumi Pattern crochet pattern - detailed view of completed project

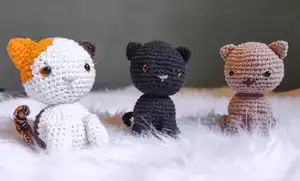
The embroidered nose and mouth details add personality and warmth to your finished kitten. This pattern is designed to be both beginner-friendly and satisfying for experienced crocheters looking for a quick, delightful project.

Why You'll Love This Adorable Kitten Amigurumi Pattern

I absolutely love how this kitten pattern brings out the natural cuteness of our feline friends in crochet form! The proportions are just perfect - not too big, not too small, making it ideal for gifting or keeping as your own desk companion. I'm particularly fond of the embroidered facial features that give each kitten its own unique personality and expression.

Adorable Kitten Amigurumi Pattern step 1 - construction progress Adorable Kitten Amigurumi Pattern step 2 - assembly progress Adorable Kitten Amigurumi Pattern step 3 - details and accessories Adorable Kitten Amigurumi Pattern step 4 - final assembly and finishing

Switch Things Up

I love how versatile this kitten pattern can be with just a few simple modifications! You can easily create a whole family of cats by changing yarn colors - imagine a sleek black kitten, a classic orange tabby, or even a sophisticated gray version. I particularly enjoy experimenting with different yarn textures too; using a fuzzy yarn creates an incredibly soft and cuddly finish that feels amazing to touch.

For a more personalized touch, I sometimes add small accessories like a tiny crocheted collar or bow tie using contrasting colors. You could even create seasonal versions by adding small holiday-themed elements or changing the color scheme to match different occasions.

I've also discovered that slight modifications to the ear shape can completely change the kitten's personality - making them more pointed creates a more alert expression, while keeping them rounded gives a sleepier, more relaxed look.

Common Mistakes & How to Fix Them

βœ— Forgetting to stuff firmly before closing openings can result in a floppy finished product βœ— Not placing safety eyes symmetrically between the specified rounds creates an unbalanced facial expression βœ— Skipping stitch markers when working in rounds often leads to miscounted stitches and uneven shapes βœ— Rushing through the embroidery details without proper planning can create messy or crooked facial features

Adorable Kitten Amigurumi Pattern

Create your own sweet and cuddly kitten companion with this charming amigurumi pattern! This delightful project features a perfectly proportioned feline friend with embroidered facial details, cute little ears, and a curved tail that brings personality to life. Perfect for cat lovers and crochet enthusiasts alike, this pattern includes detailed instructions for creating an adorable kitten that makes a wonderful gift or personal keepsake.

Beginner Friendly 4-6 Hours

Materials Needed for Adorable Kitten Amigurumi Pattern

β€” Main Fabric

  • 01
    80g cotton yarn or 3-ply yarn in colors of your choice
  • 02
    Fine cotton or acrylic yarn suitable for amigurumi work

β€” Tools Required

  • 01
    Crochet hook (size appropriate for yarn weight)
  • 02
    Safety eyes size 6
  • 03
    Yarn needle
  • 04
    Scissors
  • 05
    Stitch markers
  • 06
    Polyester fiberfill stuffing

Progress Tracker

0% Complete

β€” Head :

Round 1 :

6 sc in magic ring (6)

Round 2 :

6 inc (12)

Round 3 :

(1 sc, inc) x 6 (18)

Round 4 :

(2 sc, inc) x 6 (24)

Round 5 :

(3 sc, inc) x 6 (30)

Round 6 :

(4 sc, inc) x 6 (36)

Round 7 :

(5 sc, inc) x 6 (42)

Round 8-14 :

sc in each st (42)

Round 15 :

(5 sc, dec) x 6 (36)

Round 16 :

(4 sc, dec) x 6 (30)

Info :

Place eyes, embroider details and stuff

Round 17 :

(3 sc, dec) x 6 (24)

Round 18 :

(2 sc, dec) x 6 (18)

Round 19 :

(1 sc, dec) x 6 (12)

Round 20 :

6 dec (6)

β€” Ears (make 2) :

Round 1 :

6 sc in magic ring (6)

Round 2 :

sc in each st (6)

Round 3 :

6 inc (12)

Round 4 :

sc in each st (12)

β€” Body :

Round 1 :

6 sc in magic ring (6)

Round 2 :

6 inc (12)

Round 3 :

(1 sc, inc) x 6 (18)

Round 4 :

(2 sc, inc) x 6 (24)

Round 5 :

(3 sc, inc) x 6 (30)

Round 6 :

(4 sc, inc) x 6 (36)

Round 7-12 :

sc in each st (36)

Round 13 :

(4 sc, dec) x 6 (30)

Round 14 :

(3 sc, dec) x 6 (24)

β€” Front Paws (make 2) :

Round 1 :

5 sc in magic ring (5)

Round 2 :

5 inc (10)

Round 3-8 :

sc in each st (10)

β€” Back Paws (make 2) :

Round 1 :

5 sc in magic ring (5)

Round 2 :

5 inc (10)

Round 3-4 :

sc in each st (10)

β€” Tail :

Step 1 :

Make 12 chains

Step 2 :

Skip last 2 chains, work 3 hdc in next chain, 3 hdc in following chain

Step 3 :

Work 6 hdc in remaining chains, then 3 hdc in each of the last 2 chains

Assembly Instructions

  • Sew the head securely to the body, ensuring proper alignment and proportion
  • Attach ears to the top of the head, positioning them symmetrically for a balanced look
  • Sew front paws to the sides of the body at an appropriate height for sitting position
  • Attach back paws to the bottom of the body, ensuring the kitten can sit stably
  • Sew the tail to the back of the body, positioning it for a natural curved appearance
  • Embroider the nose and mouth details using the step-by-step photo guide provided

Important Notes

  • πŸ’‘Use stitch markers consistently to maintain accurate stitch counts throughout the project
  • πŸ’‘Stuff all pieces firmly but not too tightly to maintain the proper shape and proportions
  • πŸ’‘Place safety eyes between rounds 16-17 before completing the decreases for best positioning
  • πŸ’‘Take time with the embroidery details as they truly bring the kitten's personality to life

This charming kitten amigurumi pattern combines beginner-friendly techniques with adorable results that will melt anyone's heart! The sweet proportions and embroidered facial features create a personality-filled companion that's perfect for gift-giving or keeping as your own crafting buddy. With clear instructions and helpful assembly tips, you'll fall in love with creating these precious feline friends. 🐱 Happy crocheting! 🧢✨

You ask,

we answer.

FAQs

What yarn weight works best for this kitten pattern?

This pattern works best with worsted weight (4) cotton or acrylic yarn, though you can use sport weight for a smaller kitten or bulky weight for a larger version.

Can I make this pattern without safety eyes?

Absolutely! You can embroider the eyes instead using black yarn or thread for a completely child-safe version suitable for babies and toddlers.

How do I get the embroidered nose to look neat?

Follow the step-by-step photo guide in the pattern. The key is to wrap the thread multiple times to create dimension, then add the vertical line for the classic kitten nose shape.

What size will the finished kitten be?

Using worsted weight yarn, the finished kitten will be approximately 4-5 inches tall when sitting, making it perfect for desk display or as a small gift.