๐Ÿงถ Beautiful โœจ Detailed ๐Ÿ’ Adorable

Sterling the Star Amigurumi Pattern

Sterling the Star Amigurumi Pattern
4.6โ˜… Rating
4-6 Hours Time Needed
2.4K Made This
โœ‚๏ธ

Intermediate Level

Ideal for those with basic knitting experience, featuring slightly more advanced stitches and techniques to expand your skills.

โฑ๏ธ

Weekend Treat

Takes 5-7 hours, making it an enjoyable project to finish over a couple of days.

๐Ÿงธ

Cute Companion

An adorable friend to cherish, handcrafted with love to bring comfort and joy for years to come.

About This Sterling the Star Amigurumi Pattern

Sterling the Star is a delightful amigurumi pattern that creates a charming 10-inch star-shaped friend. This pattern features five perfectly shaped points that come together to form an adorable star with a sweet face and cuddly personality. The design uses continuous spiral construction with back loop only stitches for a beautiful textured finish. Perfect for beginners ready to try something new or intermediate crocheters looking for a quick and satisfying project.

Sterling the Star Amigurumi Pattern crochet pattern - detailed view of completed project

This pattern includes detailed instructions for both front and back construction, plus a comprehensive tutorial for creating felt eyes if you prefer them over safety eyes. The finished star makes a wonderful nursery decoration, comfort toy, or thoughtful handmade gift.

Why You'll Love This Sterling the Star Amigurumi Pattern

I absolutely love this pattern because it combines simplicity with charm in the most delightful way. The star shape is instantly recognizable and universally loved, making it perfect for crafters of all skill levels. I find the construction method fascinating - starting with individual points and then joining them creates such a satisfying building process. The finished result is incredibly huggable and has that perfect kawaii appeal that makes everyone smile when they see it.

Sterling the Star Amigurumi Pattern step 1 - construction progress Sterling the Star Amigurumi Pattern step 2 - assembly progress Sterling the Star Amigurumi Pattern step 3 - details and accessories Sterling the Star Amigurumi Pattern step 4 - final assembly and finishing

Switch Things Up

I love how versatile this star pattern can be with just a few creative tweaks! You could easily turn Sterling into a magical Christmas decoration by using sparkly metallic yarn or adding some sequins for extra shine. I've also experimented with making mini versions using sport weight yarn - they make perfect keychains or gift toppers.

For a completely different look, try using variegated yarn to create a rainbow star effect, or go bold with neon colors for a modern twist. I sometimes add small bells inside during stuffing to create a gentle rattle sound that babies love. You could even create a whole constellation by making multiple stars in different sizes and colors!

The felt eye tutorial opens up so many possibilities too - try using colored felt for different expressions or even add eyelashes for a more feminine look. I've seen crafters use this same construction method to create other shapes like flowers by adjusting the point count. The techniques you learn here will definitely inspire your next amigurumi adventure!

Common Mistakes & How to Fix Them

โœ— Forgetting to use stitch markers when working in continuous spirals can cause stitch count confusion โœ— Not stuffing the points firmly enough before continuing can result in floppy or misshapen star points โœ— Joining points too tightly during assembly can create puckering and distort the star's overall shape โœ— Working through both loops instead of back loops only will change the texture and appearance significantly

Sterling the Star Amigurumi Pattern

Create your own adorable Sterling the Star with this charming amigurumi pattern! This delightful 10-inch point-to-point star features a sweet butterscotch color and expressive black eyes that will bring joy to any room. Perfect for gifting or adding a touch of handmade magic to your home decor, this cuddly star combines simple crochet techniques with detailed instructions to help you craft a memorable keepsake that will be treasured for years to come.

Intermediate 4-6 Hours

Materials Needed for Sterling the Star Amigurumi Pattern

โ€” Main Fabric

  • 01
    Worsted weight yarn in butterscotch color (120 yards)
  • 02
    Loops and Thread Impeccable Solids in Butterscotch recommended

โ€” Tools Required

  • 01
    G (4.00mm) crochet hook or size needed for firm fabric
  • 02
    Tapestry needle
  • 03
    Stitch marker
  • 04
    Stuffing
  • 05
    15mm black safety eyes OR black felt for felt eyes
  • 06
    Black embroidery floss or sewing thread (for felt eyes)
  • 07
    White Size 3 cotton crochet thread (for felt eye highlights)
  • 08
    2 different sized sewing needles (for felt eyes)
  • 09
    Straight pins with white heads (for felt eyes)
  • 10
    Small sharp scissors (for felt eyes)

Progress Tracker

0% Complete

โ€” Points (Make 5) :

Round 1 :

SC 4 in Magic Ring (4)

Round 2 :

(SC 2 in next st) 4 times (8)

Round 3 :

SC in each st around

Round 4 :

(SC 2 in next st, SC in next st) 4 times (12)

Round 5 :

SC in each st around

Round 6 :

(SC 2 in next st, SC in next 2 sts) 4 times (16)

Round 7 :

SC in each st around

Round 8 :

(SC 2 in next st, SC in next 3 sts) 4 times (20)

Round 9 :

SC in each st around

Round 10 :

(SC 2 in next st, SC in next 4 sts) 4 times (24)

Round 11 :

SC in each st around

Round 12 :

(SC 2 in next st, SC in next 5 sts) 4 times (28)

Round 13 :

SC in each st around

Round 14 :

(SC 2 in next st, SC in next 6 sts) 4 times (32)

Round 15 :

SC in each st around

Round 16 :

(SC 2 in next st, SC in next 7 sts) 4 times (36)

Info :

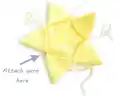
Fasten off with long tail. Do not fasten off the fifth point; continue to work for the body

โ€” Front :

Round 1 :

(SC2tog, SC in next 7 sts) 2 times; to join next point, (SC2tog in next point, SC in next 7 sts, SC2tog, SC in next 7 sts). Repeat for each point (80)

Info :

To join in a round, SC2tog the first 2 sts of round 1, this is the first SC2tog of round 2

Round 2 :

(SC2tog, SC in next 6 sts) 10 times (70)

Round 3 :

(SC2tog, SC in next 12 sts) 5 times (65)

Round 4 :

(SC2tog, SC in next 11 sts) 5 times (60)

Round 5 :

(SC2tog, SC in next 10 sts) 5 times (55)

Round 6 :

(SC2tog, SC in next 9 sts) 5 times (50)

Round 7 :

(SC2tog, SC in next 3 sts) 10 times (40)

Round 8 :

(SC2tog, SC in next 2 sts) 10 times (30)

Round 9 :

(SC2tog, SC in next st) 10 times (20)

Round 10 :

(SC2tog) 10 times (10)

Round 11 :

(SC2tog) 5 times (5)

Info :

Fasten off

โ€” Back :

Info :

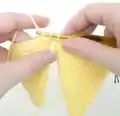
To join the yarn, locate the junction of the points where there is no yarn tail and attach the yarn to the first stitch of the point to the left

Info :

Follow the instructions as for the Front

Info :

After round 8, stop and sew up the holes created by where the points are connected

Info :

If using safety eyes, attach them now the front of the star at round 7. Felt eyes will be attached after the star is finished

Info :

Stuff the star, beginning with the points. For best results, start with a little bit of stuffing in each point and slowly fill up each point. Once all of the points are stuffed, begin stuff the body

Info :

Continue working, stopping and adding a little more stuffing every few rounds until the end

Info :

Fasten off

Assembly Instructions

  • Stuff each of the five points firmly but not too tightly, starting with small amounts of stuffing
  • Join the points using SC2tog method as described in the front section instructions
  • Sew up any holes created where the points connect to the body after round 8
  • If using safety eyes, attach them to the front at round 7 before completing the back
  • Continue stuffing the body gradually as you work the decreasing rounds
  • For felt eyes, complete the star first then follow the detailed felt eye tutorial provided

Important Notes

  • ๐Ÿ’กAll pieces are worked through back loops only for the distinctive textured appearance
  • ๐Ÿ’กUse a stitch marker to track the beginning of each round since this pattern uses continuous spiral construction
  • ๐Ÿ’กDon't fasten off the fifth point as it becomes the starting point for the front body construction
  • ๐Ÿ’กStuff gradually and check firmness frequently to achieve the best star shape
  • ๐Ÿ’กSafety eyes must be attached before completing the back, while felt eyes are added after finishing

This charming Sterling the Star pattern brings together the joy of amigurumi with the timeless appeal of a cuddly star friend. The unique construction method of creating individual points and joining them creates a satisfying building experience that results in a perfectly huggable companion. Whether you choose safety eyes or try your hand at the detailed felt eye tutorial, Sterling will shine bright in any collection. Happy crocheting and may your star bring as much joy to make as it will to hold!

You ask,

we answer.

FAQs

Can I use a different yarn weight for this pattern?

While the pattern calls for worsted weight yarn, you can experiment with different weights, but remember to adjust your hook size accordingly and expect size variations in the finished star.

What's the difference between safety eyes and felt eyes?

Safety eyes are plastic eyes with secure backs that are attached before stuffing and are safer for children. Felt eyes are sewn on after completion and give a softer, more vintage look but aren't recommended for very young children.

Why do I work through back loops only?

Working through back loops only creates the distinctive ribbed texture that gives Sterling his charming appearance and helps the star points hold their shape better.

Can I make Sterling in different colors?

Absolutely! While the pattern shows butterscotch yellow, Sterling would be adorable in any color. Consider pastels for nurseries or bright colors for playful gifts.

How firm should I stuff the star?

Stuff firmly enough that the star holds its shape but not so tight that it becomes hard. The points should feel full but still be soft and squeezable.