🧢 Beautiful ✨ Detailed πŸ’ Adorable

Adorable Smurf Amigurumi Pattern

Adorable Smurf Amigurumi Pattern
4.7β˜… Rating
2-3 Hours Time Needed
1.1K Made This
βœ‚οΈ

Beginner Friendly Level

Perfect for those just starting their sewing journey, with clear instructions and simple techniques

⏱️

Bite-Sized Project

Complete in under 2 hoursβ€”quick, fun, and perfect for a little creative escape.

🧸

Cute Companion

An adorable friend to cherish, handcrafted with love to bring comfort and joy for years to come.

About This Adorable Smurf Amigurumi Pattern

This delightful Smurf amigurumi pattern brings the beloved blue character from the classic cartoon series right into your hands. Standing at approximately 10cm tall, this charming figure features the iconic white hat, expressive plastic eyes, and that unmistakable Smurf blue color. The pattern uses basic crochet stitches and techniques, making it accessible for beginners while still being enjoyable for more experienced crocheters.

Adorable Smurf Amigurumi Pattern crochet pattern - detailed view of completed project

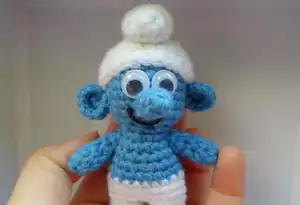
Perfect for fans of the Smurfs or anyone looking to create a nostalgic handmade gift. This compact size makes it ideal for display, gifting, or as a companion for children.

Why You'll Love This Adorable Smurf Amigurumi Pattern

I absolutely love how this pattern captures the essence of childhood nostalgia while being perfectly achievable for beginners. The joy of watching Papa Smurf, Smurfette, or any of the beloved characters come to life in your hands is truly magical. The compact size makes it a quick and satisfying project that you can complete in one sitting, and the result is so charming that you'll want to make an entire Smurf village!

Adorable Smurf Amigurumi Pattern step 1 - construction progress Adorable Smurf Amigurumi Pattern step 2 - assembly progress Adorable Smurf Amigurumi Pattern step 3 - details and accessories Adorable Smurf Amigurumi Pattern step 4 - final assembly and finishing

Switch Things Up

I love how this classic Smurf pattern opens up so many creative possibilities! While the traditional blue and white combination is iconic, I find myself imagining a whole rainbow village of Smurfs in different color schemes. You could create a spring Smurf in pastels, a autumn version in warm oranges and browns, or even a festive holiday Smurf in red and green.

I often suggest to fellow crocheters to experiment with different yarn textures too - imagine how cozy this little guy would look in a soft alpaca blend, or how fun he'd be in a sparkly yarn for special occasions. The beauty of amigurumi is that once you master the basic shape, the world becomes your creative playground.

I also think about scaling - make a tiny keychain version with thread and a steel hook, or go big with chunky yarn for a huggable companion. Each size brings its own charm and purpose to your crafting repertoire.

Common Mistakes & How to Fix Them

βœ— Forgetting to stuff the head and body firmly before closing, resulting in a floppy Smurf βœ— Not maintaining consistent tension throughout, causing uneven stitches and shape distortion βœ— Placing the eyes too high or too low, affecting the characteristic Smurf expression βœ— Overstuffing the hat top, making it look bulky instead of naturally droopy

Adorable Smurf Amigurumi Pattern

Bring the beloved blue character to life with this charming Smurf amigurumi pattern! Perfect for fans of the classic cartoon, this delightful project creates a 10cm tall Smurf complete with his iconic white hat and adorable features. Using simple stitches and basic techniques, you'll craft a nostalgic companion that captures all the magic of the Smurf village. The pattern includes detailed instructions for the body, arms, legs, ears, nose, and hat, making it an enjoyable project for crocheters looking to create something truly special.

Beginner Friendly 2-3 Hours

Materials Needed for Adorable Smurf Amigurumi Pattern

β€” Main Fabric

  • 01
    Wool acrylic 100% in Light Blue and White colors
  • 02
    Any worsted weight acrylic yarn in blue and white will work perfectly

β€” Tools Required

  • 01
    2mm crochet hook
  • 02
    Tapestry needle
  • 03
    Stuffing
  • 04
    Plastic eyes
  • 05
    Scissors
  • 06
    Stitch markers (optional but helpful)

Progress Tracker

0% Complete

β€” Head and Body :

Round 1 :

With Light Blue yarn 10sc in magic ring

Round 2 :

2sc in each st [20sts]

Round 3-9 :

1sc in each st [20sts]

Round 10 :

(2sctog) rep to end [10sts]

Round 11 :

1sc in each st [10sts]

Round 12 :

(1sc, 2sc in next st) rep to end [15sts]

Round 13-14 :

1sc in each st [15sts]

Round 15 :

(2sc, 2sc in next st) rep to end [20sts]

Round 16 :

1sc in each st [20sts]

Info :

Join White yarn

Round 17-19 :

1sc in each st [20sts]

Info :

Stuff the body

Info :

Count 10 stitches and join with a chain the last point made with 10th stitch

Round 20 :

3sc, 2sctog, 3sc, 2sctog + chain initially made [9sts]

Round 21 :

2sctog working in the chain and in the first sc [8sts]

Round 22 :

1sc in each st [8sts]

Round 23 :

2hdc in next st, 1dc and 1tr in next st, 2tr in next st, 1tr and 1dc in next st, 2hdc in next st, 1sc in next 3st [13st]

Round 24 :

1sc in each st [13sts]

Round 25 :

work sl st for all the way around in back loop [13sts]

Info :

Fill with stuffing, sew the two ends and cut the thread. Work the other leg and foot in the same way.

β€” Arms :

Round 1 :

With Light Blue yarn 6sc in magic ring

Round 2 :

1sc in each st [6sts]

Round 3 :

(1sc, 2sctog) rep to end [4sts]

Round 4-6 :

1sc in each st [4sts]

Info :

Fill with stuffing, cut the thread, sew them to the body

β€” Ears :

Round 1 :

With Light Blue yarn 5sc in magic ring

Round 2 :

2sc in each st [10sts]

Info :

Cut the thread, sew them to the body

β€” Nose :

Round 1 :

With Light Blue yarn 6sc in magic ring

Round 2 :

(1sc, 2sctog) rep to end [4sts]

Round 3 :

1sc in each st [4sts]

Info :

Fill with stuffing, cut the thread, sew it to the center of the head

β€” Hat :

Round 1 :

With White yarn 10sc in magic ring

Round 2-9 :

1sc in each st [10sts]

Round 10 :

2sc in each st [20sts]

Round 11 :

(1sc in next 3st, 2sc in next st) rep to end [25sts]

Round 12-14 :

1sc in each st [25sts]

Info :

Fill the top with a bit of stuffing and sew it on the head, glue the eyes

Assembly Instructions

  • Stuff the head and body firmly before closing each section
  • Sew the arms to the sides of the body at shoulder height
  • Attach the ears to the sides of the head, slightly angled outward
  • Sew the nose to the center of the face, between where the eyes will be placed
  • Glue or sew the plastic eyes onto the face at appropriate height
  • Fill the hat top lightly with stuffing and sew it securely to the head

Important Notes

  • πŸ’‘Maintain consistent tension throughout to ensure even shape and size
  • πŸ’‘Stuff firmly but not too tightly to maintain the proper proportions
  • πŸ’‘Use safety eyes if making this for young children instead of plastic eyes
  • πŸ’‘The finished Smurf should be approximately 10cm tall when complete
  • πŸ’‘Work in continuous rounds unless otherwise specified

This adorable Smurf amigurumi pattern brings childhood nostalgia right into your hands! Perfect for beginners and experienced crocheters alike, this charming 10cm tall figure captures all the magic of the beloved blue characters. With simple stitches and clear instructions, you'll create a delightful companion that's sure to bring smiles. Whether as a gift or for your own collection, this Smurf will add a touch of whimsy to any space. 🧢 Happy crocheting! 🧡✨

You ask,

we answer.

FAQs

What size hook should I use for this Smurf pattern?

The pattern calls for a 2mm hook, which helps create tight, even stitches that prevent stuffing from showing through.

Can I use different colors for my Smurf?

While the classic Smurf is blue and white, you can certainly experiment with colors! Just make sure to use the same weight yarn throughout.

How do I attach the plastic eyes securely?

Plastic eyes typically have a washer back. Place them between rounds as indicated, then secure with the washer from inside before stuffing.

My Smurf seems smaller than 10cm, what went wrong?

This could be due to tight tension or using a smaller hook. Check your gauge and try loosening your tension slightly.

Can I make this pattern larger?

Yes! Use a larger hook and thicker yarn, but you'll need to adjust the number of stitches proportionally for a larger size.