🧶 Beautiful ✨ Detailed 💝 Adorable

Little Prince Amigurumi Pattern

Little Prince Amigurumi Pattern
4.2★ Rating
12-15 Hours Time Needed
1.5K Made This
✂️

Advanced Level

Designed for experienced knitters, these patterns involve intricate designs and complex techniques to challenge and inspire.

⏱️

Slow & Steady

A 10-12 hour project—great for savoring the process over several sessions.

🧸

Cute Companion

An adorable friend to cherish, handcrafted with love to bring comfort and joy for years to come.

About This Little Prince Amigurumi Pattern

This Little Prince amigurumi pattern is a tribute to one of the most beloved stories in literature. The set includes three main pieces: the Little Prince himself with his distinctive outfit and accessories, his faithful fox friend, and the mysterious planet they call home. Each character is crafted with attention to detail, from the prince's curly hair and aviator goggles to the fox's expressive ears and striped tail. The pattern combines multiple techniques including color changes, specialized stitches like the Double Treble Crochet for the prince's textured hair, and intricate assembly work.

Little Prince Amigurumi Pattern crochet pattern - detailed view of completed project

What makes this pattern special is the storytelling element woven into every stitch. The rose with its wire stem represents the prince's beloved flower, while the planet's rings create a three-dimensional effect that brings the cosmic setting to life.

Why You'll Love This Little Prince Amigurumi Pattern

I absolutely love how this pattern captures the whimsy and depth of Saint-Exupéry's masterpiece. There's something magical about watching these beloved characters come to life under your hook, and I find myself smiling every time I see the little prince's sweet expression or the fox's playful stance. The variety of techniques keeps the project engaging, and the detailed instructions make even the most complex parts achievable. Plus, you'll end up with a beautiful display piece that's perfect for both children and adults who cherish this timeless story.

Little Prince Amigurumi Pattern step 1 - construction progress Little Prince Amigurumi Pattern step 2 - assembly progress Little Prince Amigurumi Pattern step 3 - details and accessories Little Prince Amigurumi Pattern step 4 - final assembly and finishing

Switch Things Up

I love how this pattern allows for so much creative personalization while staying true to the classic story. You could easily experiment with different color combinations for the prince's outfit - maybe a deep blue cape instead of forest green, or swap the orange scarf for a rich burgundy. I've seen makers add their own touches like tiny crocheted stars to scatter around the planet, or even create additional accessories like a small telescope or watering can.

The fox offers wonderful opportunities for variation too - you could adjust the size to make a smaller companion, or play with the tail stripes using different color patterns. Some crafters I know have added small details like embroidered whiskers or a tiny smile to give their fox more personality.

What really excites me about this pattern is how it opens the door to creating an entire Little Prince universe. Once you've mastered these techniques, you could design other characters from the story or even create multiple planets with different textures and ring configurations. The possibilities are endless when you let your imagination soar!

Common Mistakes & How to Fix Them

✗ Forgetting to stuff the head firmly before closing can result in a floppy appearance ✗ Not maintaining consistent tension when working the Double Treble Crochet hair can create uneven texture ✗ Skipping stitch markers during color changes often leads to misaligned pattern sections ✗ Rushing the assembly process without proper pinning can cause misaligned facial features and proportions

Little Prince Amigurumi Pattern

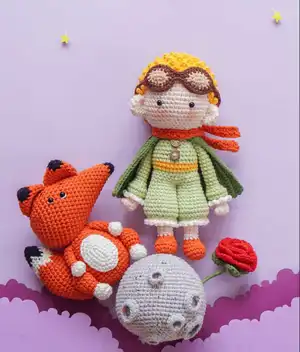
Create your own magical Little Prince character set complete with the beloved prince, his adorable fox companion, and their mysterious planet! This enchanting amigurumi pattern brings Antoine de Saint-Exupéry's timeless story to life through the art of crochet. Perfect for literature lovers and crochet enthusiasts alike, this detailed pattern includes everything you need to craft these whimsical characters. Each piece captures the essence of the classic tale, from the prince's signature scarf and aviator goggles to the fox's expressive features and the textured planet with its distinctive rings.

Advanced 12-15 Hours

Materials Needed for Little Prince Amigurumi Pattern

— Main Fabric

  • 01
    YarnArt Jeans in multiple colors: light green (11), white (01), orange (85), light beige (73), yellow (35), light camel (07), brown (70), forest green (69), black (53), red (90)
  • 02
    Alize Cotton Gold Tweed in tweed grey (533) for the planet
  • 03
    All yarns are worsted weight cotton or cotton blend for durability and shape retention

— Tools Required

  • 01
    Crochet hook size 2.5mm
  • 02
    2 pairs of 6mm safety black eyes
  • 03
    2 wooden 9mm buttons
  • 04
    Tapestry needles
  • 05
    Black thread for embroidery
  • 06
    Pins for assembly
  • 07
    Stitch markers
  • 08
    Scissors
  • 09
    Polyester fiberfill stuffing
  • 10
    Wire for rose stem

Progress Tracker

0% Complete

— Prince's Hair (yarn E) :

Round 1 :

sc 6 into a magic loop (6)

Round 2 :

(sc 1, Double Tr) 6x (12)

Round 3 :

inc 12 (24)

Round 4 :

[sc 1, Double Tr] 12x (24)

Round 5 :

[sc 1, inc] 12x (36)

Round 6 :

[sc 1, Double Tr] 18x (36)

Round 7 :

[sc 2, inc] 12x (48)

Round 8 :

[sc 1, Double Tr] 24x (48)

Round 9 :

sc 48 (48)

Round 10 :

[Double Tr, sc 1] 24x (48)

Round 11 :

sc 48 (48)

Round 12-15 :

Repeat rnd 8-11 (4 rnds) (48)

Round 16-18 :

Repeat rnd 8-10 (3 rnds) (48)

— Prince's Head (yarn D) :

Round 1 :

sc 6 into a magic loop (6)

Round 2 :

inc 6 (12)

Round 3 :

[sc 1, inc] 6x (18)

Round 4 :

sc 1, inc, [sc 2, inc] 5x, sc 1 (24)

Round 5 :

[sc 3, inc] 6x (30)

Round 6 :

sc 2, inc, [sc 4, inc] 5x, sc 2 (36)

Round 7 :

[sc 5, inc] 6x (42)

Round 8 :

sc 3, inc, [sc 6, inc] 5x, sc 3 (48)

Round 9 :

[sc 7, inc] 6x (54)

Round 10-21 :

sc 54 (12 rnds), insert eyes between rnd 17&18 (54)

Round 22 :

[sc 7, dec] 6x (48)

Round 23 :

[sc 6, dec] 6x (42)

Round 24 :

[sc 5, dec] 6x (36)

Round 25 :

[sc 4, dec] 6x (30)

Round 26 :

[sc 3, dec] 6x, stuff firmly (24)

Round 27 :

[sc 2, dec] 6x (18)

— Prince's Arms (yarn D, X2) :

Round 1 :

sc 6 in a magic loop (6)

Round 2 :

[sc 1, inc] 3x (9)

Round 3 :

sc 4, Bobble, sc 4 (9)

Round 4-5 :

sc 9 (2 rnds), change to yarn A (9)

Round 6 :

(blo) inc 9 (18)

Round 7-8 :

sc 18 (2 rnds) (18)

Round 9 :

dec 9 (9)

Round 10-23 :

sc 9 (14 rnds) (9)

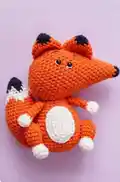
— Fox's Head (yarn I) :

Round 1 :

sc 4 into a magic loop (4)

Round 2 :

sc 1, inc 2, sc 1 (6)

Round 3 :

sc 2, inc 2, sc 2, change to yarn C (8)

Round 4 :

sc 3, inc 2, sc 3 (10)

Round 5-20 :

Continue increasing pattern until 42 sts, then work even rounds (42)

Round 21-26 :

sc 42, insert eyes between specified rounds (42)

Round 27-32 :

Decrease to close, stuff firmly (6)

— Planet (yarn J) :

Round 1-9 :

Follow Prince's Head pattern rounds 1-9 (54)

Round 10 :

sc 4, inc, [sc 8, inc] 5x, sc 4 (60)

Round 11 :

[sc 9, inc] 6x (66)

Round 12-24 :

sc 66 (13 rnds) (66)

Round 25-34 :

Decrease rounds to close, stuff firmly (6)

— Rose (yarn K) :

Round 1 :

ch 28, start on the 4th st from the hook, (dc 2), ch 1, skip 1 st, *(dc 3), ch 1, skip 1 st*, repeat till end (52)

Round 2 :

*ch 2, dc 1, (dc 2), dc 1, ch 2, sc 1*, repeat till end (117)

Assembly Instructions

  • Sew the curly hair securely to the head, ensuring the Double Treble stitches face forward for proper texture
  • Attach the head to the body using the opening created during construction, stuffing firmly before final closure
  • Position and sew arms to the body between rounds 24-25, adding slight stuffing for shape
  • Attach aviator goggles to the head, positioning them just above the eyes for authentic look
  • Secure the scarf around the neck and drape the cape over the shoulders, tacking in place
  • Assemble the fox by attaching head to body, then adding arms, legs, belly, and tail in sequence
  • Create the rose by folding the crocheted strip and sewing the bottom together, then attach to wire stem wrapped with green yarn

Important Notes

  • 💡Use stitch markers consistently when working color changes and complex stitch patterns
  • 💡Maintain firm but not overly tight stuffing to preserve the characters' shapes
  • 💡Pin all pieces in position before final sewing to ensure proper proportions and alignment
  • 💡Take extra care with the Double Treble Crochet stitches in the hair - push them forward as you work
  • 💡The planet rings should be sewn in overlapping positions as shown in the diagram for realistic effect
  • 💡When working with multiple colors, weave in ends securely to prevent unraveling during play

This enchanting Little Prince amigurumi set brings the magic of Saint-Exupéry's beloved tale into your hands. With intricate details like the prince's textured hair, aviator goggles, and flowing scarf, plus his adorable fox companion and mysterious planet, this pattern creates a complete storytelling collection. The advanced techniques used throughout, including specialized stitches and multi-piece assembly, result in characters that truly capture the essence of this timeless story. Perfect for display or gentle play, these handcrafted pieces will be treasured for years to come. 🌟✨

You ask,

we answer.

FAQs

What makes the Double Treble Crochet in the hair so special?

The Double Treble Crochet creates the textured, curly appearance of the Little Prince's hair. You yarn over 3 times (4 loops on hook) and use your finger to push each stitch forward as you work for the proper dimensional effect.

Can I make this pattern without the advanced stitches?

While you could substitute regular single crochet for the hair, the Double Treble Crochet is what gives this pattern its distinctive look. The instructions include detailed guidance to help you master this technique.

How do I get the planet rings to look three-dimensional?

Create rings in three different sizes (S, M, L) and sew them overlapping around the planet as shown in the assembly photos. This creates the illusion of depth and movement.

What's the best way to attach the wire stem to the rose?

After crocheting the rose and folding it into shape, wrap the remaining green yarn around the wire stem, then use a tapestry needle to hide the end securely within the wrapped stem.

How long does this complete set take to make?

The full set typically takes 12-15 hours, with the Little Prince being the most time-intensive piece due to his detailed clothing and accessories. The fox and planet are quicker to complete.