🧢 Beautiful ✨ Detailed πŸ’ Adorable

Mini Mouse Amigurumi Pattern

Mini Mouse Amigurumi Pattern
3.9β˜… Rating
2-3 Hours Time Needed
1.7K Made This
βœ‚οΈ

Beginner Friendly Level

Perfect for those just starting their sewing journey, with clear instructions and simple techniques

⏱️

Bite-Sized Project

Complete in under 2 hoursβ€”quick, fun, and perfect for a little creative escape.

🧸

Tiny Treasure

Small, sweet, and gift-worthy creations that fit perfectly in the palm of your hand with detailed charm.

About This Mini Mouse Amigurumi Pattern

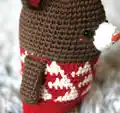
This mini mouse pattern is perfect for crochet enthusiasts who love creating small, detailed projects. The pattern combines basic amigurumi techniques with fun color changes to create a charming character. With its geometric red and white body design and adorable orange ears, this little mouse has so much personality packed into its tiny frame. The pattern teaches essential skills like working in the round, color changes, and basic shaping.

Mini Mouse Amigurumi Pattern crochet pattern - detailed view of completed project

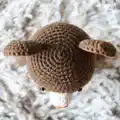
The mouse features a continuous work design where the head, body, and legs are crocheted as one piece, making assembly much easier. The only separate pieces are the arms, ears, and snout, which are sewn on at the end.

Why You'll Love This Mini Mouse Amigurumi Pattern

I absolutely love this pattern because it's the perfect introduction to color work without being overwhelming. The geometric pattern on the body is so satisfying to create, and watching that little mouse come to life round by round is pure magic. Plus, the finished size makes it perfect for using up yarn scraps, and you can customize the colors to create a whole family of tiny mice!

Mini Mouse Amigurumi Pattern step 1 - construction progress Mini Mouse Amigurumi Pattern step 2 - assembly progress Mini Mouse Amigurumi Pattern step 3 - details and accessories Mini Mouse Amigurumi Pattern step 4 - final assembly and finishing

Switch Things Up

I love how versatile this little mouse pattern can be! You can easily switch up the body pattern by creating stripes instead of the geometric design, or make a solid-colored mouse for a cleaner look. Try using variegated yarn for a completely different effect, or add a tiny scarf or bow for extra charm.

For a seasonal twist, I've made these in Halloween colors with orange and black, or Christmas colors with red and green. You could even create a whole family of mice in different sizes by adjusting your hook size. The possibilities are endless, and each variation brings its own personality to this sweet little character!

Common Mistakes & How to Fix Them

βœ— Forgetting to change colors at the right rounds - always check the symbol pattern guide βœ— Not stuffing firmly enough - the mouse needs good structure to maintain its shape
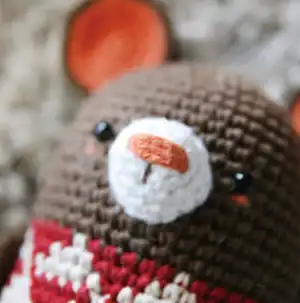
 βœ— Placing eyes too far apart - they should be 4 stitches apart between rounds 13-14 βœ— Rushing the color changes - take time to weave in ends properly as you go

Mini Mouse Amigurumi Pattern

Create this adorable mini mouse companion that fits perfectly in your hand! This charming pattern features a sweet brown mouse with geometric red and white details, complete with orange ears and tiny yellow feet. Perfect for beginners who want to practice color changes and basic amigurumi techniques. The finished mouse measures about 6 inches tall and makes a wonderful gift, keychain, or desk companion.

Beginner Friendly 2-3 Hours

Materials Needed for Mini Mouse Amigurumi Pattern

β€” Main Fabric

  • 01
    Worsted weight yarn in beige, yellow, white, brown, orange, and red colors
  • 02
    Cotton or acrylic yarn recommended for durability and color definition

β€” Tools Required

  • 01
    Crochet hook 5/0 (3mm)
  • 02
    5mm black plastic safety eyes (2 pieces)
  • 03
    Yarn needle
  • 04
    Scissors
  • 05
    Stitch markers
  • 06
    Fiberfill stuffing
  • 07
    Glue for eyes

Progress Tracker

0% Complete

β€” Head / Body / Legs :

Round 1 :

6 sc in magic ring [6 sts]

Round 2 :

(2-sc inc) x 6 [12]

Round 3 :

(sc x1, 2-sc inc) x 6 [18]

Round 4 :

(sc x2, 2-sc inc) x 6 [24]

Round 5 :

(sc x3, 2-sc inc) x 6 [30]

Round 6 :

(sc x4, 2-sc inc) x 6 [36]

Round 7 :

(sc x5, 2-sc inc) x 6 [42]

Round 8 :

(sc x6, 2-sc inc) x 6 [48]

Round 9-36 :

sc in all 48 st [48] (Change colors according to symbol pattern)

Info :

Divide legs: identify center space between legs by 6 stitches, each leg 18 stitches

Round 37-40 :

sc in all 18 st [18] (First leg - left leg)

Round 41 :

(sc x1, sc2tog) x 6 [12]

Round 42 :

(sc2tog) x 6 [6]

Info :

Fasten off, stuff leg, close opening. Rejoin yarn for second leg (right leg) and repeat rounds 37-42

β€” Arms :

Round 1 :

5 sc in magic ring [5 sts]

Round 2 :

(2-sc inc) x 5 [10]

Round 3-11 :

sc in all 10 st [10]

Info :

Fasten off, flatten arm, do not stuff. Make 2 arms total.

β€” Snout :

Foundation :

Make 4 chains with white yarn

Round 1 :

sc x1 in second ch from hook, sc x1 in next chain, sc x3 in bottom chain, working up other side - sc x1, sc x2 in next chain, slst [8 sts]

Round 2 :

ch 1, 2-sc inc, sc x1, (2-sc inc) x 3, sc x1, (2-sc inc) x 2, slst [14]

Round 3 :

ch 1, 2-sc inc, sc x3, 2-sc inc, sc x2, sc2tog, sc x1, sc2tog, sc x2, slst [14]

Round 4 :

ch 1, sc in all 14 st, slst [14]

β€” Ears :

Round 1 :

6 sc in magic ring with orange yarn [6 sts]

Round 2 :

(2-sc inc) x 6 [12]

Round 3 :

(sc x1, 2-sc inc) x 6 [18]

Round 4 :

(sc x2, 2-sc inc) x 6 [24]

Round 5 :

Edging: locate orange ear part on brown ear, sc together with brown yarn [24]

Info :

Make 2 orange ears and 2 brown ears. Orange stitches through back loop only, brown through both loops.

Assembly Instructions

  • Attach safety eyes between rounds 13-14, spacing them 4 stitches apart
  • Sew snout to face centered below the eyes, add nose and mouth embroidery
  • Attach arms between rounds 20-21 on sides of body
  • Position ears on top of head between rounds 14-15 with orange parts facing forward
  • Sew 6 stitches between legs to close the gap after completing both legs
  • Stuff head and body firmly before closing, stuff legs lightly

Important Notes

  • πŸ’‘Follow color change pattern according to symbol chart on page 1 for accurate design
  • πŸ’‘Use stitch markers to track round beginnings and leg divisions
  • πŸ’‘Change colors as indicated: brown for head, red/beige for body, red/yellow for legs
  • πŸ’‘Fasten off arms without stuffing to maintain proper flat shape
  • πŸ’‘Glue eyes securely if making for small children instead of using safety eyes

This charming Mini Mouse pattern brings joy in a small package! With its geometric red and white body pattern and sweet orange ears, this little companion is perfect for beginners wanting to practice color changes. The continuous construction makes it surprisingly quick to complete, and the finished mouse is absolutely adorable. 🧢 Happy crocheting! 🐭✨

You ask,

we answer.

FAQs

What size will my finished mouse be?

The finished mouse will be approximately 15cm (5.9 inches) tall when using worsted weight yarn with a 3mm hook, or smaller if using fingering weight yarn.

Can I use different colors than shown?

Absolutely! You can customize the colors to create your own unique mouse. Just follow the same color change pattern indicated in the symbol chart.

How do I change colors cleanly?

Change colors at the beginning of rounds as indicated in the pattern. Leave long tails to weave in securely, and follow the symbol pattern guide for exact placement.

Do I need to stuff the arms?

No, the arms should be flattened and not stuffed according to the pattern instructions to maintain the proper shape.

Can I make this mouse larger?

Yes! Use a thicker yarn weight and larger hook to create a bigger version, or stick with the same yarn but use a larger hook size.