๐Ÿงถ Beautiful โœจ Detailed ๐Ÿ’ Adorable

Snoopy Amigurumi Pattern

Snoopy Amigurumi Pattern
3.9โ˜… Rating
8-10 Hours Time Needed
1.1K Made This
โœ‚๏ธ

Intermediate Level

Ideal for those with basic knitting experience, featuring slightly more advanced stitches and techniques to expand your skills.

โฑ๏ธ

All-Day Adventure

Requires 8-10 hours, ideal for a full day of immersive knitting.

๐Ÿงธ

Cute Companion

An adorable friend to cherish, handcrafted with love to bring comfort and joy for years to come.

About This Snoopy Amigurumi Pattern

This delightful Snoopy pattern captures every beloved detail of Charles Schulz's iconic beagle character. From his distinctive elongated snout and floppy black ears to his classic sitting pose, this amigurumi brings the world's most famous dog to life in soft, huggable form. The pattern features intricate construction techniques including detailed facial embroidery and individually crocheted fingers that showcase advanced amigurumi skills.

Snoopy Amigurumi Pattern crochet pattern - detailed view of completed project

Standing proudly with his signature collar, this Snoopy makes the perfect companion for Peanuts fans of all ages. The carefully designed proportions ensure he's instantly recognizable while maintaining that sweet, handmade charm.

Why You'll Love This Snoopy Amigurumi Pattern

I absolutely love how this pattern brings such an iconic character to life with incredible attention to detail. The way each stitch builds up to create Snoopy's unmistakable silhouette is truly magical, and seeing those familiar black ears and gentle expression come together never fails to make me smile. Working on this pattern feels like spending time with an old friend, and the finished result is guaranteed to bring joy to anyone who sees it.

Snoopy Amigurumi Pattern step 1 - construction progress Snoopy Amigurumi Pattern step 2 - assembly progress Snoopy Amigurumi Pattern step 3 - details and accessories Snoopy Amigurumi Pattern step 4 - final assembly and finishing

Switch Things Up

I love how versatile this Snoopy pattern can be with just a few creative tweaks. Sometimes I'll add a tiny red scarf for a winter version, or even experiment with different ear positions to give him unique expressions. The beauty of this pattern is in the details - you could make his tail a bit longer, adjust the ear shapes slightly, or even add small safety eyes instead of embroidered ones for a different look.

What really excites me about this pattern is how it opens the door to creating the whole Peanuts gang. Once you've mastered Snoopy's basic construction, you could adapt the techniques to make Woodstock, or even try your hand at Charlie Brown using similar proportions. I've seen crafters make entire Peanuts families, each with their own personality quirks reflected in the stitching.

The embroidery work on this pattern is where you can really let your creativity shine. While the traditional sleepy-eyed look is classic, you could experiment with different eye shapes or even add eyebrows for more expression. Some makers I know have created themed versions - holiday Snoopy with festive colors, or beach Snoopy with lighter summer tones. The possibilities are endless when you start thinking outside the traditional color palette!

Common Mistakes & How to Fix Them

โœ— Forgetting to stuff the head firmly enough, which can cause it to lose its distinctive oval shape over time โœ— Misplacing the ears too high or low on the head, disrupting Snoopy's characteristic proportions and facial balance โœ— Making the embroidered eyes uneven or too large, which changes his gentle, sleepy expression entirely โœ— Overstuffing the arms and legs, making them too rigid and losing the natural, relaxed pose that makes Snoopy so endearing

Snoopy Amigurumi Pattern

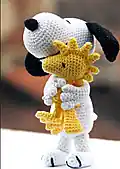
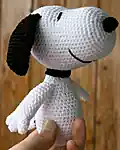
Create your very own adorable Snoopy from the beloved Peanuts comic strip with this detailed amigurumi pattern. This charming white beagle comes complete with his signature black ears, embroidered facial features, and classic collar. Perfect for gifting to Charlie Brown fans or adding a touch of nostalgic charm to any collection. The pattern includes clear step-by-step instructions for crafting Snoopy's distinctive head shape, body, arms with individual fingers, and all the special details that make him instantly recognizable.

Intermediate 8-10 Hours

Materials Needed for Snoopy Amigurumi Pattern

โ€” Main Fabric

  • 01
    White yarn (approximately 75 grams) for main body, head, arms, legs, and feet
  • 02
    Black yarn for ears, nose, collar, tail tip, and facial embroidery details

โ€” Tools Required

  • 01
    3mm (C/2, 11) crochet hook or size appropriate for chosen yarn
  • 02
    Stuffing material
  • 03
    Tapestry needle for sewing and embroidery
  • 04
    Ball-point pins for positioning
  • 05
    Stitch marker for round tracking
  • 06
    Scissors

Progress Tracker

0% Complete

โ€” Head (with white yarn) :

Round 1 :

6 sc in magic ring (6 sts)

Round 2 :

(1 inc)x6 (12 sts)

Round 3 :

(1 sc, 1 inc)x6 (18 sts)

Round 4 :

(2 sc, 1 inc)x6 (24 sts)

Round 5 :

(3 sc, 1 inc)x6 (30 sts)

Round 6 :

(4 sc, 1 inc)x6 (36 sts)

Round 7 :

(5 sc, 1 inc)x6 (42 sts)

Round 8-17 :

sc even (42 sts)

Round 18 :

15 sc, (1 inc, 1 sc)x6, 15 sc (48 sts)

Round 19 :

15 sc, (1 inc, 2 sc)x6, 15 sc (54 sts)

Round 20-27 :

sc even (54 sts)

Info :

Start stuffing

Round 28 :

(7 sc, 1 dec)x6 (48 sts)

Round 29 :

(6 sc, 1 dec)x6 (42 sts)

Round 30 :

(5 sc, 1 dec)x6 (36 sts)

Round 31 :

(4 sc, 1 dec)x6 (30 sts)

Round 32 :

(3 sc, 1 dec)x6 (24 sts)

Round 33 :

(2 sc, 1 dec)x6 (18 sts)

Round 34 :

(1 sc, 1 dec)x6 (12 sts)

Info :

Tightly finish stuffing

Round 35 :

(1 dec)x6 (6 sts)

Info :

Fasten off, close hole and weave in ends

โ€” Ear (make 2 with black yarn) :

Round 1 :

6 sc in magic ring (6 sts)

Round 2 :

(1 inc)x6 (12 sts)

Round 3 :

(1 sc, 1 inc)x6 (18 sts)

Round 4 :

(2 sc, 1 inc)x6 (24 sts)

Round 5-12 :

sc even (24 sts)

Round 13 :

(6 sc, 1 dec)x3 (21 sts)

Round 14 :

(5 sc, 1 dec)x3 (18 sts)

Round 15 :

(4 sc, 1 dec)x3 (15 sts)

Round 16 :

sc even (15 sts)

Round 17 :

(3 sc, 1 dec)x 3 (12 sts)

Round 18 :

(2 sc, 1 dec)x 3 (9 sts)

Round 19 :

sc even (9 sts)

Info :

Fasten off, leaving a long tail to sew to head. Don't stuff

โ€” Nose (with black yarn) :

Round 1 :

Chain 5 stitches. We are going to work around the foundation chain in spiral, to make an oval

Round 2 :

Starting from 2nd chain from hook, crochet 4 sc. Turn and crochet 4 sc on the back loops of the chain (8 sts)

Round 3-4 :

sc even (8 sts)

Info :

Stuff the nose lightly

Info :

Fasten off leaving a very long tail, as we are using it to sew the nose and to embroider the eyes and the mouth

โ€” Body (with white yarn) :

Round 1 :

6 sc in magic ring (6 sts)

Round 2 :

(1 inc)x6 (12 sts)

Round 3 :

(1 sc, 1 inc)x6 (18 sts)

Round 4 :

(2 sc, 1 inc)x6 (24 sts)

Round 5 :

(3 sc, 1 inc)x6 (30 sts)

Round 6 :

(4 sc, 1 inc)x6 (36 sts)

Round 7 :

(5 sc, 1 inc)x6 (42 sts)

Round 8-14 :

sc even (42 sts)

Round 15 :

(5 sc, 1 dec)x6 (36 sts)

Round 16-17 :

sc even (36 sts)

Round 18 :

(4 sc, 1 dec)x6 (30 sts)

Round 19 :

sc even (30 sts)

Round 20 :

(3 sc, 1 dec)x6 (24 sts)

Info :

Start stuffing

Round 21-23 :

sc even (24 sts)

Round 24 :

(6 sc, 1 dec)x3 (21 sts)

Round 25 :

(5 sc, 1 dec)x3 (18 sts)

Round 26 :

(4 sc, 1 dec)x3 (15 sts)

Round 27 :

sc even (15 sts)

Info :

Finish stuffing and F.O., leaving a long tail for sewing

โ€” Arm (make 2 with white yarn) :

Info :

To make the arm, we begin by crocheting the 3 fingers, then joining them and continue crocheting the hand and arm

Round 1 :

4 sc in magic ring (4 sts)

Round 2 :

(1 sc, 1 inc)x2 (6 sts)

Round 3 :

sc even (6 sts). Cut the yarn

Info :

First, crochet two fingers like this, then crochet a third finger following the same steps, but this time do not cut the yarn

Round 4 :

Insert your hook on the first stitch of the second finger. Crochet 1 sc on each of the next 3 sc. Join the first finger you crocheted. Crochet 1 sc on each of the 6 sc of this finger. Continue by crocheting 1 sc on the remaining 3 sc of the second finger and crocheting 1 sc on each of the 6 sc of the third finger. Now you have 18 sts

Info :

If necessary, sew between the fingers

Round 5 :

(1 sc, 1 dec)x6 (12 sts)

Round 6-15 :

sc even (12 sts)

Round 16 :

(2 sc, 1 dec)x3 (9 sts)

Info :

Stuff lightly

Round 17 :

sc even (9 sts)

Info :

Fasten off, leaving a long tail for sewing

โ€” Leg (make 2 with white yarn) :

Round 1 :

Leaving a long tail at the beginning, chain 12 stitches and make a circle by joining the last chain with the first chain (be careful to not twist the chain!). We continue working in spiral

Round 2-6 :

sc even (12 sts)

Round 7 :

5 sc, 1 sl st. Cut the yarn, leaving a long tail to sew

โ€” Foot (make 2 with white yarn) :

Round 1 :

6 sc in magic ring (6 sts)

Round 2 :

(1 inc)x6 (12 sts)

Round 3 :

(3 sc, 1 inc)x3 (15 sts)

Round 4-15 :

sc even (15 sts)

Round 16 :

(3 sc, 1 dec)x3 (12 sts)

Info :

Stuff

Round 17 :

(1 dec)x6 (6 sts)

Info :

Cut the yarn, close the hole and weave in ends

โ€” Collar (with black yarn) :

Round 1 :

Chain 18 stitches. We are working in flat

Round 2 :

From second chain from hook, crochet 1 sc in every chain (17 sts)

Info :

Fasten off, leaving a long tail to sew

โ€” Tail (start with white yarn) :

Round 1 :

4 sc in magic ring (4 sts)

Round 2 :

sc even (4 sts)

Round 3 :

(1 sc, 1 inc)x2 (6 sts)

Round 4 :

(2 sc, 1 inc)x2 (8 sts)

Round 5-7 :

sc even (8 sts)

Round 8 :

(2 sc, 1 dec)x2 (6 sts). Change to black yarn

Round 9 :

sc even (6 sts)

Info :

Fasten off, leaving a long tail for sewing. Stuff lightly

โ€” Patch (with black yarn) :

Round 1 :

Chain 5 stitches

Round 2 :

Starting from 2nd chain from hook, crochet 4 sc. Turn and crochet 4 sc on the back loops of the chain (8 sts)

Round 3 :

(1 sc, 1 inc)x4 (12 sts)

Round 4 :

4 sc, 4 inc, 4 sc (16 sts)

Info :

Fasten off, leaving a long tail to sew to body

Assembly Instructions

  • Attach the head to the body by positioning it roughly between rows 24-28 of the head, using sturdy mattress stitch for neck strength
  • Sew the nose over the initial magic ring of the head, ensuring it's horizontally straight in relation to reference pins
  • Embroider eyes between rows 16-17 using the spare thread from the nose, placing them according to pin references
  • Embroider the mouth 11 rows from the nose edge, counting 8 stitches left and right from center point
  • Attach ears to temples roughly 6 rows up from the center of the eyes, positioning them symmetrically
  • Sew arms to both sides of the body between rows 23-24, adjusting stuffing for desired arm position
  • Attach the collar around the neck and sew tail with patch on Snoopy's back between rows 9-10 of body
  • Connect legs to feet and position legs on both sides of the initial magic ring, ensuring Snoopy stands properly before final sewing

Important Notes

  • ๐Ÿ’กUse stitch markers consistently to track rounds, especially during shaping sections of the head and body
  • ๐Ÿ’กStuff the neck area very tightly as it's Snoopy's structural weak point and needs extra support
  • ๐Ÿ’กCotton yarn provides the best results for structure, but softer yarns work well with the collar for added support
  • ๐Ÿ’กPlace pins carefully on row 18 increases to ensure proper facial feature alignment and symmetry
  • ๐Ÿ’กEmbroider facial features with double thread for eyes but single thread for the mouth to achieve the right proportions
  • ๐Ÿ’กPosition all parts with pins before final sewing to ensure correct placement and balanced appearance

This heartwarming Snoopy pattern brings Charles Schulz's beloved beagle to life in perfect amigurumi form. Every stitch captures his gentle spirit and iconic charm, from those droopy ears to his sweet embroidered smile. Whether you're a longtime Peanuts fan or discovering Snoopy for the first time, this cuddly companion will bring endless joy to your crafting journey. ๐Ÿงถ Happy crocheting! ๐Ÿ•โœจ

You ask,

we answer.

FAQs

What's the best yarn weight for this Snoopy pattern?

This pattern works best with worsted weight (4) yarn using a 3mm hook. Cotton yarn gives the best structure and stitch definition, though acrylic blends work well too.

How do I make sure Snoopy's head shape is correct?

The key is firm, even stuffing and following the increase/decrease pattern precisely. The distinctive oval shape comes from the specific shaping in rounds 18-19, so pay special attention to those sections.

Can I make Snoopy in different sizes?

Yes! Use a smaller hook and thinner yarn for a mini version, or a larger hook with chunky yarn for a bigger Snoopy. Just maintain the same proportional relationships between all pieces.

Why won't my Snoopy stand up properly?

Make sure the legs are positioned symmetrically on either side of the body's initial magic ring, with row 7 of the legs facing outward. Also check that the feet are firmly stuffed and the leg-to-foot connection is secure.

How do I get the facial embroidery to look right?

Use the pin placement guide carefully - pins on row 18 increases are crucial for symmetry. Embroider eyes with double thread between rows 16-17, and keep the mouth centered 11 rows down from the nose edge.