🧢 Beautiful ✨ Detailed πŸ’ Adorable

Spinderella the Spider Amigurumi Pattern

Spinderella the Spider Amigurumi Pattern
4.8β˜… Rating
3-4 Hours Time Needed
3.3K Made This
βœ‚οΈ

Intermediate Level

Ideal for those with basic knitting experience, featuring slightly more advanced stitches and techniques to expand your skills.

⏱️

Weekend Treat

Takes 5-7 hours, making it an enjoyable project to finish over a couple of days.

🧸

Cute Companion

An adorable friend to cherish, handcrafted with love to bring comfort and joy for years to come.

About This Spinderella the Spider Amigurumi Pattern

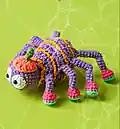
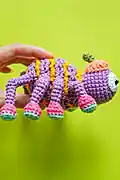
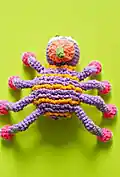
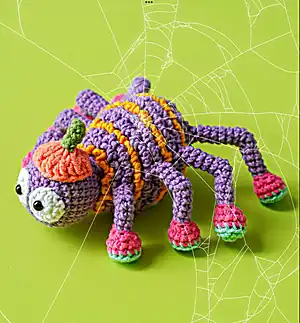
Spinderella is a charming Halloween spider that combines adorable design with festive flair. Featuring a rich purple body with contrasting orange stripes and eight colorful legs in vibrant shades, this amigurumi brings personality to any space. The pattern includes a delightful pumpkin hat complete with a green stem, adding the perfect autumn touch to this friendly arachnid companion.

Spinderella the Spider Amigurumi Pattern crochet pattern - detailed view of completed project

This intermediate-level pattern uses color-changing techniques and includes detailed assembly instructions with helpful photos. Perfect for seasonal decorating or as a unique handmade gift for Halloween enthusiasts.

Why You'll Love This Spinderella the Spider Amigurumi Pattern

I absolutely love this pattern because it transforms a traditionally scary creature into something completely endearing and huggable. The color combinations are stunning - the purple and orange create such a vibrant, eye-catching design that feels both festive and friendly. What really draws me to this project is how the pumpkin hat adds such a whimsical touch, making Spinderella feel like a beloved character rather than just another spider.

Spinderella the Spider Amigurumi Pattern step 1 - construction progress Spinderella the Spider Amigurumi Pattern step 2 - assembly progress Spinderella the Spider Amigurumi Pattern step 3 - details and accessories Spinderella the Spider Amigurumi Pattern step 4 - final assembly and finishing

Switch Things Up

I love experimenting with color combinations to make each Spinderella unique! Try swapping the purple body for deep burgundy or forest green, or create a pastel version with soft pink and lavender. You could even make the stripes in metallic yarn for a glamorous Halloween spider.

For the legs, consider making them all the same color for a more uniform look, or use gradient colors that fade from dark to light. The pumpkin hat could be replaced with a witch's hat in black, or even a tiny flower crown for a spring version.

I also enjoy adding small details like tiny bows on the legs or embroidered eyelashes to give Spinderella more personality. Some crafters have added small crochet accessories like a tiny purse or even miniature boots for the feet!

Common Mistakes & How to Fix Them

βœ— Forgetting to stuff the legs gradually while crocheting, making them difficult to shape properly later βœ— Not maintaining consistent tension during color changes, resulting in visible gaps between stripe sections βœ— Placing safety eyes too far apart or too close together, affecting the spider's facial expression βœ— Insufficient stuffing in the body before closing, causing the spider to appear flat or misshapen

Spinderella the Spider Amigurumi Pattern

Create an adorable purple spider with orange stripes and colorful legs! This delightful Halloween-themed amigurumi features a charming pumpkin hat and whimsical character that's perfect for autumn decorating. With detailed instructions for creating eight colorful legs and festive accessories, Spinderella brings spooky-cute charm to any home. The pattern includes step-by-step photos and clear guidance for crafting this friendly spider companion.

Intermediate 3-4 Hours

Materials Needed for Spinderella the Spider Amigurumi Pattern

β€” Main Fabric

  • 01
    YarnArt Jeans in purple (Color A, 72), yellow (Color B, 35), white (Color C, 01), coral (Color D, 61), green (Color E, 69), turquoise (Color F, 79), fuchsia (Color G, 59)
  • 02
    Medium weight cotton yarn suitable for amigurumi in various colors for body, stripes, and legs

β€” Tools Required

  • 01
    Crochet hook size 2.5mm
  • 02
    Safety eyes size 6mm (1 pair)
  • 03
    Tapestry needles
  • 04
    Pins
  • 05
    Stitch markers
  • 06
    Scissors
  • 07
    Polyester fiberfill stuffing

Progress Tracker

0% Complete

β€” Eyes (yarn C, X2) :

Round 1 :

sc 6 into a magic loop (6)

Round 2 :

inc 6, slst (12)

Info :

Break the yarn, leave a long thread to sew later

β€” Body (yarn A) :

Info :

Crochet BLO on all the rnds on the Body. Change to color each 2 lines

Round 1 :

sc 6 into a magic loop (6)

Round 2 :

(blo) inc 6 (12)

Round 3 :

(blo) [sc 1, inc] 6x (18)

Round 4 :

(blo) [sc 2, inc] 6x (24)

Round 5 :

(blo) [sc 3, inc] 6x (30)

Round 6 :

(blo) [sc 4, inc] 6x (36)

Round 7-8 :

(blo) sc 36 (2 rnds) (36)

Round 9 :

(blo) sc 36 (36)

Round 10-11 :

(blo) sc 36 (2 rnds) (36)

Round 12 :

(blo) sc 12, dec 6, sc 12 (30)

Round 13 :

(blo) sc 30 (30)

Round 14 :

(blo) sc 9, dec 6, sc 9 (24)

Round 15 :

(blo) sc 24 (24)

Round 16 :

(blo) sc 6, dec 6, sc 6 (18)

Round 17 :

(blo) sc 18, start stuffing (18)

Info :

Do not break the yarn, move to crochet the Head

β€” Head (yarn A) :

Round 18 :

[sc 2, inc] 6x (24)

Round 19 :

[sc 3, inc] 6x (30)

Round 20-24 :

sc 30 (5 rnds) (30)

Round 25 :

[sc 3, dec] 6x (24)

Round 26 :

[sc 2, dec] 6x (18)

Round 27 :

[sc 1, dec] 6x, stop to insert the eyes into the Head, stuffing (12)

Round 28 :

dec 6 (6)

Info :

Break the yarn, weave in the last 6 sts, hide the remaining yarn

β€” Pumpkin's Hat (yarn D) :

Round 1 :

MR, ch 2, dc 9, slst on the ch 2 (9)

Round 2 :

ch 2, (dc 1, FPDC 1 on the same stitch) 9x, slst in the ch 2 (18)

Info :

Break the yarn, leave a long thread to sew later. Continue to crochet the Stem

β€” Stem (yarn E) :

Round 1 :

sc 5 into a magic loop (5)

Round 2-4 :

sc 5 (3 rnds) (5)

Info :

Break the yarn, leave a long thread to sew later

β€” Legs (Make 8 with varying colors and lengths) :

Round 1 :

sc 6 into a magic loop (6)

Round 2 :

inc 6, change to yarn G (12)

Round 3 :

sc 12 blo (12)

Round 4 :

sc 12 (12)

Round 5 :

dec 6, change to yarn A (6)

Round 6 :

sc 6 blo, stuff slightly (6)

Round 7-8 :

sc 6 (2 rnds) (6)

Info :

Continue with varying lengths for each leg as specified in pattern

Assembly Instructions

  • Insert 6mm safety eyes into the white eye pieces and attach securely
  • Sew the completed eyes onto the head between rounds 26-27 as shown in photos
  • Attach the pumpkin hat to the top of the head, ensuring proper placement
  • Sew the green stem to the center of the pumpkin hat
  • Attach the first set of legs to the body with proper spacing between each leg (1 round and 1 stitch higher than previous)
  • Continue attaching remaining legs, maintaining consistent spacing and height differences
  • Create decorative stripes on the body using chain 3 and slip stitch technique in front loops only, changing colors as specified

Important Notes

  • πŸ’‘Use stitch markers to keep track of rounds, especially during color changes on the body
  • πŸ’‘Stuff the body and head firmly but not too tightly for best shape
  • πŸ’‘Remember to change colors every 2 rounds for the striped body effect
  • πŸ’‘Pin legs in place before sewing to ensure correct positioning and spacing
  • πŸ’‘Work in back loops only (BLO) for all body rounds to create the texture for stripes
  • πŸ’‘The leg lengths vary according to the pattern - follow the specific round counts for each leg pair

This enchanting Spinderella pattern brings Halloween magic to life with vibrant colors and whimsical details! The combination of purple body, orange stripes, and rainbow legs creates a spider that's more friend than fright. Perfect for autumn decorating or year-round cuddles, this pattern offers clear instructions with helpful photos to guide you through each step. πŸ•·οΈ Happy crocheting! 🧢✨

You ask,

we answer.

FAQs

Can I use different yarn weights for this pattern?

It's best to stick with the recommended medium weight cotton yarn to maintain proper proportions and stitch definition for the striped body effect.

How do I keep track of the color changes for the body stripes?

Use stitch markers and follow the pattern carefully - colors change every 2 rounds. The pattern specifies when to work in back loops only for the stripe effect.

Why are the legs different lengths?

Each pair of legs has a specific length to create a natural spider appearance. Follow the round counts specified for each leg pair in the pattern.

Can I make the spider larger or smaller?

Yes, but you'll need to adjust the hook size and possibly the yarn weight. A larger hook will make a bigger spider, while a smaller hook creates a more compact version.

How do I attach the legs securely?

Pin each leg in place first, ensuring proper spacing (1 round and 1 stitch higher than the previous leg), then sew securely with matching thread using a tapestry needle.