🧢 Beautiful ✨ Detailed πŸ’ Adorable

Adorable Sugar Mice Amigurumi Pattern

Adorable Sugar Mice Amigurumi Pattern
3.9β˜… Rating
1-1.5 Hours Time Needed
3.0K Made This
βœ‚οΈ

Beginner Friendly Level

Perfect for those just starting their sewing journey, with clear instructions and simple techniques

⏱️

Bite-Sized Project

Complete in under 2 hoursβ€”quick, fun, and perfect for a little creative escape.

🧸

Tiny Treasure

Small, sweet, and gift-worthy creations that fit perfectly in the palm of your hand with detailed charm.

About This Adorable Sugar Mice Amigurumi Pattern

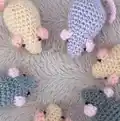
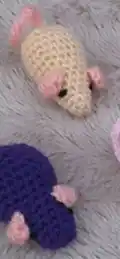
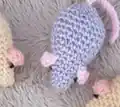
This adorable Sugar Mice pattern creates tiny, squeezable companions that are perfect for little hands or as decorative pieces. Each mouse measures just a few inches tall, making them ideal for quick projects or gift-making. The simple construction involves creating a rounded body with attached ears and a chain-stitch tail, requiring only basic crochet skills. The pattern is written in both UK and US terms for universal accessibility.

Adorable Sugar Mice Amigurumi Pattern crochet pattern - detailed view of completed project

These sweet mice can be customized with different color combinations and optional bells or squeaks inside for interactive play. The compact size makes them perfect for using up yarn scraps and creating a whole family of colorful mice.

Why You'll Love This Adorable Sugar Mice Amigurumi Pattern

I absolutely love this pattern because it's so incredibly satisfying to complete in just one sitting! There's something magical about watching these tiny mice come to life with just a few simple stitches. I find myself making them in batches because they're so addictive to create, and everyone who sees them immediately wants their own little mouse family. The fact that you can add a bell or squeak makes them even more special for gift-giving.

Adorable Sugar Mice Amigurumi Pattern step 1 - construction progress Adorable Sugar Mice Amigurumi Pattern step 2 - assembly progress Adorable Sugar Mice Amigurumi Pattern step 3 - details and accessories Adorable Sugar Mice Amigurumi Pattern step 4 - final assembly and finishing

Switch Things Up

I love experimenting with different color combinations to create unique mouse families! Try making them in pastels for a sweet nursery theme, or go bold with bright rainbow colors for playful gifts.

Consider adding tiny accessories like miniature bows, hats, or even small scarves to give each mouse its own personality. You could also vary the ear colors or create striped tails using multiple colors.

For special occasions, I like making themed versions - white and gold for weddings, red and green for Christmas, or orange and black for Halloween. The possibilities are endless!

Try making them in different yarn textures too - a fuzzy yarn creates adorable fluffy mice, while cotton gives them a more structured appearance.

Common Mistakes & How to Fix Them

βœ— Overstuffing the body will cause the stitches to stretch and show stuffing through gaps βœ— Forgetting to use stitch markers can lead to losing track of round beginnings and uneven shaping βœ— Not securing the ears properly during Row 7 can result in loose or misaligned ear placement βœ— Making the tail chain too tight will cause it to curl excessively rather than hang naturally

Adorable Sugar Mice Amigurumi Pattern

Create these charming little sugar mice with this delightful amigurumi pattern! These sweet pocket-sized companions are perfect for beginners looking to practice basic stitches while making something absolutely adorable. With their cute pink ears, long tails, and tiny black eyes, these mice will steal your heart. The pattern includes both UK and US crochet terms, making it accessible to crocheters worldwide. Add a small bell or squeak inside for extra charm!

Beginner Friendly 1-1.5 Hours

Materials Needed for Adorable Sugar Mice Amigurumi Pattern

β€” Main Fabric

  • 01
    Hayfield Bonus DK yarn in main color - 6g
  • 02
    Hayfield Bonus DK yarn in contrast color for ears and tail - small amount
  • 03
    Hayfield Bonus Black 0965 yarn for eyes - small amount

β€” Tools Required

  • 01
    3mm crochet hook
  • 02
    Hi-Loft quality toy stuffing
  • 03
    Wool needle for sewing
  • 04
    Stitch markers
  • 05
    Scissors
  • 06
    Optional: Small bell or squeak

Progress Tracker

0% Complete

β€” Ears (Make 2):

Row 1:

Using contrast yarn, ch2, (sc, hdc, dcinc, hdc and sc) into 2nd st from hook

Info:

Fasten off leaving a short end

β€” Body:

Row 1:

Using main yarn, ch2, sc 6sts into 2nd st from hook (alternatively sc 6sts into magic ring) (6)

Row 2:

(sc into next st, inc) x3 (9)

Row 3:

sc (9)

Row 4:

(sc into next 2sts, inc) x3 (12)

Row 5:

sc (12)

Row 6:

(sc into next 3sts, inc) x3 (15)

Row 7:

sc into next 3sts, place straight edge of ear on top of body right side down, working through both layers sc into the next 3sts, then sc into next 3sts, place straight edge of ear on top of body right side down, working through both layers sc into the next 3sts, then sc into last 3sts (15)

Row 8:

(sc into next 4sts, inc) x3 (18)

Row 9:

(sc into next 5sts, inc) x3 (21)

Row 10:

(sc into next 6sts, inc) x3 (24)

Rows 11-13:

sc (24) (3 rows)

Row 14:

(sc into next 2sts, dec) x6 (18)

Row 15:

(sc into next st, dec) x6 (12)

Info:

Stuff body (optional - add small bell or squeak at this stage)

Row 16:

dec x6 (6)

Info:

Leaving a 15cm end, change to contrast and ch1, pull main color tight and then tie ends together to join. Tuck contrast end inside body.

Row 17:

ch15, starting in 2nd ch from hook sl st into the next 14ch (14)

Info:

Fasten off leaving a 5cm end. Tuck contrast end inside body.

β€” Assembly:

Tail Assembly:

With main 15cm end, using a running stitch through front loops, gather last 6sts tightly while ensuring contrast ends don't show. Sew through base of tail several times to secure.

Eyes:

Using black yarn, sew 2 eyes 1 stitch in length, 4 rows back from starting circle and 4 stitches apart. Weave ends through body and cut.

Assembly Instructions

  • Stuff the body firmly but not too tightly to maintain proper shape
  • Attach the tail by gathering the last 6 stitches with the main color yarn end
  • Secure the tail base by sewing through it multiple times before weaving end through body
  • Sew black eyes 4 rows back from the starting circle, spacing them 4 stitches apart
  • Weave all loose ends through the body interior and trim excess yarn
  • If using a bell or squeak, insert it before closing the body opening

Important Notes

  • πŸ’‘Use stitch markers to keep track of rounds and ensure even shaping
  • πŸ’‘Don't overstuff the mice - they should be squeezable when pinched firmly
  • πŸ’‘Attach ears securely during Row 7 by working through both layers properly
  • πŸ’‘Keep contrast yarn ends hidden inside the body for a clean finish
  • πŸ’‘The pattern includes both UK and US crochet terminology for convenience

These precious Sugar Mice bring instant joy to any crochet basket! Perfect for beginners wanting to practice basic techniques while creating something absolutely adorable. Whether you make them as gifts, decorations, or playthings, these tiny treasures are sure to bring smiles wherever they go. The quick completion time means you can create an entire mouse family in an afternoon. Happy crocheting and enjoy your new tiny friends!

You ask,

we answer.

FAQs

What size are the finished mice?

The completed Sugar Mice are small, palm-sized toys that measure approximately 2-3 inches in length, perfect for little hands or as decorative pieces.

Can I use different yarn weights?

Yes, but using a different yarn weight will change the final size. Stick with DK weight yarn and a 3mm hook for the intended size, or adjust hook size accordingly for other weights.

Are these safe for babies?

If making for babies, omit the small bell or squeak and ensure all yarn ends are securely woven in. Always supervise young children with handmade toys.

How much yarn do I need for one mouse?

You only need about 6g of main color yarn plus small amounts of contrast colors, making this perfect for using up yarn scraps.

Can I make the tail shorter or longer?

Absolutely! Simply adjust the number of chains in Row 17. Make fewer chains for a shorter tail or more chains for a longer one.