🧢 Beautiful ✨ Detailed πŸ’ Adorable

Alan the Lion Amigurumi Pattern

Alan the Lion Amigurumi Pattern
4.1β˜… Rating
8-10 Hours Time Needed
2.4K Made This
βœ‚οΈ

Intermediate Level

Ideal for those with basic knitting experience, featuring slightly more advanced stitches and techniques to expand your skills.

⏱️

All-Day Adventure

Requires 8-10 hours, ideal for a full day of immersive knitting.

🧸

Cute Companion

An adorable friend to cherish, handcrafted with love to bring comfort and joy for years to come.

About This Alan the Lion Amigurumi Pattern

Alan the Lion is a majestic amigurumi creation that combines classic crochet techniques with intricate details. This pattern features a unique integrated head and snout design that eliminates seaming, creating a smooth, professional finish. The colorwork t-shirt adds a playful touch while the voluminous mane brings Alan's regal personality to life.

Alan the Lion Amigurumi Pattern crochet pattern - detailed view of completed project

With his gentle expression and huggable size, Alan makes the perfect companion for children and adults alike. The pattern includes detailed photo tutorials for the trickier techniques, ensuring your success every step of the way.

Why You'll Love This Alan the Lion Amigurumi Pattern

I absolutely love how this pattern challenges you to grow your amigurumi skills while creating something truly special. The integrated snout technique is a game-changer that I use in many of my designs now, and the detailed mane work is so satisfying to complete. Alan's personality really shines through in those sweet safety eyes and that magnificent flowing mane.

Alan the Lion Amigurumi Pattern step 1 - construction progress Alan the Lion Amigurumi Pattern step 2 - assembly progress Alan the Lion Amigurumi Pattern step 3 - details and accessories Alan the Lion Amigurumi Pattern step 4 - final assembly and finishing

Switch Things Up

I love how versatile this Alan pattern can be with just a few creative tweaks! Try making him in different color combinations - imagine a white lion with a silver mane, or even a fantasy version in purples and blues. The t-shirt offers endless possibilities too - you could create stripes in team colors, add a simple colorwork pattern, or even crochet a tiny logo. For special occasions, I've made versions with bow ties instead of t-shirts, and they look absolutely dapper. The mane style can change his whole personality - keep it shorter and neater for a younger lion look, or let it flow long and wild for maximum majesty. You could even experiment with ombre effects in the mane using multiple shades of the same color family. Don't forget about seasonal versions - add a tiny Santa hat for Christmas, or use autumn colors for a cozy fall companion!

Common Mistakes & How to Fix Them

βœ— Not maintaining tight tension throughout the project, resulting in visible stuffing and uneven stitches βœ— Rushing the color changes in the t-shirt section, leading to messy transitions between colors βœ— Overstuffing the head and body, making the lion too firm and losing its cuddly appeal βœ— Cutting the mane hair too short initially, leaving no room for styling and shaping adjustments

Alan the Lion Amigurumi Pattern

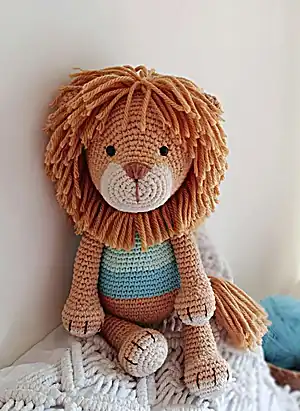
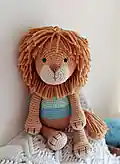
Create your own adorable lion companion with this detailed amigurumi pattern! Alan is approximately 30cm tall and features a magnificent fluffy mane, striped t-shirt, and sweet embroidered features. This intermediate-level pattern includes step-by-step instructions for crafting the head with integrated snout, body with color-changing t-shirt, poseable limbs, and that show-stopping mane made from cashmilon wool. Perfect for those ready to tackle color changes and detailed assembly work.

Intermediate 8-10 Hours

Materials Needed for Alan the Lion Amigurumi Pattern

β€” Main Fabric

  • 01
    Semi-thick cotton yarn 8/6 or DK in camel and natural color for the lion body
  • 02
    Aquamarine green and light turquoise yarn for the striped t-shirt
  • 03
    Brown embroidery thread for nose and claw details
  • 04
    Acrylic wool like cashmilon wool 4/7 in camel color for the mane (80gr for body, 60gr for mane)

β€” Tools Required

  • 01
    Crochet hook size 2.25mm or 2.5mm
  • 02
    Black safety eyes size 8mm or 10mm
  • 03
    Polyester fiberfill stuffing
  • 04
    Sewing needle
  • 05
    Stitch markers
  • 06
    Scissors
  • 07
    Pins
  • 08
    Sharp scissors for mane trimming

Progress Tracker

0% Complete

β€” Head :

R1 :

Make 6 sc in a magic ring (6)

R2 :

6 inc (12)

R3 :

(1 inc, 1 sc) x6 (18)

R4 :

(3 inc, 6sc) x2 (24)

R5 :

(1 inc, 1 sc) x3, 6sc (1 inc, 1 sc) x3, 6sc (30)

R6 :

(1 inc, 2sc) x3, 6sc, (1 inc, 2sc) x3, 6sc (36)

R7 :

12sc in natural, 6sc in camel, 18sc in natural (36)

R8 :

11sc in natural, 8sc in camel, 17sc in natural (36)

R9 :

10sc in natural, 10sc in camel, 16sc in natural (36)

R10 :

9sc in natural, 12sc in camel, 15sc in natural (36)

R11 :

10sc, (1 inc, 1sc) x6, 14sc (42)

R12 :

42sc (42)

R13 :

10sc, (1 inc, 2sc) x6, 14sc (48)

R14 :

10sc, (1 inc, 3sc) x6, 14sc (54)

R15 :

(1 inc, 8sc) x6 (60)

R16 to R25 :

60sc (60) 10 rounds

R26 :

(1 dec, 8sc) x6 (54)

R27 :

54sc (54)

R28 :

(1 dec, 7sc) x6 (48)

R29 :

48sc (48)

R30 :

(1 dec, 6sc) x6 (42)

R31 :

(1 dec, 5sc) x6 (36)

R32 :

(1 dec, 4sc) x6 (30)

R33 :

(1 dec, 3sc) x6 (24)

R34 :

(1 dec, 2sc) x6 (18)

R35 :

(1 dec, 1sc) x6 (12)

Info :

Place eyes on 2nd round from last natural color round with 9-10 stitches separation. Fill with polyfiber. Close with 1 sl sc.

β€” Ears x2 :

R1 :

6 sc in a magic ring (6)

R2 :

6 inc (12)

R3 :

(1 inc, 1sc) x6 (18)

R4 to R6 :

18sc (18) 3 rounds

R7 :

(1 dec, 7sc) x2 (16)

Info :

Close with 1 sl st, leave thread to sew. Don't stuff ears.

β€” Body :

R1 :

Make 6 sc in a magic ring (6)

R2 :

6 inc (12)

R3 :

(1 inc, 1sc) x6 (18)

R4 :

(1 inc, 2sc) x6 (24)

R5 :

(1 inc, 3sc) x6 (30)

R6 :

(1 inc, 4sc) x6 (36)

R7 :

(1 inc, 5sc) x6 (42)

R8 :

(1 inc, 6sc) x6 (48)

R9 :

(1 inc, 7sc) x6 (54)

R10 to R14 :

54sc (54) 5 rounds

R15 to R19 :

Change to light turquoise, 54sc (54) 5 rounds

R20 :

(1 dec, 7sc) x6 (48)

R21 and R22 :

48sc (48) 2 rounds

R23 :

Change to aquamarine green, (1 dec, 6sc) x6 (42)

R24 and R25 :

42sc (42) 2 rounds

R26 :

(1 dec, 5sc) x6 (36)

R27 and R28 :

36sc (36) 2 rounds

R29 :

(1 dec, 4sc) x6 (30)

R30 and R31 :

30sc (30) 2 rounds

R32 :

(1 dec, 3sc) x6 (24)

R33 and R34 :

24sc (24) 2 rounds

Info :

Close with 1 sl st, leave long thread to sew. Fill with polyfiber.

β€” Legs x2 :

R1 :

Make 6sc in a magic ring (6)

R2 :

6 inc (12)

R3 :

(1 inc, 1sc) x6 (18)

R4 :

(1 inc, 2sc) x6 (24)

R5 :

(1 inc, 3sc) x6 (30)

R6 to R9 :

Change to camel, 30sc (30) 4 rounds

R10 :

9sc, 6 dec, 9sc (24)

R11 :

8sc, 4 dec, 8sc (20)

R12 :

8sc, 2 dec, 8sc (18)

R13 and R14 :

18sc (18) 2 rounds

R15 :

(1 dec, 7sc) x2 (16)

R16 and R17 :

16sc (16) 2 rounds

R18 :

1 dec, 14sc (15)

R19 to R24 :

15sc (15) 6 rounds

R25 :

(1 dec, 3sc) x3 (12)

R26 :

Close by flattening and unite pairs with 1 sc (6sc)

Info :

Fill base with polyfiber, continue filling to R23. Last 2 rounds unfilled.

β€” Arms x2 :

R1 :

Make 6sc in a magic ring (6)

R2 :

6 inc (12)

R3 :

(1 inc, 1sc) x6 (18)

R4 :

(1 inc, 2sc) x6 (24)

R5 to R8 :

Change to camel, 24sc (24) 4 rounds

R9 :

6sc, 6 dec, 6sc (18)

R10 :

6sc, 3 dec, 6sc (15)

R11 :

15sc (15)

R12 :

(1 dec, 3sc) x3 (12)

R13 to R21 :

12sc (12) 9 rounds

R22 and R23 :

Change to light turquoise, 12sc (12) 2 rounds

R24 to R25 :

Change to aquamarine green, 12sc (12) 2 rounds

R26 :

(1dec, 4sc) x2 (10)

R27 :

Close by flattening and unite pairs with 1 sc (5sc)

Info :

Fill base with polyfiber. Last 3 rounds unfilled.

β€” Tail :

R1 :

6 sc in a magic ring (6)

R2 :

6 inc (12)

R3 and R4 :

12sc (12) 2 rounds

R5 :

(1 dec, 2sc) x3 (9)

R6 to R19 :

9sc (9) 14 rounds

R20 :

Flatten and knit 4 sc taking opposites together

Info :

Fill base and half of tail lightly. Add wool hair starting at R5.

Assembly Instructions

  • Sew head onto body with color changing at back, eyes centered at front, approximately 5 rounds from natural color end
  • Attach legs 3 rounds beneath first t-shirt round using pins to center them evenly on both sides
  • Position arms underneath the union of head and body, making couple stitches under each arm for security
  • Sew tail one round under the t-shirt at the back of the body
  • Embroider 3 claws on each leg and arm, centered with 3 stitches separation over 3 rounds
  • Create mane using cashmilon wool, starting at inner ear border and working around head in layers
  • Trim and style mane carefully, cutting front area to eyes level and shaping in layers

Important Notes

  • πŸ’‘Always knit very tightly using hook 1-2 sizes smaller than yarn recommendation for best shape
  • πŸ’‘Use stitch markers to track rounds, especially during color changes in t-shirt section
  • πŸ’‘Place safety eyes between rounds as specified before stuffing head completely
  • πŸ’‘Make color changes in last step of last stitch for cleanest transitions
  • πŸ’‘Fill head and body firmly but not too tightly to maintain cuddly feel
  • πŸ’‘Cut mane hair conservatively - you can always trim more but can't add length back

This magnificent Alan the Lion pattern brings together intermediate crochet techniques with stunning results! The integrated snout design creates a seamless, professional finish while the colorwork t-shirt adds playful charm. That glorious mane steals the show with its realistic texture and volume. Alan stands proudly at 30cm tall, ready to become someone's most treasured companion. 🦁 Happy crocheting! 🧢✨

You ask,

we answer.

FAQs

Can I use different yarn weights for this pattern?

Yes, but it will change the final size. Using thicker yarn will make Alan larger, while thinner yarn will make him smaller. Adjust your hook size accordingly and remember to use tight tension.

What if I can't find cashmilon wool for the mane?

You can substitute with any fuzzy acrylic yarn or even use a thicker cotton yarn (8/12) for more volume. The key is choosing something that will give texture and fullness to the mane.

How do I prevent holes when changing colors?

Make color changes in the last step of the last stitch of the round, and don't cut the yarn when working short color sections - just carry it loosely behind your work.

Can I make Alan without safety eyes?

Absolutely! You can embroider the eyes with black yarn instead. This also makes Alan safe for very young children.

Why are my decreases creating holes?

Make sure you're working with tight tension and using the invisible decrease method. Also ensure you're stuffing firmly as you go to support the fabric structure.