๐Ÿงถ Beautiful โœจ Detailed ๐Ÿ’ Adorable

Amalfi Top Pattern

Amalfi Top Pattern
3.9โ˜… Rating
15-20 Hours Time Needed
2.9K Made This
โœ‚๏ธ

Advanced Level

Designed for experienced knitters, these patterns involve intricate designs and complex techniques to challenge and inspire.

โฑ๏ธ

All-Day Adventure

Requires 8-10 hours, ideal for a full day of immersive knitting.

๐Ÿ‘•

Casual Chic

Relaxed style with a modern twist, perfect for everyday wear while maintaining that handcrafted uniqueness.

About This Amalfi Top Pattern

The Amalfi Top is a sophisticated men's crochet shirt that showcases advanced granny square construction techniques. This pattern creates a fitted button-up top with short sleeves, featuring diagonal squares, full squares, and half squares that come together to form an elegant textured fabric. The design includes detailed instructions for multiple sizes and a professional collar finish.

Amalfi Top Pattern crochet pattern - detailed view of completed project

This pattern requires precise gauge control and advanced assembly skills to create the perfect fit. The modular construction allows for customization in length and ensures a tailored appearance.

Why You'll Love This Amalfi Top Pattern

I absolutely love this pattern because it challenges you to think beyond traditional crochet projects and venture into sophisticated menswear construction. The combination of different square types creates such an interesting texture that looks professionally made, and I find the modular approach incredibly satisfying as you watch each piece come together. The final result is a garment that truly showcases your advanced crochet skills while creating something genuinely wearable and stylish.

Amalfi Top Pattern step 1 - construction progress Amalfi Top Pattern step 2 - assembly progress Amalfi Top Pattern step 3 - details and accessories Amalfi Top Pattern step 4 - final assembly and finishing

Switch Things Up

I love how versatile this Amalfi Top pattern can be with just a few creative modifications! While the original uses a neutral tone, I've experimented with bold colors like deep navy or forest green that really make the texture pop. You could also try using a variegated yarn to create subtle color transitions throughout the squares.

For a more casual look, I sometimes skip the collar entirely and create a simple crew neck finish instead. The button placket can be modified too - try using vintage wooden buttons for a more rustic feel, or metal buttons for an industrial edge.

I've also made this pattern work for different seasons by adjusting the yarn weight. Using a lighter cotton creates perfect summer wear, while a wool blend makes it suitable for layering in cooler months. The modular construction makes it so easy to customize the fit exactly how you want it.

Common Mistakes & How to Fix Them

โœ— Not maintaining consistent gauge throughout all squares which leads to uneven assembly and poor fit โœ— Rushing the assembly process without proper pinning which results in crooked seams and misaligned squares โœ— Incorrectly counting stitches in the granny square corners leading to squares that don't lay flat โœ— Skipping the collar spacing guidelines which creates an ill-fitting neckline that doesn't sit properly

Amalfi Top Pattern

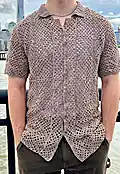
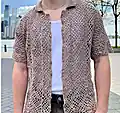
Create this stunning men's button-up shirt that combines the elegance of Italian coastal style with the comfort of crochet. This sophisticated pattern features an intricate diagonal square design that creates beautiful texture and visual interest. Perfect for warm weather or layering, this versatile top offers a modern twist on classic menswear with its relaxed fit and breathable construction.

Advanced 15-20 Hours

Materials Needed for Amalfi Top Pattern

โ€” Main Fabric

  • 01
    Alize Diva Stretch Yarn color 167, weight 2 - varying yardage by size (2750-5250 yards)

โ€” Tools Required

  • 01
    Crochet hook 3.75mm (F)
  • 02
    9mm buttons (7 pieces)
  • 03
    Stitch markers
  • 04
    Tapestry needle
  • 05
    Optional measuring tape
  • 06
    Scissors
  • 07
    Pins for assembly

Progress Tracker

0% Complete

โ€” Diagonal Squares (Make 5) :

Round 1 :

Ch 2. In the 2nd ch from hook, make: [dc 3, ch 2, dc 3]. (8, 8, 8, 8, 8, 8)

Round 2 :

Ch 1 (does not count as st), turn, dc 3 times in the next st from hook. Ch 2, in the next ch-2 space from your hook, make: [dc 3, ch 2, dc 3]. Then, ch 2, and make 3 dc into the very last st. (18, 18, 18, 18, 18, 18)

Round 3 :

Ch 1 (does not count as st), turn, dc 3 times in the next st from hook. Ch 2, in the next ch-2 space from your hook, dc 3 times. Then, ch 2. In the next ch-2 space from your hook, make: [dc 3, ch 2, dc 3]. Then, ch 2, and dc 3 times in the next ch-2 space from your hook. Ch 2, and dc 3 times into the very last st. (28, 28, 28, 28, 28, 28)

Round 4 :

Ch 1 (does not count as st), turn, dc 3 times in the next st from hook. Ch 2, in the next ch-2 space from your hook, dc 3 times. Again, ch 2, and dc 3 times in the next ch-2 space from your hook. Then, ch 2, and in the next ch-2 space from your hook, make: [dc 3, ch 2, dc 3]. Then, ch 2, and make 3 dc into the next ch-2 space from hook. Again, ch 2 and make 3 dc into the next ch-2 space from hook. Finally, ch 2 and dc 3 times into the very last st. (38, 38, 38, 38, 38)

Round 5 :

Ch 1 (does not count as st), turn, dc 3 times in the next st from hook. Ch 2, in the next ch-2 space from your hook, dc 3 times. Again, ch 2, and dc 3 times in the next ch-2 space from your hook. Once more, ch 2 and dc 3 times in the next ch-2 space from your hook. Then, ch 2, and in the next ch-2 space from your hook, make: [dc 3, ch 2, dc 3]. Then, ch 2, and make 3 dc into the next ch-2 space from hook. Again, ch 2 and make 3 dc into the next ch-2 space from hook. Once more, ch 2 and make 3 dc into the next ch-2 space from hook. Lastly, ch 2 and dc 3 times into the very last st. (48, 48, 48, 48, 48, 48)

Info :

Fasten off.

โ€” Full Squares (Make 72, 77, 86, 91, 102, 107) :

Round 1 :

Ch 2. In the 2nd ch from hook, make: [dc 3, ch 2, dc 3, ch 2, dc 3, ch 2]. Then, sl st across your first 3 dc of the round, and sl st once more into the first ch-2 space of the round. (20, 20, 20, 20, 20, 20)

Round 2 :

Ch 1 (does not count as st), in the same ch-2 space, make: [dc 3, ch 2, dc 3]. **Ch 2, in the next ch-2 space from hook, make: [dc 3, ch 2, dc 3]. Repeat from ** two more times. Then, sl st across the first 3 dc of the round, and sl st once more into the very first ch-2 space of the round. (40, 40, 40, 40, 40, 40)

Round 3 :

Ch 1 (does not count as st), in the same ch-2 space, make: [dc 3, ch 2, dc 3]. **Ch 2, dc 3 times in the next ch-2 space from hook. Ch 2, in the next ch-2 space from hook make: [dc 3, ch 2, dc 3]. Repeat from ** once more. Then, ch 2, dc 3 times in the next ch-2 space from hook. Ch 2, and sl st across the first 3 dc of the round, and then sl st once more into the first ch-2 space of the round. (60, 60, 60, 60, 60, 60)

Round 4 :

Ch 1 (does not count as st), in the same ch-2 space, make: [dc 3, ch 2, dc 3]. **Ch 2, dc 3 times in the next ch-2 space from hook. Ch 2, dc 3 times in the next ch-2 space from hook. Ch 2, in the next ch-2 space from hook make: [dc 3, ch 2, dc 3]. Repeat from ** once more. Then, ch 2, dc 3 times in the next ch-2 space from hook. Again, ch 2, dc 3 times in the next ch-2 space from hook. Lastly, ch 2, and sl st across the first 3 dc of the round, and then sl st once more into the first ch-2 space of the round. (80, 80, 80, 80, 80, 80)

Info :

Fasten off.

โ€” Half Squares (Make 18, 18, 20, 20, 18, 18) :

Round 1 :

Ch 2. In the 2nd ch from hook, make: [dc 3, ch 2, dc 3, ch 2, dc 3]. (13, 13, 13, 13, 13, 13)

Round 2 :

Ch 1 (does not count as st), turn, dc in the next st from hook. Ch 2, in the next ch-2 space from hook, make: [dc 3, ch 2, dc 3]. Ch 2, in the next ch-2 space from hook, make: [dc 3, ch 2, dc 3]. Ch 2, dc in the very last st. (26, 26, 26, 26, 26, 26)

Round 3 :

Ch 1 (does not count as st, dc 3 times in the next ch-2 space from hook. Ch 2, in the next ch-2 space from hook make: [dc 3, ch 2, dc 3]. Ch 2, dc 3 times in the next ch-2 space from hook. Ch 2, in the next ch-2 space from hook make: [dc 3, ch 2, dc 3]. Ch 2, dc 3 times in the next ch-2 space from hook. (33, 33, 33, 33, 33, 33)

Round 4 :

Ch 1 (does not count as st), turn, dc in the next st from hook. Ch 2, dc 3 times in the next ch-2 space from hook. Ch 2, in the next ch-2 space from hook make: [dc 3, ch 2, dc 3]. Ch 2, dc 3 times in the next ch-2 space from hook. Again, Ch 2, dc 3 times in the next ch-2 space from hook. Ch 2, in the next ch-2 space from hook make: [dc 3, ch 2, dc 3]. Ch 2, dc 3 times in the next ch-2 space from hook. Ch 2, dc in the very last st. (44, 44, 44, 44, 44, 44)

Round 5 :

Ch 1 (does not count as st), turn, dc 3 times in the next ch-2 space from hook. Ch 2, dc 3 times in the next ch-2 space from hook. Ch 2, in the next ch-2 space from hook make: [dc 3, ch 2, dc 3]. Ch 2, dc 3 times in the next ch-2 space from hook. Ch 2, dc 3 times in the next ch-2 space from hook. Again, Ch 2, dc 3 times in the next ch-2 space from hook. Then ch 2, in the next ch-2 space from hook make: [dc 3, ch 2, dc 3]. Ch 2, dc 3 times in the next ch-2 space from hook. Again, Ch 2, dc 3 times in the next ch-2 space from hook. (53, 53, 53, 53, 53, 53)

Info :

Fasten off.

โ€” Shirt Collar :

Round 1 :

For all sizes, ch 19. Turn, dc in 2nd ch from hook and in each ch across. (18)

Round 2 :

Ch 1 (does not count as st), turn, dc in each st across. (18)

Rounds (3-42, 3-42, 3-52, 3-52, 3-62, 3-62) :

Repeat Round 2. Fasten off.

Assembly Instructions

  • Create the top base by assembling a rectangle that is (8, 9, 10, 11, 12, 13) full squares wide and 5 full squares tall
  • Attach front panels made of 2x2 full squares with one full square and one diagonal square stacked on top to the first two and last two columns of the top base
  • Sew the back panel rectangle (4, 4, 4.5, 4.5, 5, 5) squares wide and 3 squares tall between the front panels on the top base
  • Connect the front panels' top-most full square to the top edge of the back panel by sewing from corner inward
  • Sew a line of half squares down each front panel edge, starting underneath the diagonal square to the bottom
  • Create sleeves by making loops of (4.5, 4.5, 5, 5, 5.5, 5.5) squares, stack another identical loop, then add (.5, .5, 1, 1, 1.5, 1.5) squares with diagonal squares at each end
  • Attach sleeves to sleeve holes by pinning at midpoints and sewing evenly spaced, then sew collar to neckline starting 1 inch from front panels and add buttons with 2-inch spacing

Important Notes

  • ๐Ÿ’กMaintain consistent gauge throughout all squares as this directly affects the final fit and appearance
  • ๐Ÿ’กUse stitch markers to keep track of rounds, especially during the complex granny square construction
  • ๐Ÿ’กPin all pieces in place before sewing to ensure proper alignment and spacing
  • ๐Ÿ’กCheck gauge frequently with the provided measurement: one full square should measure 8.5cm x 8.5cm
  • ๐Ÿ’กTake time to properly space the collar and buttons for a professional finish

This sophisticated Amalfi Top pattern brings Italian coastal elegance to your crochet wardrobe with its intricate granny square construction and modern menswear silhouette. The combination of diagonal squares, full squares, and half squares creates a stunning textured fabric that's both challenging to make and rewarding to wear. Perfect for the advanced crocheter who wants to create something truly special and professionally finished. ๐Ÿงถ Happy crocheting! ๐Ÿงตโœจ

You ask,

we answer.

FAQs

What if my gauge doesn't match the pattern exactly?

Gauge is crucial for this pattern. If your squares are too small or large, adjust your hook size accordingly. The pattern requires one full square to measure 8.5cm x 8.5cm for proper fit.

Can I adjust the length of the shirt?

Yes! You can add or remove rows of squares from the top base to achieve your preferred length. Just make sure to adjust yarn requirements accordingly.

How do I ensure the sleeves fit properly?

The sleeve loops should fit comfortably around the widest part of the arm. Add or remove a half-square from the loop if needed to get the best fit before proceeding.

What's the best way to join all the squares together?

Use a slip stitch or single crochet join for strength. Pin everything in place first and sew with matching yarn color for the most professional finish.

Is this pattern suitable for beginners?

This is definitely an advanced pattern requiring experience with granny squares, gauge control, and garment construction. Beginners should master basic granny squares first.