🧢 Beautiful ✨ Detailed πŸ’ Adorable

Ava the Butterfly Amigurumi Pattern

Ava the Butterfly Amigurumi Pattern
4.2β˜… Rating
3-4 Hours Time Needed
1.6K Made This
βœ‚οΈ

Beginner Friendly Level

Perfect for those just starting their sewing journey, with clear instructions and simple techniques

⏱️

Bite-Sized Project

Complete in under 2 hoursβ€”quick, fun, and perfect for a little creative escape.

🧸

Cute Companion

An adorable friend to cherish, handcrafted with love to bring comfort and joy for years to come.

About This Ava the Butterfly Amigurumi Pattern

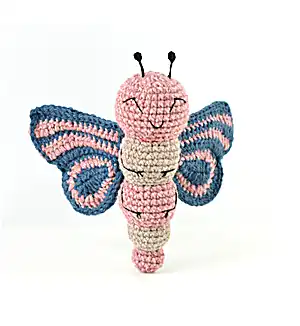
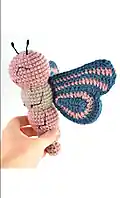
This delightful butterfly pattern combines basic amigurumi techniques with beautiful color work to create a stunning 7-inch tall companion. The design features a segmented body worked in alternating colors and intricate wings made from two panels each. With its sweet embroidered face and delicate antennae, Ava brings nature's beauty into your home through the art of crochet.

Ava the Butterfly Amigurumi Pattern crochet pattern - detailed view of completed project

The pattern includes detailed instructions for creating five separate pieces that come together beautifully. Each wing is crafted from two panels that are joined together, creating dimensional depth and visual interest.

Why You'll Love This Ava the Butterfly Amigurumi Pattern

I absolutely love how this pattern teaches you multiple techniques in one project! You'll master working in continuous rounds, color changes, and panel construction all while creating something truly magical. The satisfaction of watching those beautiful wings come together is incredible, and the final result is a butterfly that looks like it could flutter away at any moment.

Ava the Butterfly Amigurumi Pattern step 1 - construction progress Ava the Butterfly Amigurumi Pattern step 2 - assembly progress Ava the Butterfly Amigurumi Pattern step 3 - details and accessories Ava the Butterfly Amigurumi Pattern step 4 - final assembly and finishing

Switch Things Up

I love experimenting with different color combinations for this butterfly pattern! Try making a monarch version with orange and black, or go bold with rainbow stripes down the body. You could even add some sparkly thread worked alongside your regular yarn for a magical fairy-tale effect.

For a more realistic approach, research actual butterfly species and replicate their wing patterns. The Painted Lady or Swallowtail butterflies have gorgeous color schemes that would translate beautifully to crochet.

I've also discovered that adding small beads or sequins to the wing centers creates beautiful eye-spots that catch the light. Just make sure they're securely attached if the butterfly will be handled by children.

Common Mistakes & How to Fix Them

βœ— Not maintaining consistent tension when changing colors can create uneven stripes in the body sections βœ— Forgetting to stuff the body sections as you work can make it difficult to achieve proper shaping βœ— Rushing through the wing panel construction without checking stitch counts can result in mismatched panels βœ— Placing the wings too high or low on the body can throw off the butterfly's proportions and balance

Ava the Butterfly Amigurumi Pattern

Create this adorable butterfly friend with beautiful striped wings and a sweet smile! This charming amigurumi project features multiple color sections and detailed wing construction that results in a delightful 7-inch tall companion. Perfect for nature lovers and anyone who enjoys colorful, whimsical crochet projects that bring joy to any space.

Beginner Friendly 3-4 Hours

Materials Needed for Ava the Butterfly Amigurumi Pattern

β€” Main Fabric

  • 01
    Lion Brand Wool-Ease in Rose Heather (#140) - 1 ball
  • 02
    Lion Brand Wool-Ease in Oatmeal (#024) - 1 ball
  • 03
    Lion Brand Wool-Ease in Denim (#114) - 1 ball

β€” Tools Required

  • 01
    Crochet hook size F-5 (3.75 mm)
  • 02
    Steel crochet hook size 9 (1.25 mm) for antennae
  • 03
    Stitch markers
  • 04
    Large-eyed blunt needle
  • 05
    Black embroidery floss or cotton crochet thread size 10
  • 06
    Fiberfill stuffing
  • 07
    Scissors

Progress Tracker

0% Complete

β€” Body :

β€” First Section (Head) :

Setup :

With larger hook and A, make a magic ring

Rnd 1 (RS) :

Work 8 sc in ring; do not join, work in continuous rnds (spiral). Gently but firmly, pull tail to tighten center of ring. Place a marker in last st made to indicate end of rnd. Move marker up as each rnd is completed.

Rnd 2 :

Work 2 sc in each st around – you will have 16 sc in this rnd

Rnd 3 :

* Sc in next st, 2 sc in next st; rep from * around – 24 sc

Rnd 4 :

* Sc in next 2 sts, 2 sc in next st; rep from * around – 32 sc

Rnds 5-10 :

Sc in each st around

Rnd 11 :

* Sc in next 2 sts, sc2tog; rep from * around – 24 sc

Rnd 12 :

* Sc in next st, sc2tog; rep from * around; change to B in last st – 16 sc

β€” Second Section :

Rnd 13 :

With B, working in front loops only, * sc in next st, 2 sc in next st; rep from * around – 24 sc

Info :

Begin stuffing piece and continue stuffing until piece is complete

Rnd 14 :

* Sc in next 3 sts, 2 sc in next st; rep from * around – 30 sc

Rnds 15-18 :

Sc in each st around

Rnd 19 :

* Sc in next st, sc2tog; rep from * around – 20 sc

Rnd 20 :

* Sc in next 3 sts, sc2tog; rep from * around; change to A in last st – 16 sc

β€” Third Section :

Rnd 21 :

With A, working in front loops only, * sc in next st, 2 sc in next st; rep from * around – 24 sc

Rnd 22 :

* Sc in next 5 sts, 2 sc in next st; rep from * around – 28 sc

Rnds 23-25 :

Sc in each st around

Rnd 26 :

* Sc in next 2 sts, sc2tog; rep from * around – 21 sc

Rnd 27 :

* Sc in next st, sc2tog; rep from * around; change to B in last st – 14 sc

β€” Fourth Section :

Rnd 28 :

With B, working in front loops only, * sc in next st, 2 sc in next st; rep from * around – 21 sc

Rnds 29-31 :

Sc in each st around

Rnd 32 :

* Sc in next st, sc2tog; rep from * around – 14 sc

Rnd 33 :

* Sc2tog; rep from * around; change to A in last st – 7 sc

β€” Fifth Section :

Rnd 34 :

With A, working in front loops only, 2 sc in each st around – 14 sc

Rnds 35 and 36 :

Sc in each st around

Rnd 37 :

* Sc2tog; rep from * around – 7 sc

Finish :

Fasten off, leaving a long yarn tail. Thread tail through top of sts of last rnd. Pull tail to close opening and knot securely

β€” Wings (make 2) :

β€” Panel I :

β€” Lower Section :

Setup :

With larger hook and C, ch 8

Rnd 1 (RS) :

Sc in 2nd ch from hook, sc in next 2 ch, hdc in next ch, (hdc, dc) in next ch, 2 dc in next ch, 4 dc in next ch; working along opposite side of beg ch-8, 2 dc in next ch, (dc, hdc) in next ch, hdc in next ch, sc in next 3 ch; join with sl st in first sc and change to A – 20 sts

Rnd 2 :

With A, do NOT turn, sc in same st as joining sl st, sc in next 3 sts, hdc in next 2 sts, 2 hdc in next st, 2 dc in next st, dc in next st, 2 dc in each of next 2 sts, dc in next st, 2 dc in next st, 2 hdc in next st, hdc in next 2 sts, sc in last 4 sts; join with sl st in first sc and change to C – 26 sts

Rnd 3 :

With C, do NOT turn, sc in same st as joining sl st, sc in next 8 sts, 2 sc in next st, hdc in next st, 2 dc in each of next 4 sts, hdc in next st, 2 sc in next st, sc in last 9 sts; join with sl st in first sc – 32 sts. Do not fasten off

β€” Upper Section :

Info :

Work back and forth in rows. Do NOT turn before working Row 1. Row 1 of panel I is worked with front (RS) of lower section facing you

Row 1 (RS) :

With C, do NOT turn, sc in same st as joining sl st, sc in next 4 sts, hdc in next 3 sts, 2 hdc in next st, 2 dc in each of next 3 sts and change to A in last st; leave remaining sts unworked – 16 sts

Row 2 :

With A, ch 2 (does not count as a st), TURN, 2 dc in first st, dc in next 5 sts, hdc in next 5 sts, sc in next 5 sts and change to C in last st – 17 sts

Row 3 :

With C, ch 1, TURN, sc in first 10 sts, hdc in next 3 sts, dc in next 3 sts, 2 dc in next st and change to A in last st – 18 sts

Row 4 :

With A, ch 2 (does not count as a st), TURN, dc2tog, dc in next 3 sts, hdc in next 3 sts, sc in next 10 sts and change to C in last st – 17 sts

Row 5 :

With C, ch 1, TURN, sc in first 10 sts, hdc in next 3 sts, dc in next 2 sts, dc2tog – 16 sts. Fasten off

β€” Panel II :

β€” Lower Section :

Info :

Work same as lower section of Panel I

β€” Upper Section :

Info :

Work back and forth in rows. TURN at the beg of Row 1. Row 1 of Panel II is worked with back (WS) of lower section facing you

Rows 1-5 :

Work same as Rows 1-5 of upper section of Panel I, except beg Row 1 with WS of lower section facing you. Rows 1, 3, and 5 will be worked with WS of lower section facing you and Rows 2 and 4 will be worked with RS of lower section facing you. Do not fasten off

β€” Join Panels :

Assembly :

Hold panels I and II together with sts and rows matching. Working through both thicknesses, sl st evenly spaced all the way around outer edges of Wing; join with sl st in first sl st. Fasten off. Rep to make second Wing

β€” Antennae (make 2) :

Setup :

With smaller hook and black embroidery floss of cotton crochet thread, make a magic ring

Rnd 1 :

Work 6 sc in ring. Gently but firmly, pull tail to tighten center of ring and then ch 8

Finish :

Fasten off, leaving a long tail for sewing Antennae to Body. Rep to make second Antenna

Assembly Instructions

  • Sew Wings to back of Body, between Rnds 12 and 19, and about 6 sts apart
  • With black embroidery floss, embroider straight st eyes between Rnds 5 and 8, about 4 sts apart
  • Embroider mouth below eyes using black embroidery floss
  • Embroider 2 straight st legs between Rnds 14 and 19, and 2 legs between Rnds 21 and 26
  • Sew Antennae to top of head between Rnds 1 and 2 using yarn tails
  • Weave in all remaining ends securely

Important Notes

  • πŸ’‘Work tightly with the hook size specified so that stuffing won't show through the stitches
  • πŸ’‘Use stitch markers to keep track of rounds, especially during color changes in the body sections
  • πŸ’‘Stuff the body firmly but not too tightly to maintain proper shape and proportions
  • πŸ’‘When joining wing panels, ensure stitches and rows are properly aligned for best results
  • πŸ’‘If making for a baby or child, ensure all pieces are very securely sewn together for safety

This enchanting Ava the Butterfly pattern brings the beauty of nature into your crochet world! With her colorful striped body and magnificent detailed wings, she's perfect for anyone who loves whimsical creatures. The pattern teaches valuable techniques like color changes and panel construction while creating something truly magical. Whether displayed on a shelf or given as a heartfelt gift, this butterfly will bring smiles wherever she lands! πŸ¦‹ Happy crocheting! 🧢✨

You ask,

we answer.

FAQs

What if my butterfly doesn't measure 7 inches tall?

Gauge isn't critical for this project, but if size matters to you, try adjusting your hook size. A smaller hook will create a tighter, smaller butterfly, while a larger hook will make it bigger.

Can I use different colors than specified?

Absolutely! Feel free to customize your butterfly with any colors you love. Just make sure to maintain the same color pattern for the best visual effect.

How do I prevent the stuffing from showing through?

Work with tight, even tension and use the hook size specified in the pattern. The tight gauge helps create a dense fabric that conceals the stuffing.

What's the best way to attach the wings securely?

Use the yarn tails from the wings when possible, and sew through multiple stitches on both the wing and body. Make sure to knot securely on the inside.

Can I make the antennae with yarn instead of embroidery floss?

Yes, but embroidery floss creates more delicate, realistic-looking antennae. If using yarn, try a fine weight for the best appearance.