๐Ÿงถ Beautiful โœจ Detailed ๐Ÿ’ Adorable

Anglerfish SAM Amigurumi Pattern

Anglerfish SAM Amigurumi Pattern
4.4โ˜… Rating
15-20 Hours Time Needed
3.4K Made This
โœ‚๏ธ

Intermediate Level

Ideal for those with basic knitting experience, featuring slightly more advanced stitches and techniques to expand your skills.

โฑ๏ธ

All-Day Adventure

Requires 8-10 hours, ideal for a full day of immersive knitting.

๐Ÿ 

Charming Critter

Delightful animal designs with sweet details that capture the essence of your favorite woodland and farmyard friends.

About This Anglerfish SAM Amigurumi Pattern

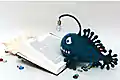
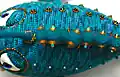
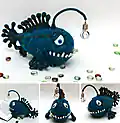
This extraordinary Anglerfish pattern brings the mysterious depths of the ocean to life in your hands. Sam the Anglerfish is not just an ordinary amigurumi - he's a complex creature featuring multiple intricate fins, realistic teeth with wire frames, and a functional fishing line with light bulb. The pattern includes detailed bead embroidery techniques to create stunning decorative patterns across his body.

Anglerfish SAM Amigurumi Pattern crochet pattern - detailed view of completed project

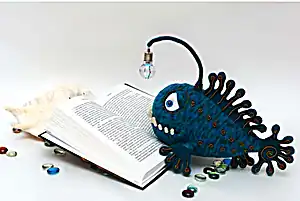
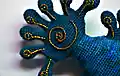
What makes this pattern special is its engineering - each fin has multiple finger-like rays that require careful assembly and wire reinforcement. The result is a poseable, sturdy anglerfish that can serve as both a cuddly toy and an impressive display piece.

Why You'll Love This Anglerfish SAM Amigurumi Pattern

I absolutely love how this pattern challenges you to think like an engineer while creating art. The wire framework system teaches you professional toy-making techniques, and the bead embroidery adds a luxurious finishing touch. It's incredibly satisfying to see all the complex pieces come together into this magnificent deep-sea creature!

Anglerfish SAM Amigurumi Pattern step 1 - construction progress Anglerfish SAM Amigurumi Pattern step 2 - assembly progress Anglerfish SAM Amigurumi Pattern step 3 - details and accessories Anglerfish SAM Amigurumi Pattern step 4 - final assembly and finishing

Switch Things Up

I love experimenting with different color combinations for this pattern - imagine creating a bioluminescent version using glow-in-the-dark yarn or metallic threads! You could also scale up the pattern for a larger statement piece, or create a whole school of smaller anglerfish in various colors. The wire framework technique opens up so many possibilities for other sea creatures too.

Consider adding LED strips along the fins for extra drama, or using different bead colors to create seasonal variations. Some makers have even created themed versions - like a steampunk anglerfish with copper wire visible through mesh sections. The beauty of this pattern is how the engineering principles can be adapted to your creative vision while maintaining the structural integrity that makes it so special!

Common Mistakes & How to Fix Them

โœ— Forgetting to stuff finger rays firmly enough, causing them to be floppy and lose their shape over time โœ— Not wrapping wire ends properly with plaster, which can cause injury and wire exposure through the fabric โœ— Skipping the shift stitches when instructed, leading to misaligned pattern pieces and asymmetrical fin placement โœ— Overstuffing the main body sections, which can distort the wire framework and cause structural problems

Anglerfish SAM Amigurumi Pattern

Create your own mysterious deep-sea companion with this enchanting Anglerfish pattern! This unique amigurumi features intricate fins, realistic teeth, glowing fishing line, and beautiful bead embroidery details. Perfect for those who love ocean creatures and want to craft something truly special that doubles as both a toy and decorative piece.

Intermediate 15-20 Hours

Materials Needed for Anglerfish SAM Amigurumi Pattern

โ€” Main Fabric

  • 01
    Vita Brilliant Print multicolor yarn (2604) - approximately 1.5 skeins
  • 02
    Vita Brilliant solid green yarn (4981) - approximately 0.5 skein
  • 03
    Vita Pelican white cotton yarn (3951) for eyes and teeth
  • 04
    Vita Pelican cotton yarn in yellow (3998), silver gray (3965), and black (3952) for light bulb

โ€” Tools Required

  • 01
    1.5mm crochet hook
  • 02
    1.0mm or 1.25mm crochet hook for details
  • 03
    1.0-1.5mm copper wire (approximately 6 meters)
  • 04
    Wire cutters
  • 05
    Pliers
  • 06
    White fabric plaster or insulation tape
  • 07
    Toy eyes 12mm or beads
  • 08
    Transparent glue
  • 09
    10/0 and 6/0 decorative beads
  • 10
    Nylon thread for beading
  • 11
    Sewing needle
  • 12
    Scissors
  • 13
    Stitch markers
  • 14
    Polyester stuffing
  • 15
    LED light bulb (optional)

Progress Tracker

0% Complete

โ€” Side Fins :

Ray A (2 rays) :

1) Make a MR, 6 sc into the ring

Round 2 :

2 sc in each st around (12)

Round 3 :

(3 sc, 2 sc in next st) * 3 (15)

Rounds 4-5 :

sc in each st around (15)

Round 6 :

(3 sc, 2 sc tog) * 3 (12)

Round 7 :

(sc, 2 sc tog) * 4 (8)

Rounds 8-10 :

sc in each st around (8)

โ€” Lower Fin :

Ray A (2 rays) :

Follow same pattern as side fin rays

Ray B (1 ray) :

Follow same pattern as side fin rays

โ€” Dorsal Fin :

Ray A (1 ray) :

Rounds 8-12: sc in each st around (8)

Ray B (1 ray) :

Rounds 8-16: sc in each st around (8)

Ray C (2 rays) :

Rounds 8-15: sc in each st around (8)

Ray D (3 rays) :

Rounds 8-13: sc in each st around (8)

Ray E (1 ray) :

Rounds 8-12: sc in each st around (8)

โ€” Tail :

Ray A (2 rays) :

Rounds 8-11: sc in each st around (8)

Ray B (4 rays) :

Rounds 8-12: sc in each st around (8)

Ray C (1 ray) :

Round 13: 2 sc in next st, 2 sc, (2 sc in next st) * 2, 2 sc, 2 sc in next st (12)

โ€” Body Assembly :

Lower Jaw :

Start with MR, 6 sc into ring, increase to 148 sts following detailed pattern

Muzzle :

Start with MR, 7 sc into ring, increase to 129 sts following detailed pattern

Assembly :

Join muzzle and lower jaw, continue working in rounds with decreases

โ€” Teeth :

Type A (2 teeth) :

Rounds 5-10: sc in each st around (9)

Type B (2 teeth) :

Rounds 5-8: sc in each st around (9)

Type C (2 teeth) :

Rounds 5-6: sc in each st around (9)

Type D (8-10 teeth) :

Rounds 2-4: sc in each st around (6)

โ€” Eyes :

Eye Whites :

Start with MR, 6 sc, increase to 32 sts, then decrease back to 6 sts

Eyelids :

Ch 4, work in oval shape to create eyelid covering

โ€” Fishing Line :

Rounds 1-56 :

sc in each st around (6)

Rounds 57-64 :

Increase gradually to 18 sts for bulb attachment

โ€” Finishing :

Wire Framework :

Insert copper wire into all fins and body for structure

Bead Embroidery :

Add decorative beads in patterns across fins and body

Final Assembly :

Attach all components, insert light bulb, and complete finishing touches

Assembly Instructions

  • Insert wire frameworks into all fin rays before stuffing, ensuring even wire lengths for proper support
  • Attach side fins to body between rounds 1-2 and 8-9, securing wire ends with plaster wrapping
  • Sew dorsal fin to back of fish, positioning rays according to the labeled diagram provided
  • Attach lower fin to belly between rounds 40-41, following same wire insertion techniques
  • Join tail to body by connecting wire frameworks and securing with additional wire wrapping
  • Install teeth using individual wire frames, spacing them according to the placement diagram
  • Create eye sockets by stitching from upper to lower eye edges, then attach completed eyes

Important Notes

  • ๐Ÿ’กAlways wrap wire ends with plaster to prevent injury and fabric damage
  • ๐Ÿ’กUse stitch markers consistently to track rounds, especially during color changes and fin assembly
  • ๐Ÿ’กStuff finger rays firmly but not tightly to maintain proper shape and wire positioning
  • ๐Ÿ’กPin all major components in place before final sewing to ensure correct alignment
  • ๐Ÿ’กFollow the shift stitch instructions carefully to maintain proper marker positioning throughout construction

This magnificent Anglerfish SAM pattern pushes the boundaries of traditional amigurumi with its engineering-focused approach and professional finishing techniques. The combination of wire frameworks, bead embroidery, and functional lighting creates a museum-quality piece that showcases advanced crochet skills. Every detail has been carefully designed to bring the mysterious beauty of deep-sea creatures into your home! ๐ŸŸโœจ

You ask,

we answer.

FAQs

Can I make this pattern without the wire framework?

While possible, the wire framework is essential for the fins to maintain their shape and for the fishing line to support the light bulb. Without it, the anglerfish will be floppy and not hold its intended form.

What if I can't find the specific yarn colors mentioned?

You can substitute with any smooth yarn that's not very stretchy. The key is maintaining consistent gauge and choosing colors that create good contrast between the main body and detail work.

How do I attach the LED light bulb safely?

The pattern includes instructions for crocheting your own light bulb if you can't source the LED version. If using a real LED, ensure all wire connections are properly insulated and secure.

Is this pattern suitable for beginners?

This is definitely an intermediate to advanced pattern due to the complex assembly, wire work, and multiple components. Beginners should master basic amigurumi techniques first.

How long does this project typically take to complete?

Expect 15-20 hours for the complete project, including all fins, body assembly, wire framework installation, and bead embroidery finishing work.