🧢 Beautiful ✨ Detailed πŸ’ Adorable

Baby Bat Amigurumi Pattern

Baby Bat Amigurumi Pattern
4.9β˜… Rating
2-3 Hours Time Needed
3.7K Made This
βœ‚οΈ

Beginner Friendly Level

Perfect for those just starting their sewing journey, with clear instructions and simple techniques

⏱️

Bite-Sized Project

Complete in under 2 hoursβ€”quick, fun, and perfect for a little creative escape.

πŸ¦‡

Tiny Treasure

Small, sweet, and gift-worthy creations that fit perfectly in the palm of your hand with detailed charm.

About This Baby Bat Amigurumi Pattern

This adorable baby bat pattern combines simple crochet techniques with charming details to create a pocket-sized companion. The body and head are worked continuously in rounds, while the wings are crafted separately and attached for a dimensional effect. Safety eyes bring personality to this little creature, and the compact size makes it perfect for quick gifting or Halloween decorating.

Baby Bat Amigurumi Pattern crochet pattern - detailed view of completed project

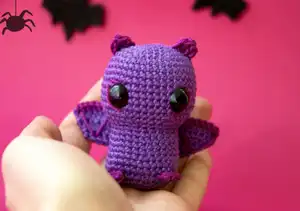
The pattern includes detailed instructions for creating tiny ears and delicate feet that add authenticity to your finished bat. Assembly is straightforward, making this an ideal project for building confidence with amigurumi construction techniques.

Why You'll Love This Baby Bat Amigurumi Pattern

I absolutely love how this pattern transforms a few simple stitches into such an endearing character! The baby bat's compact size makes it incredibly satisfying to complete quickly, and there's something magical about watching those tiny features come together. The safety eyes give it such a sweet, innocent expression that completely changes how you think about bats. I find myself making multiples because they're so addictive to create and make perfect little gifts that always bring smiles.

Baby Bat Amigurumi Pattern step 1 - construction progress Baby Bat Amigurumi Pattern step 2 - assembly progress Baby Bat Amigurumi Pattern step 3 - details and accessories Baby Bat Amigurumi Pattern step 4 - final assembly and finishing

Switch Things Up

I love how versatile this little bat pattern can be with just a few creative tweaks! Sometimes I make a whole family of bats in different sizes by adjusting the hook size - using a smaller hook creates tiny baby bats perfect for keychains, while a larger hook makes adorable big brother bats.

Color variations are endless too. I've made spooky black bats with silver accents for Halloween, soft pastels for a gentler look, and even rainbow versions that kids absolutely adore. Adding a small loop to the head turns them into ornaments.

For extra personality, I sometimes embroider tiny fangs with white thread or add glitter to the wings for a magical sparkle effect. The wings can be positioned differently too - spread wide for flying poses or folded for a sleepy look.

Common Mistakes & How to Fix Them

βœ— Not maintaining consistent tension can cause uneven body shape and visible gaps between stitches βœ— Placing safety eyes too far apart or too close together dramatically changes the bat's facial expression βœ— Overstuffing the head and body can distort the shape and make wing attachment difficult βœ— Forgetting to stuff before closing rounds makes it nearly impossible to achieve proper shaping later

Baby Bat Amigurumi Pattern

Create an adorable miniature bat with this charming amigurumi pattern! This sweet little creature features a plump purple body, delicate wings, and tiny ears that make it irresistibly cute. Perfect for Halloween decorations or year-round companionship, this baby bat brings a touch of whimsical magic to any space. The pattern uses simple stitches and basic techniques, making it accessible while creating a delightfully detailed finished piece that captures the gentle spirit of these misunderstood creatures.

Beginner Friendly 2-3 Hours

Materials Needed for Baby Bat Amigurumi Pattern

β€” Main Fabric

  • 01
    Cotton or acrylic yarn in violet/purple (Farbe A) and burgundy/dark purple (Farbe B)
  • 02
    Schachenmayr Catania yarn recommended in colors 0113 violet and 0282 phlox

β€” Tools Required

  • 01
    Crochet hook size 2.5mm
  • 02
    Safety eyes 11mm
  • 03
    Fiberfill stuffing
  • 04
    Yarn needle
  • 05
    Scissors
  • 06
    Embroidery needle

Progress Tracker

0% Complete

β€” Head :

Round 1 :

6 sc in magic ring

Round 2 :

2 sc in each st (12)

Round 3 :

(1 sc, inc) x 6 (18)

Round 4 :

(2 sc, inc) x 6 (24)

Round 5 :

(3 sc, inc) x 6 (30)

Round 6 :

(4 sc, inc) x 6 (36)

Round 7 :

(5 sc, inc) x 6 (42)

Round 8-14 :

1 sc in each st

Info :

Place safety eyes between rounds 12 and 13 with 9 stitches spacing

Round 15 :

(5 sc, dec) x 6 (36)

Round 16 :

(4 sc, dec) x 6 (30)

Round 17 :

(3 sc, dec) x 6 (24)

Info :

Stuff head firmly

Round 18 :

1 sc in each BLO (24)

Round 19 :

(3 sc, inc) x 6 (30)

Round 20-22 :

1 sc in each st

Round 23 :

(4 sc, inc) x 6 (36)

Round 24-25 :

1 sc in each st

Round 26 :

(4 sc, dec) x 6 (30)

Round 27 :

(3 sc, dec) x 6 (24)

Round 28 :

(2 sc, dec) x 6 (18)

Info :

Stuff body

Round 29 :

(1 sc, dec) x 6 (12)

Round 30 :

dec x 6 (6)

β€” Wings :

With Color A :

Chain 25, turn

Row 1 :

1 sc in each ch, turn (24)

Row 2 :

skip 1, 20 sc, skip 1, turn (22)

Row 3 :

skip 1, 18 sc, skip 1, turn (20)

Row 4 :

skip 1, 16 sc, skip 1, turn (18)

Row 5 :

skip 1, 14 sc, skip 1, turn (16)

Info :

Cut yarn and weave in ends. Sew thread ends toward center of wing so attachment point comes out nearer to middle of wing for better attachment

With Color B :

Attach yarn to first row of wing. Crochet 24 sc along wing edge. Cut yarn and leave long end. Use yarn needle to embroider triangles on wing

β€” Ears (Make 2) :

With Color B :

Chain 2, into second chain from hook

Row 1 :

hdc, sc, hdc, sc. Cut yarn and leave long end

β€” Feet (Make 2) :

With Color B :

Chain 2

Row 1 :

Into second chain from hook: 4 sc. Cut yarn and leave long end

Assembly Instructions

  • Attach wings to sides of body between the head and body junction, positioning them symmetrically
  • Sew ears to top of head with burgundy sections facing forward for color contrast
  • Attach small feet to bottom of body, spacing them evenly
  • Secure all yarn ends by weaving through multiple stitches and trimming excess
  • Position safety eyes before final head stuffing to ensure proper placement

Important Notes

  • πŸ’‘Use consistent tension throughout to maintain even stitch appearance and proper sizing
  • πŸ’‘Safety eyes must be inserted before completing the head as they cannot be added later
  • πŸ’‘Stuff firmly but avoid overstuffing which can distort the shape and stretch stitches
  • πŸ’‘Wings should be positioned symmetrically and sewn securely to prevent drooping
  • πŸ’‘Keep color changes clean by carrying unused yarn inside the work when possible

This charming baby bat pattern brings together simple crochet techniques with delightful details to create an irresistibly cute companion. The combination of soft purple tones and tiny burgundy accents gives this little creature a gentle, approachable personality that's perfect for Halloween or year-round cuddles. With its compact size and quick completion time, it's an ideal project for gift-giving or building your amigurumi skills. The satisfaction of watching this sweet face come to life with just a few basic stitches never gets old! πŸ¦‡

You ask,

we answer.

FAQs

What size will the finished baby bat be?

The completed baby bat measures approximately 3-4 inches tall, making it a perfect pocket-sized companion.

Can I use different colors for this pattern?

Absolutely! While the pattern calls for purple and burgundy, you can use any color combination. Black and gray would be traditional, or try pastels for a softer look.

Are safety eyes necessary or can I embroider the eyes?

Safety eyes give the best result, but you can embroider eyes if making this for a very young child or prefer a softer look.

How do I prevent the wings from drooping after attachment?

Sew wings securely at multiple points and consider adding a few hidden stitches from wing to body for extra support.

What's the best way to stuff this small project?

Use small amounts of stuffing at a time and push it into place with a chopstick or stuffing tool for even distribution.