๐Ÿงถ Beautiful โœจ Detailed ๐Ÿ’ Adorable

Baby Bat Amigurumi Pattern

Baby Bat Amigurumi Pattern
4.6โ˜… Rating
4-5 Hours Time Needed
2.4K Made This
โœ‚๏ธ

Intermediate Level

Ideal for those with basic knitting experience, featuring slightly more advanced stitches and techniques to expand your skills.

โฑ๏ธ

Weekend Treat

Takes 5-7 hours, making it an enjoyable project to finish over a couple of days.

๐Ÿงธ

Cute Companion

An adorable friend to cherish, handcrafted with love to bring comfort and joy for years to come.

About This Baby Bat Amigurumi Pattern

This charming Baby Bat pattern combines classic amigurumi techniques with delightful details like embroidered blush and a tiny bow-tie. The wings are worked in double crochet to create beautiful texture and dimension, while the body uses simple single crochet rounds for a smooth, cuddly finish. Each component is carefully designed to create the perfect proportions for this sweet nocturnal friend.

Baby Bat Amigurumi Pattern crochet pattern - detailed view of completed project

The pattern includes detailed assembly instructions with helpful photos to guide you through positioning the ears and wings perfectly. Special attention is given to stuffing techniques that ensure your bat maintains its adorable shape and expression.

Why You'll Love This Baby Bat Amigurumi Pattern

I absolutely love how this pattern brings together different crochet techniques to create such personality in a small project. The way the wings fold naturally and the sweet embroidered blush gives each bat its own unique character. There's something so satisfying about watching this little creature come to life as you add each component, and the finished result is simply irresistible!

Baby Bat Amigurumi Pattern step 1 - construction progress Baby Bat Amigurumi Pattern step 2 - assembly progress Baby Bat Amigurumi Pattern step 3 - details and accessories Baby Bat Amigurumi Pattern step 4 - final assembly and finishing

Switch Things Up

I love how versatile this little bat pattern can be! You could easily swap out the bow-tie for different seasonal accessories - maybe a tiny santa hat for Christmas, or a small flower crown for spring. The color possibilities are endless too - imagine a whole family of bats in different shades!

For a more advanced challenge, try adding small wire armatures to the wings to make them poseable, or experiment with different yarn textures like fuzzy mohair for a more realistic bat fur effect. You could even create a whole Halloween scene with multiple bats in various sizes by adjusting your hook size.

The embroidered blush is another area where you can get creative - try different expressions like sleepy eyes with tiny embroidered lashes, or even add small embroidered fangs for a playful vampire bat look!

Common Mistakes & How to Fix Them

โœ— Not maintaining consistent tension throughout the project, especially when switching between single crochet and double crochet sections โœ— Placing safety eyes too early before securing the backs, making it difficult to crochet subsequent rounds properly โœ— Overstuffing the head during decrease rounds, which can distort the shape and make the eyes appear crooked โœ— Incorrect wing positioning during assembly, resulting in an unbalanced or awkward appearance from the front view

Baby Bat Amigurumi Pattern

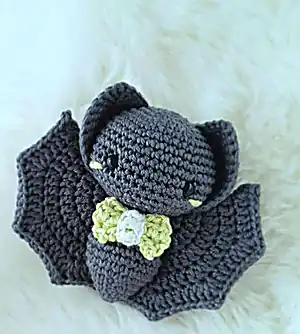
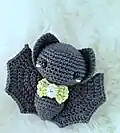
Create an adorable baby bat with this charming amigurumi pattern! This sweet little creature features detailed wings, cute ears, and a delightful bow-tie that makes it perfect for Halloween decorations or year-round cuddles. The pattern uses simple stitches and clear instructions, making it accessible for crocheters who want to add some whimsical charm to their collection. With its compact size and endearing design, this baby bat will quickly become a favorite handmade treasure.

Intermediate 4-5 Hours

Materials Needed for Baby Bat Amigurumi Pattern

โ€” Main Fabric

  • 01
    Approximately 25g yarn in main color (Scheepjes Catona in Anthracite 501, Dark Olive 387, Bridal White 105)
  • 02
    Small amount of accent color yarn for blush and bow-tie (Scheepjes Catona in Lime Juice 392, Apricot 524, Light Orchid 226)
  • 03
    Small amount of white yarn for bow-tie knot

โ€” Tools Required

  • 01
    2.25mm crochet hook (or hook suitable for chosen yarn)
  • 02
    6mm safety eyes
  • 03
    Stuffing
  • 04
    Darning/Tapestry needle
  • 05
    Pins
  • 06
    Scissors

Progress Tracker

0% Complete

โ€” Head :

Round 1 :

6 sc in mr (6)

Round 2 :

(inc) x 6 (12)

Round 3 :

(sc, inc) x 6 (18)

Round 4 :

(sc 2, inc) x 6 (24)

Round 5 :

(sc 3, inc) x 6 (30)

Round 6 :

(sc 4, inc) x 6 (36)

Round 7-8 :

sc in each - 2 rounds (36)

Round 9 :

(sc 5, inc) x 6 (42)

Round 10-13 :

sc in each - 4 rounds (42)

Info :

Insert safety eyes as shown. Do not add the backs yet, as it may be difficult to crochet the next round.

Round 14 :

(sc 4, dec) x 7 (35)

Info :

Stuffing step 1

Round 15 :

(sc 3, dec) x 7 (28)

Info :

Stuffing step 2

Round 16 :

(sc 2, dec) x 7 (21)

Round 17 :

(sc, dec) x 7 (14)

Info :

Stuffing step 3

Finish :

Slst, FO, and weave in tail
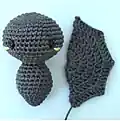
โ€” Body :

Round 1 :

6 sc in mr (6)

Round 2 :

(inc, sc) x 3 (9)

Round 3 :

(inc, sc 2) x 3 (12)

Round 4 :

(inc, sc 3) x 3 (15)

Round 5 :

(inc, sc 4) x 3 (18)

Round 6 :

(inc, sc 2) x 6 (24)

Round 7-9 :

sc in each stitch - 3 rounds (24)

Info :

Begin to stuff the body. From here, stuff as you go.

Round 10 :

(dec, sc 6) x 3 (21)

Round 11 :

sc in each stitch (21)

Round 12 :

(dec, sc 5) x 3 (18)

Round 13 :

(sc 3, dec, sc 2, dec) x 2 (14)

Finish :

Sc in the next 3 stitches, Slst in the next. Cut yarn, leaving a long tail for sewing, and pull through.

โ€” Ears :

Make 2 :

Start with 6sc in mr

Round 1 :

(3sc, sc) x 3 (12)

Round 2 :

Sc, (3sc, sc 3) x 2, 3sc, sc 2 (18)

Round 3 :

Sc 2, (3sc, sc 5) x 2, 3sc, sc 3 (24)

Round 4 :

Sc 3, (3sc, sc 7) x 2, 3sc, sc 4 (30)

Round 5 :

Sc 4, (2sc, sc 9) x 2, 2sc, sc 4, slst (33)

Finish :

Cut yarn, and pull through - leaving approx. 40cm tail. Make the second ear.

โ€” Wings :

Make 2 :

Into mr...

Round 1 :

Ch3, dc 15, slst into ch2 (16)

Round 2 :

Ch3, dc in same ch2 space, (dc, dc-inc) x 7, dc, slst in ch2 (24)

Round 3 :

Ch3, dc in same ch2 space, (dc 2, dc-inc) x 7, dc 2, slst in ch2 (32)

Round 4 :

Ch3, dc in same ch2 space, (dc 3, dc-inc) x 7, dc 3, slst in ch2 (40)

Round 5 :

Ch3, dc in same ch2 space, ch2, 2dc in the same space then... (dc 4, 2dc ch2 2dc) x 7, dc 4, slst in ch 2 (80)

Finish :

Cut approx. 60 cm of yarn and pull through.

โ€” Bow-Tie :

In accent color :

Ch 8, hdc in 3rd ch from hook, hdc in each space (6)

Rows 2-4 :

Ch 2, turn, hdc in each stitch (6) - 3 rows

Finish :

Fasten off and weave in ends

In white :

Ch 7 with a 10cm tail

Row 1 :

Dc in 3rd ch from hook, dc in each space (4)

Finish :

Slst into ch1, cut 10cm and pull through

Assembly Instructions

  • Attach head to body by lining up the slip stitch on the body with the slip stitch on the head, then stitch together through front loops only
  • Position ears using the three-point system: Point A at second stitch back from blush between rounds 12-13, Point B between rounds 8-9, Point C at top tip between rounds 3-4
  • Attach wings to body creating a narrow V-shape, with starting rings positioned where body meets head, 3-4 stitches apart
  • Sew wings from bottom to top using one stitch every 2-3 body rows, then secure additional points at ear level and bottom of body
  • Attach bow-tie between the 2nd and 3rd rows beneath the head
  • Embroider blush on cheeks by inserting needle through opening, bringing out two stitches back from eye between rounds 11-12

Important Notes

  • ๐Ÿ’กMaintain consistent tension throughout the project, especially when switching between single crochet and double crochet sections
  • ๐Ÿ’กDo not add safety eye backs until instructed, as it makes crocheting subsequent rounds difficult
  • ๐Ÿ’กTake time with stuffing and shaping - it really makes a difference in the final cute appearance
  • ๐Ÿ’กAlways check ear positioning from the front before sewing to ensure proper placement
  • ๐Ÿ’กBe careful handling small bats with pins - they may stick through the body during assembly
  • ๐Ÿ’กKeep wings neat and compact - they should be almost as tall as the head and body combined

This precious Baby Bat pattern brings together the charm of amigurumi with delightful details that make each creation unique. The combination of textured wings and sweet embroidered features creates a character full of personality that's perfect for Halloween decorating or year-round snuggles. With clear instructions and helpful assembly tips, you'll love watching this adorable nocturnal friend come to life in your hands! ๐Ÿงถ Happy crocheting! ๐Ÿฆ‡โœจ

You ask,

we answer.

FAQs

What size will my finished baby bat be?

The finished baby bat is quite small and compact, perfect for palm-sized cuddling. The exact size depends on your yarn weight and hook size, but using the recommended 2.25mm hook with DK weight yarn creates a charming mini bat.

Can I use different colors for my baby bat?

Absolutely! While the pattern uses grey/anthracite as the main color, you can create your bat in any color combination you like. Consider traditional brown, spooky black, or even fun rainbow colors for a unique twist.

How do I ensure my wings are the right size?

The wings should be almost as tall as the head and body combined. If your wings are much larger, try using a smaller hook. Keep your double crochet stitches neat and compact for the best results.

What should I do if my bat's eyes look crooked?

This often happens from overstuffing during the decrease rounds. Make sure to stuff gently and place plenty of stuffing above the eye area initially to keep them looking straight and forward.

Can I make this pattern larger?

Yes! You can increase the size by using a larger hook and thicker yarn. Just remember to adjust your safety eye size accordingly and maintain consistent tension throughout all components.