🧢 Beautiful ✨ Detailed πŸ’ Adorable

Baby Bears Amigurumi Pattern

Baby Bears Amigurumi Pattern
4.2β˜… Rating
12-15 Hours Time Needed
3.2K Made This
βœ‚οΈ

Intermediate Level

Ideal for those with basic knitting experience, featuring slightly more advanced stitches and techniques to expand your skills.

⏱️

Slow & Steady

A 10-12 hour projectβ€”great for savoring the process over several sessions.

🧸

Cute Companion

An adorable friend to cherish, handcrafted with love to bring comfort and joy for years to come.

About This Baby Bears Amigurumi Pattern

This delightful Baby Bears pattern creates a complete nursery set featuring an adorable bear with overalls, beanie, pacifier, blanket, and bassinet. Each bear stands approximately 20cm tall and comes with carefully designed accessories that add charm and functionality. The pattern includes detailed instructions for embroidered facial features and assembly techniques that bring these sweet bears to life.

Baby Bears Amigurumi Pattern crochet pattern - detailed view of completed project

The set includes everything needed for a complete baby bear nursery experience. Optional flower embellishments add an extra touch of sweetness to the beanie.

Why You'll Love This Baby Bears Amigurumi Pattern

I absolutely love how this pattern combines classic amigurumi techniques with practical baby accessories. The attention to detail in each component, from the tiny pacifier to the functional bassinet, creates a cohesive set that's both beautiful and meaningful. The embroidered facial features give each bear such personality, and the ability to customize colors makes every creation unique.

Baby Bears Amigurumi Pattern step 1 - construction progress Baby Bears Amigurumi Pattern step 2 - assembly progress Baby Bears Amigurumi Pattern step 3 - details and accessories Baby Bears Amigurumi Pattern step 4 - final assembly and finishing

Switch Things Up

I love how versatile this Baby Bears pattern can be with just a few creative modifications! You could easily change up the color scheme to match any nursery theme - think soft pastels for a vintage look, or bold primary colors for a modern touch. The overalls could be made in different colors or even with stripes for a fun twist.

For a seasonal variation, I'd suggest making the beanie in festive colors and adding small embroidered details like snowflakes for winter bears or flowers for spring versions. You could also experiment with different flower types for the beanie decoration - maybe tiny roses or daisies instead of the basic flower pattern.

The blanket offers endless possibilities too - try different stitch patterns like granny squares or shell stitches for texture variety. I've even seen crafters add small pockets to the overalls or create themed accessories like tiny books or toys that fit in the bear's hands.

Common Mistakes & How to Fix Them

βœ— Forgetting to stuff only the hands and feet while leaving arms and legs empty βœ— Not maintaining tight tension which can cause stuffing to show through stitches βœ— Placing facial features incorrectly - eyes should be 6 stitches apart on round 11 βœ— Overstuffing the head making it difficult to close properly at the end

Baby Bears Amigurumi Pattern

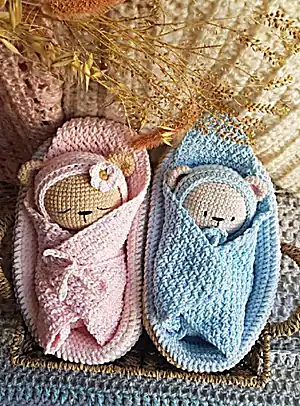
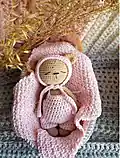
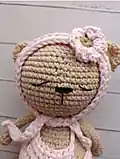
Create these adorable baby bears complete with overalls, beanie, pacifier, bassinet, and blanket! This comprehensive pattern includes everything you need to make the perfect nursery set. The bears are approximately 20cm tall and come with detailed accessories that make them extra special. Perfect for baby showers, nursery decoration, or as a cherished gift for new parents.

Intermediate 12-15 Hours

Materials Needed for Baby Bears Amigurumi Pattern

β€” Main Fabric

  • 01
    100grs of medium cotton yarn in blue/pink/beige colors
  • 02
    100grs of Himalaya Baby Dolphin yarn in blue/pink/beige/grey colors
  • 03
    Small amount of embroidery thread for facial features

β€” Tools Required

  • 01
    Crochet hooks size 2mm, 3.5mm, 4mm, 5mm
  • 02
    Polyester fiberfill stuffing
  • 03
    Scissors
  • 04
    Tapestry needle
  • 05
    Embroidery needle
  • 06
    Stitch markers

Progress Tracker

0% Complete

β€” Feet x2

Round 1:

6 sc in a magic ring (6)

Round 2:

6 inc (12)

Round 3:

1 sc, 1 inc (18)

Round 4-5:

18 sc (2 rounds) (18)

Round 6:

3 dec, 12 sc (15)

Round 7:

15 sc (15)

Round 8:

3 dec, 9 sc (12)

Round 9-10:

12 sc (2 rounds) (12)

Info:

Stuff only the bottom, the rest of the leg is empty

Round 11:

4 sc, 1 dec (10)

Round 12-15:

10 sc (4 rounds) (10)

Round 16:

fold the edge flat and close with 5 sc

β€” Arms x2

Round 1:

6 sc in a magic ring (6)

Round 2:

6 inc (12)

Round 3:

12 sc (12)

Round 4:

3 dec, 6 sc (9)

Round 5:

2 dec, 5 sc (7)

Round 6:

7 sc (7)

Round 7-17:

7 sc (11 rounds) (7)

Round 18:

fold the edge flat and crochet 3 sc

Info:

Stuff only the hand, the rest of the arm is empty

β€” Body

Round 1:

6 sc in a magic ring (6)

Round 2:

6 inc (12)

Round 3:

1 sc, 1 inc (18)

Round 4:

2 sc, 1 inc (24)

Round 5:

3 sc, 1 inc (30)

Round 6:

4 sc, 1 inc (36)

Round 7:

5 sc, 1 inc (42)

Round 8:

6 sc, 1 inc (48)

Round 9:

48 sc (48)

Round 10:

Place the legs and work 5 sc together with the body, 19 sc, 5 sc with the other leg, 19 sc (48)

Round 11-14:

48 sc (4 rounds) (48)

Round 15:

6 sc, 1 dec (42)

Round 16:

42 sc (42)

Round 17:

5 sc, 1 dec (36)

Round 18:

36 sc (36)

Round 19:

4 sc, 1 dec (30)

Round 20:

30 sc (30)

Round 21:

3 sc, 1 dec (24)

Round 22:

24 sc (24)

Round 23:

2 sc, 1 dec (18)

Info:

Stuff the body

Round 24:

place the arms and work 3 sc together with the body, 6 sc, 3 sc with the other arm and 6 sc (18)

Round 25:

18 sc (18)

Round 26:

1 sc, 1 dec (12)

Round 27:

12 sc

β€” Head

Round 1:

12 inc (24)

Round 2:

3 sc, 1 inc (30)

Round 3:

4 sc, 1 inc (36)

Round 4:

5 sc, 1 inc (42)

Round 5:

6 sc, 1 inc (48)

Round 6:

7 sc, 1 inc (54)

Round 7-8:

54 sc (3 rounds) (54)

Round 9:

8 sc, 1 inc (60)

Round 10-17:

60 sc (8 rounds) (60)

Round 18:

8 sc, 1 dec (54)

Round 19:

7 sc, 1 dec (48)

Round 20:

6 sc, 1 dec (42)

Round 21:

5 sc, 1 dec (36)

Round 22:

4 sc, 1 dec (30)

Round 23:

3 sc, 1 dec (24)

Round 24:

2 sc, 1 dec (18)

Info:

Stuff the head firmly

Round 25:

1 sc, 1 dec (12)

Round 26:

6 dec (6)

Info:

Close the hole with the sewing needle

β€” Ears x2

Round 1:

6 sc in a magic ring (6)

Round 2:

6 inc (12)

Round 3:

1 sc, 1 inc (18)

Round 4-5:

18 sc (2 rounds) (18)

Round 6:

1 sc, 1 dec (12)

Round 7:

fold the edge flat and crochet 6 sc

Info:

Leave a long yarn tail to sew

β€” Tail

Round 1:

6 sc in a magic ring (6)

Round 2:

6 inc (12)

Round 3:

1 sc, 1 inc (18)

Round 4:

18 sc (18)

Round 5:

1 sc, 1 dec (12)

Round 6:

4 sc, 1 dec (10)

Info:

Leave a long yarn tail to sew. Stuff a little bit. Sew it between rounds 5-8 of the body

β€” Pacifier

Round 1:

Magic ring, ch 2, 11 hdc, close with a ssl (12)

Round 2:

12 sc FLO (12)

Pacifier ring:

ch 6, 1 ssl

β€” Overall

Round 1:

ch 17 + ch 2, 17 hdc, join ends with ssl (18)

Round 2-3:

ch 2, 17 hdc, 1 ssl (18)

Info:

Cut the yarn and make another piece

Round 4:

1 ssl in the ending of the first leg, ch 2, 17 hdc around the first round, keep crocheting in the second leg and finish with 1 ssl (36)

Round 5-10:

ch 2, 35 hdc (6 rounds) (36)

Info:

Mark 9 st in the front center, 9 st in the sides and 9 st in the back center

Round 11:

start from the front center, ch 2, 8 hdc (9)

Round 12-13:

ch 2, 8 hdc (2 rounds)

Straps:

ch 12 from one side of the front, 1 ssl in the back. Cut the yarn and crochet the other strap the same way

Leg edges:

In the edge of the legs, crochet 18 ssl

β€” Beanie

Round 1:

6 sc in a magic ring (6)

Round 2:

6 inc (12)

Round 3:

1 sc, 1 inc (18)

Round 4:

2 sc, 1 inc (24)

Round 5:

3 sc, 1 inc (30)

Round 6:

4 sc, 1 inc (36)

Round 7:

5 sc, 1 inc (42)

Round 8-11:

42 sc (4 rounds) (42)

Round 12:

38 sc, turn (leave 4 stitches unused)

Info:

From now on you will not crochet in spiral

Round 13:

ch 1, BLO all the round, 7 sc, 6 ch, skip 6 st, 8 sc, 6 ch, skip 6 st, 8 sc, turn (38)

Round 14:

ch 2 (this count as 1 hdc), 37 hdc, turn (38)

Round 15:

ch 2, 37 hdc (38)

Lace:

ch 20, 19 hdc, 1 ssl, cut the yarn. Repeat the same for the other side

β€” Blanket

Row 1:

Ch 40 + 3, 1 sc in the 4th chain, ch 1; Repeat till the end 1 sc, ch 1, skip 1 st; Finish with 1 sc, ch 2 and turn

Row 2:

1 sc in between sc (below each chain) and repeat all the round *1 sc, 1 ch* till the end. Repeat this sequence till you have a square of 27 x 27 cm

Chain:

Crochet a separate chain 90 to tie the blanket

Assembly:

Mark 10 cm between 1 corner and the center of the blanket and pass the chain through the blanket

β€” Bassinet

Round 1:

ch 26, 24 sc, 3 sc in the last ch, 24 in the other side of the chain, 24 sc, 3 sc (54) Place the marker

Round 2:

24 sc, 3 inc, 24 sc, 3 inc (60)

Round 3:

24 sc, (1 sc, 1 inc)x3, 24 sc, (1 sc, 1 inc)x3 (66)

Round 4:

24 sc, (2 sc, 1 inc)x3, 24 sc, (2 sc, 1 inc)x3 (72)

Round 5:

24 sc, (3 sc, 1 inc)x3, 24 sc, (3 sc, 1 inc)x3 (78)

Round 6:

24 sc, (4 sc, 1 inc)x3, 24 sc, (4 sc, 1 inc)x3 (84)

Round 7:

24 sc, (5 sc, 1 inc)x3, 24 sc, (5 sc, 1 inc)x3 (90)

Round 8:

24 sc, (6 sc, 1 inc)x3, 24 sc, (6 sc, 1 inc)x3 (96)

Round 9:

24 sc, (7 sc, 1 inc)x3, 24 sc, (7 sc, 1 inc)x3 (102)

Round 10:

102 sc BLO (102)

Round 11-19:

102 sc (9 rounds) (102)

Round 20:

change color, 102 sc BLO (102)

Round 21-30:

102 sc (10 rounds) (102)

Info:

Crochet another base with the second color

Round 31:

place the new base over the bassinet and join the edges. work 102 ssl from 1 loop, the back loop from rnd 30 of the bassinet and the front loop from the base

Round 32:

in the loops from rnd 20, work 2 rounds of sc. Start with ch 1, 101 sc. In the second round finish with a ssl in the end

β€” Flower

Round 1:

6 sc in a magic ring, close with a ssl (6)

Round 2:

Change color. 2 ch, 3 hdc in the same st, 3 ch and 1 ssl in the next st. Repeat 5 more times and you should have 6 petals. Close with a ssl in the base of the first ch 2 (12)

Assembly Instructions

  • Dress the overall on the bear as shown in the pictures
  • Sew the tail over rounds 6-7 of the overall, in the center of the back
  • Sew the pacifier between rounds 10-6 of the head
  • Sew the ears between rounds 14-20 of the head, 12 stitches apart from the top side
  • Place the beanie on the head by passing the ears through the holes
  • Sew the flower in the edge of the hood if desired
  • Wrap the baby bear with the blanket and tie with the chain

Important Notes

  • πŸ’‘Make sure the crocheting is tense so that the filling is not visible
  • πŸ’‘Stuff with polyester filling until firm, though the crochet is tense at the beginning, it will yield
  • πŸ’‘The yarn thickness will change noticeably the size of your toys
  • πŸ’‘Remember there are 3 factors that modify your crochet: hook size, yarn thickness, and crocheter's hand tension
  • πŸ’‘Use embroidery needle for facial features with proper placement guidelines

This comprehensive Baby Bears pattern creates the most adorable nursery set you've ever seen! Complete with overalls, beanie, pacifier, blanket, and bassinet, these bears are perfect for welcoming a new baby or creating a special gift. The detailed instructions ensure every element comes together beautifully, creating lasting memories with every stitch. 🧢 Happy crocheting! 🧡✨

You ask,

we answer.

FAQs

What size will my finished bear be?

The bears measure approximately 20cm (8 inches) tall when completed, with the bassinet measuring 27cm from outside or 24cm from inside, and the blanket measuring 27 x 27cm.

Can I use different yarn weights?

Yes, but keep in mind that yarn thickness will significantly change the size of your finished bears. Adjust your hook size accordingly and remember to maintain tight tension.

How do I embroider the facial features correctly?

For the eyes, mark 4 stitches for both eyes, 6 stitches separated, and sew with black yarn from round 11 to 12. For the nose, mark 3 stitches between the eyes in round 11 and pass the needle 2 times.

Do I need to stuff the entire bear?

No, only stuff the hands and feet while leaving the arms and legs empty. Stuff the head and body firmly for the best shape.

Can I make the bassinet in different colors?

Absolutely! The pattern includes color changes and you can customize the colors to match your nursery theme or personal preference.