🧢 Beautiful ✨ Detailed πŸ’ Adorable

Baby Dandelion Amigurumi Pattern

Baby Dandelion Amigurumi Pattern
4.8β˜… Rating
8-10 Hours Time Needed
2.7K Made This
βœ‚οΈ

Intermediate Level

Ideal for those with basic knitting experience, featuring slightly more advanced stitches and techniques to expand your skills.

⏱️

All-Day Adventure

Requires 8-10 hours, ideal for a full day of immersive knitting.

🧸

Cute Companion

An adorable friend to cherish, handcrafted with love to bring comfort and joy for years to come.

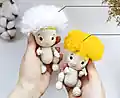
About This Baby Dandelion Amigurumi Pattern

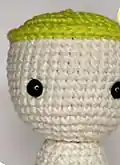
This Baby Dandelion pattern combines traditional amigurumi techniques with advanced sculpting and assembly methods. The pattern features a movable head using plastic joints, detailed facial sculpting with strong thread, and a unique fluffy hair technique using mohair or similar yarn. Special attention is given to creating the characteristic dandelion appearance with a green cap and flowing white hair that mimics dandelion seeds ready to take flight.

Baby Dandelion Amigurumi Pattern crochet pattern - detailed view of completed project

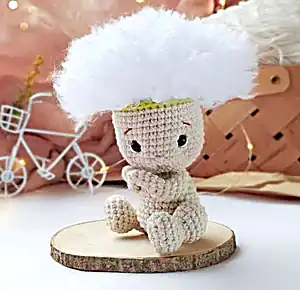
The finished Baby Dandelion stands approximately 4-5 inches tall and includes embroidered facial features, blushed cheeks, and carefully positioned limbs. This pattern requires patience and attention to detail but results in a truly special handmade creation.

Why You'll Love This Baby Dandelion Amigurumi Pattern

I absolutely love this Baby Dandelion pattern because it challenges you to learn new techniques while creating something truly magical. The combination of basic amigurumi skills with advanced sculpting and the unique hair attachment method makes every step rewarding. I find the process of watching this little character come to life through careful assembly and finishing touches incredibly satisfying, and the end result is a treasure that captures the whimsical beauty of nature in yarn form.

Baby Dandelion Amigurumi Pattern step 1 - construction progress Baby Dandelion Amigurumi Pattern step 2 - assembly progress Baby Dandelion Amigurumi Pattern step 3 - details and accessories Baby Dandelion Amigurumi Pattern step 4 - final assembly and finishing

Switch Things Up

I love experimenting with different approaches to this Baby Dandelion pattern to create unique variations that reflect personal style and creativity. You could try using different hair colors like soft yellow or pale pink to create fantasy dandelion babies, or even rainbow-colored hair for a whimsical fairy tale version.

I've found that changing the body colors can create interesting seasonal variations - imagine a spring version with soft pastel green body and lavender cap, or an autumn version with warm beige and rusty orange tones.

Another fun modification I enjoy is adjusting the hair length and styling - you could create a "just sprouted" version with very short hair, or a "ready to fly" version with extra-long flowing strands.

For those who love detailed work, I suggest adding tiny embroidered flowers or leaves to the green cap area, or even creating a small fabric or felt patch to represent a tiny garden where the dandelion is growing.

The facial expression can also be customized - try different eyebrow angles for various personalities, or add rosy cheeks for a more cherub-like appearance.

Common Mistakes & How to Fix Them

βœ— Not leaving enough space in magic ring when making head and body for plastic joint insertion can make assembly impossible βœ— Skipping the sculpting step will result in a flat face that lacks the characteristic baby-like features and expressions βœ— Using regular yarn instead of mohair or fluffy yarn for hair will not achieve the signature dandelion seed appearance βœ— Over-stuffing the head and body can make sculpting difficult and prevent proper joint movement and positioning

Baby Dandelion Amigurumi Pattern

Create this adorable Baby Dandelion amigurumi with fluffy white hair and sweet beige features. This charming pattern features detailed sculpting techniques, plastic joint connections, and embroidered facial details that bring this little dandelion character to life. Perfect for those ready to explore more advanced amigurumi techniques while creating a truly enchanting handmade treasure.

Intermediate 8-10 Hours

Materials Needed for Baby Dandelion Amigurumi Pattern

β€” Main Fabric

  • 01
    YarnArt Jeans yarn in beige #05 and green #29 (50g/160m, 55% cotton 45% polyacrylic)
  • 02
    Nako Paris white #208 for hair (100g/245m, 60% polyamide, 40% premium acrylic) or any mohair-containing yarn
  • 03
    White embroidery thread YarnArt Jeans #62
  • 04
    Black or brown embroidery thread for facial features

β€” Tools Required

  • 01
    Crochet hook 2mm (suitable for chosen yarn)
  • 02
    Safety eyes 6mm
  • 03
    Plastic joints 20mm (one for head)
  • 04
    Lighter for joint security
  • 05
    Strong thread for sculpting and thread joining
  • 06
    Scissors
  • 07
    Tapestry needle
  • 08
    Pins
  • 09
    Stitch marker
  • 10
    Fiberfill stuffing
  • 11
    Stuffing tool or wooden skewers
  • 12
    Make up blush powder or soft pink pastel
  • 13
    Paintbrush or makeup brush
  • 14
    Slicker brush for hair finishing

Progress Tracker

0% Complete

β€” Arms (make 2) :

Round 1 :

6 sc in a MR (6)

Round 2-3 :

(2 rows) 6 sc (6)

Round 4 :

inc, 5 sc (7)

Round 5 :

3 sc in 1, 2 sc, dec, 2 sc (8)

Round 6 :

(inc, 1 sc) * 2, dec, 2 sc (9)

Round 7 :

(dec, 1 sc) * 2, 2 inc, 1 sc (9)

Round 8-9 :

(2 rows) 9 sc (9)

Round 10 :

(dec, 1 sc) * 3 (6)

Info :

Cut yarn leaving tail for closing. Insert yarn tail into needle, go under front loops of all 6 sc, tighten and weave in ends. Do not stuff arms.

β€” Legs (make 2) :

Setup :

Ch 6

Round 1 :

From 2nd ch from hook: 4 sc, 3 sc in 1, 4 sc along other side of chain (11)

Round 2 :

inc, 3 sc, 3 inc, 3 sc, inc (16)

Round 3-4 :

(2 rows) 16 sc (16)

Round 5 :

5 sc, 3 dec, 5 sc (13)

Round 6 :

dec, 2 sc, 3 dec, 1 sc, dec (8)

Round 7 :

(3 sc in 1, 3 sc) * 2 (12)

Round 8 :

inc, 1 sc, inc, 3 sc, 3 inc, 3 sc (17)

Round 9-11 :

(3 rows) 17 sc (17)

Round 12 :

1 sc, 2 dec, 3 sc, 3 dec, 3 sc (12)

Round 12 :

6 dec (6)

Info :

Cut yarn, close opening, weave in end. Stuff as you go.

β€” Head (part 1) :

Round 1 :

6 sc in a MR, do not pull ring tight, leave about 6mm to insert plastic joints later (6)

Round 2 :

6 inc (12)

Round 3 :

(inc, 1 sc) * 6 (18)

Round 4 :

(inc, 2 sc) * 6 (24)

Round 5 :

(inc, 3 sc) * 6 (30)

Round 6 :

2 sc, (inc, 4) * 5, inc, 2 sc (36)

Round 7 :

(inc, 5 sc) * 6 (42)

Round 8-16 :

(9 rows) 42 sc (42)

Info :

Cut yarn leaving tail to change to green color later

β€” Body :

Round 1 :

6 sc in a MR, do not pull ring tight, leave about 6mm to insert plastic joints (6)

Round 2 :

6 inc (12)

Round 3 :

(inc, 1 sc) * 6 (18)

Round 4 :

18 sc (18)

Round 5 :

(inc, 2 sc) * 6 (24)

Info :

Connect head to body using joint. Insert joint into space left from MR on head (from inside), pass through MR on body. Fix with washer. Melt leg of joint and press against washer with flat metal tool for secure attachment.

Round 6-8 :

(3 rows) 24 sc (24)

Round 9 :

(inc, 3 sc) * 6 (30)

Round 10-13 :

(4 rows) 30 sc (30)

Round 14 :

(dec, 3 sc) * 6 (24)

Round 15 :

(dec, 2 sc) * 6 (18)

Info :

Stuff the body

Round 16 :

(dec, 1 sc) * 6 (12)

Round 17 :

6 dec (6)

Info :

Cut yarn, close opening, weave in end

β€” Head (part 2) :

Info :

Insert safety eyes between rows 10 and 11 with distance of 8-9 stitches. Make holes first using wooden skewer.

Round 17 :

Continue with green yarn. 42 sc FLO (42)

Round 18 :

42 sc through BACK LOOPS of 16th row (42)

Round 19 :

(dec, 5 sc) * 6 (36)

Round 20 :

(dec, 4 sc) * 6 (30)

Round 21 :

(dec, 3 sc) * 6 (24)

Round 22 :

(dec, 2 sc) * 6 (18)

Info :

Stuff the head

Round 23 :

(dec, 1 sc) * 6 (12)

Round 24 :

6 dec (6)

Info :

Cut yarn, close opening, weave in end

Assembly Instructions

  • Connect head to body using plastic joint system by inserting joint through magic ring spaces and securing with washer
  • Pin arms between rows 5-6 of body and attach using thread joining method with strong thread
  • Attach legs between rows 12-13 of body using same thread joining technique as arms
  • Perform facial sculpting using strong thread and following detailed point-by-point instructions in pattern
  • Embroider nose using body yarn with horizontal stitch wrapped 5-6 times
  • Add eyebrows with single stitches using brown or black embroidery thread
  • Create fluffy hair by cutting white yarn into 12cm strands and attaching using knotless method around green cap area

Important Notes

  • πŸ’‘Leave space in magic rings for plastic joint insertion - this is crucial for head mobility
  • πŸ’‘Use strong thread for sculpting and limb attachment to ensure durability and proper shaping
  • πŸ’‘Do not stuff arms to allow for natural movement and positioning
  • πŸ’‘Melt plastic joint legs carefully with blue flame only to avoid blackening
  • πŸ’‘Cut hair strands to 12cm initially, then trim to 3-4cm after attachment for proper dandelion effect
  • πŸ’‘Use stitch markers throughout to maintain accurate stitch counts during color changes

This enchanting Baby Dandelion pattern brings the magic of nature indoors with its whimsical design and fluffy white hair that captures the essence of dandelion seeds dancing in the breeze. The combination of advanced techniques like sculpting and joint assembly creates a truly special amigurumi that's both adorable and educational. Perfect for expanding your crochet skills while creating a timeless treasure that will be cherished for years to come. 🌼 Happy crocheting! 🧢✨

You ask,

we answer.

FAQs

Can I use regular acrylic yarn instead of the mohair blend for the hair?

While you can use regular acrylic yarn, the fluffy mohair blend creates the authentic dandelion seed appearance. If using acrylic, choose a light, fuzzy texture and brush it well with a slicker brush after attachment.

Is the plastic joint necessary, or can I sew the head directly to the body?

The plastic joint allows the head to move naturally and makes the dandelion more poseable. You can sew directly, but you'll lose the mobility feature that makes this pattern special.

What if I can't find 6mm safety eyes in my area?

You can substitute with 8mm eyes for a slightly different look, or embroider the eyes using black thread if you prefer a completely sewn approach.

How important is the facial sculpting step?

The sculpting creates the characteristic baby-like facial features and gives dimension to the face. While optional, it significantly enhances the final appearance and brings the character to life.

Can beginners attempt this pattern?

This is an intermediate pattern requiring knowledge of basic stitches plus comfort with techniques like sculpting, joint assembly, and detailed finishing work. Advanced beginners with patience may succeed, but some prior amigurumi experience is recommended.