๐Ÿงถ Beautiful โœจ Detailed ๐Ÿ’ Adorable

Baby Romper Tiny Tot Pattern

Baby Romper Tiny Tot Pattern
4.8โ˜… Rating
8-12 Hours Time Needed
2.3K Made This
โœ‚๏ธ

Intermediate Level

Ideal for those with basic knitting experience, featuring slightly more advanced stitches and techniques to expand your skills.

โฑ๏ธ

All-Day Adventure

Requires 8-10 hours, ideal for a full day of immersive knitting.

๐Ÿ‘ถ

Sweet Surprise

A delightful, gift-ready creation perfect for birthdays and special occasions that will be treasured for years.

About This Baby Romper Tiny Tot Pattern

This precious baby romper pattern is designed with comfort and style in mind, featuring a classic bib-front design with decorative button details. The pattern uses simple single crochet stitches worked in back loops only to create a beautiful textured fabric that's soft against baby's delicate skin. The romper includes adjustable shoulder straps and comes in five different sizes from newborn to 12 months.

Baby Romper Tiny Tot Pattern crochet pattern - detailed view of completed project

The pattern features strategic increases and decreases to create the perfect fit around baby's waist and hips, with comfortable leg openings that allow for easy diaper changes. The ribbed border adds a professional finishing touch that makes this romper suitable for special occasions or everyday wear.

Why You'll Love This Baby Romper Tiny Tot Pattern

I absolutely love this pattern because it combines classic baby fashion with modern comfort features. The textured stitch pattern created by working in back loops only gives the romper a professional, store-bought appearance while remaining simple enough for confident beginners. I'm particularly fond of how the strategic shaping creates such a flattering fit, and the adjustable straps mean this romper will grow with your little one.

Baby Romper Tiny Tot Pattern step 1 - construction progress Baby Romper Tiny Tot Pattern step 2 - assembly progress Baby Romper Tiny Tot Pattern step 3 - details and accessories Baby Romper Tiny Tot Pattern step 4 - final assembly and finishing

Switch Things Up

I love how versatile this basic romper pattern can become with just a few creative modifications. Try working the bib section in a contrasting color to create a fun color-blocked effect, or add simple surface crochet details like flowers or hearts for a more decorative touch. You could easily adapt the button placement to create an asymmetrical closure, or add small pockets to the bib front for extra charm.

For a more textured look, I sometimes substitute the single crochet rows with half double crochet or even try working some rows in the front loops only to create subtle stripe effects. The ribbed border could be replaced with a scalloped edge or picot border for a more feminine finish. I've also seen beautiful versions where crafters add small appliques or embroidered details to personalize each romper.

Consider making multiple rompers in different colors to create a coordinated baby wardrobe, or use variegated yarns for a playful rainbow effect. The pattern is so well-structured that these creative additions never interfere with the essential fit and comfort features that make this design so special.

Common Mistakes & How to Fix Them

โœ— Forgetting to check gauge before starting can result in a romper that doesn't fit properly โœ— Missing the button hole placement rows will require going back and adding them later โœ— Not marking the center stitches for straps can cause uneven shoulder strap placement โœ— Skipping stitch markers when working increases and decreases leads to uneven shaping

Baby Romper Tiny Tot Pattern

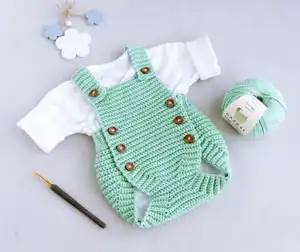
Create the sweetest little romper for your precious bundle of joy with this adorable baby romper pattern. This charming design features a classic bib front with decorative buttons, comfortable shoulder straps, and a cozy fit that's perfect for newborns through 12 months. The pattern includes detailed instructions for five different sizes and uses simple single crochet stitches worked in back loops only for a beautiful textured finish.

Intermediate 8-12 Hours

Materials Needed for Baby Romper Tiny Tot Pattern

โ€” Main Fabric

  • 01
    Sport weight cotton yarn or mixed yarn, approximately 180yd/1.76 oz (165m/50g)
  • 02
    Total yarn needed varies by size: 234-423 yards depending on chosen size

โ€” Tools Required

  • 01
    Crochet hook size 3.5mm for main pattern
  • 02
    Crochet hook size 3mm for ribbed borders and straps
  • 03
    8 buttons 1/2"-5/8" (12-15mm)
  • 04
    Stitch markers
  • 05
    Scissors
  • 06
    Yarn needle for sewing

Progress Tracker

0% Complete

โ€” Bib part :

Row 1 :

ch27(29, 31, 33, 35) sc into the 2nd ch from your hook. Sc into each chain, ch1 and turn. =26(28, 30, 32, 34)sts.

Row 2 :

sc into each stitch, ch1 and turn. =26(28, 30, 32, 34)sts.

Row 3 (inc) :

sc in the next 6sts, 2sc into the next st, sc in the next 12(14, 16, 18, 20)sts, 2sc into the next st, sc in the next 6st, ch1 and turn. =28(30, 32, 34, 36)sts.

Rows 4-5 :

sc into each stitch, ch1 and turn. =28(30, 32, 34, 36)sts.

Row 6 (inc) :

sc in the next 6sts, 2sc into the next st, sc in the next 14(16,18, 20, 22)sts, 2sc into the next st, sc in the next 6sts, ch1 and turn. =30(32,34, 36, 38)sts.

โ€” Front part with button holes :

Info :

in rows 20 (22, 22, 27, 30), 28 (31,31,36, 39), 36(40,40,45, 48) - that is, after every 7 (8,8,8,8) rows to make two holes for buttons.

โ€” The front part with the decrease stitches :

Row with decreases :

sc in the next 6sts, sc2tog, work sc into each stitch along the row until you have 8sts remaining and then sc2tog, sc in the next 6sts, ch1 and turn.

โ€” Front part with the increase stitches :

Row with increase :

sc in the next 6sts, 2 sc in the next st, work sc into each stitch along the row until you have 7 sts remaining, 2 sc in next st, sc in next 6sts, ch1 and turn.

โ€” Back part :

Info :

For the back part, continue to increase 2 sts each row till the number obtain 76 (88, 92, 92, 98)sts.

โ€” Ribbed border :

Row 1 :

ch9, into the 2nd chain from your hook, sc into each chain. Join to the back with a sl st stitch's: do sl st in the next 2 sts, turn without ch.

Row 2 :

skip two sl st, sc in the next 8 sts, ch1 and turn.

Row 3 :

sc into each chain. Join to the back with a sl st stitch's: do sl st in the next 2 sts, turn without ch.

Info :

Repeat Row 2 and 3 until you work 56 (72, 72, 76, 88) rows.

โ€” Straps :

Info :

Count the central 17 (17, 17, 21, 21)sts on the back and mark it with stitch markers. One row count as a one stitch.

Row 1 :

join with a sl st to the first marked st, ch1, sc in each of next 17 (17, 17, 21, 21)sts, ch1 and turn. =17 (17, 17, 21, 21)sts.

Row 2 :

sc in each stitch, ch1 and turn. =17(17,17,21, 21)sts.

Info :

Repeat Row 2 until you work 14 (14, 16 ,20, 22) rows.

Assembly Instructions

  • Weave in all loose ends using a yarn needle before assembly begins
  • Mark the placement for buttons on the bib front using the completed button holes as guides
  • Sew buttons securely to the bib front, ensuring they align perfectly with button holes
  • Attach the ribbed border to the bottom edge of the romper using slip stitches
  • Secure shoulder straps to the back portion at marked center stitches using reinforcing stitches
  • Test fit all button closures and strap adjustments before final finishing
  • Give the completed romper a gentle steam block to even out stitches and improve drape

Important Notes

  • ๐Ÿ’กAlways check gauge before beginning - 23 stitches and 26 rows should measure 4x4 inches using 3.5mm hook
  • ๐Ÿ’กUse stitch markers religiously when working increases and decreases to maintain even shaping
  • ๐Ÿ’กButton hole rows are critical - mark them clearly on your pattern to avoid missing them
  • ๐Ÿ’กThe back loop only technique creates the textured appearance - don't work through both loops
  • ๐Ÿ’กUse the smaller 3mm hook for straps and borders to create a tighter, more structured finish
  • ๐Ÿ’กCount stitches frequently, especially after increase and decrease rows to catch errors early

This charming baby romper brings together classic design elements with modern comfort features to create a truly special piece for your little one. The combination of simple stitches and thoughtful construction details results in a professional-looking garment that's surprisingly achievable for intermediate crocheters. Every button, every stitch, every careful increase works together to create something that will be treasured for years to come. Happy crocheting!

You ask,

we answer.

FAQs

Can I substitute different yarn weights for this pattern?

This pattern is specifically designed for sport weight yarn to achieve the proper gauge and fit. Using a different weight will significantly alter the sizing and may require hook size adjustments.

How do I know which size to make?

Refer to the size chart provided in the pattern that shows measurements for length, waist width, and hip width for each age range from newborn to 12 months.

What if my gauge doesn't match exactly?

Adjust your hook size - use a larger hook if your gauge is too tight (more stitches per inch) or a smaller hook if too loose. Always make a gauge swatch before starting.

Can I make this romper without the button holes?

The button holes are essential for getting the romper on and off easily. However, you could substitute with snaps or other closures if preferred.

Why do the straps use a smaller hook?

The smaller 3mm hook creates tighter, more structured straps that won't stretch out of shape and will provide better support for the romper.