🧢 Beautiful ✨ Detailed πŸ’ Adorable

Jellyfish Keychain Pattern

Jellyfish Keychain Pattern
4.2β˜… Rating
1-1.5 Hours Time Needed
3.9K Made This
βœ‚οΈ

Beginner Friendly Level

Perfect for those just starting their sewing journey, with clear instructions and simple techniques

⏱️

Bite-Sized Project

Complete in under 2 hoursβ€”quick, fun, and perfect for a little creative escape.

🎁

Tiny Treasure

Small, sweet, and gift-worthy creations that fit perfectly in the palm of your hand with detailed charm.

About This Jellyfish Keychain Pattern

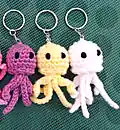
This delightful jellyfish keychain pattern combines simple crochet techniques with creative tentacle construction to create an adorable ocean-inspired accessory. The pattern features a rounded body worked in continuous rounds, followed by unique spiral and straight tentacles that give each jellyfish its distinctive flowing movement. The finishing touches include embroidered eyes and a secure keychain attachment, making these perfect for personal use or as thoughtful handmade gifts.

Jellyfish Keychain Pattern crochet pattern - detailed view of completed project

Each jellyfish measures approximately 3 inches from top to tentacle tips, making them the perfect size for keychains or bag charms. The pattern uses basic stitches and techniques, making it accessible for beginners while still being engaging for experienced crocheters.

Why You'll Love This Jellyfish Keychain Pattern

I absolutely love how these tiny jellyfish capture the graceful essence of their ocean counterparts in such a compact, portable form. The combination of spiral and straight tentacles creates beautiful movement and texture that makes each piece feel alive and dynamic. I find the quick construction time incredibly satisfying - you can complete one in just over an hour, making them perfect for last-minute gifts or when you need a creative break. The way the tentacles flow and the sweet embroidered eyes give each jellyfish its own personality, and I love how you can customize them with different colors to create a whole school of these adorable sea creatures.

Jellyfish Keychain Pattern step 1 - construction progress Jellyfish Keychain Pattern step 2 - assembly progress Jellyfish Keychain Pattern step 3 - details and accessories Jellyfish Keychain Pattern step 4 - final assembly and finishing

Switch Things Up

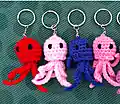
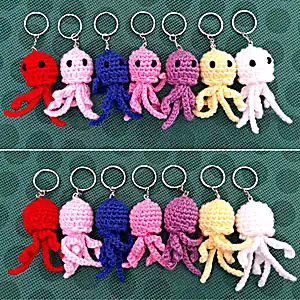
I love experimenting with different color combinations to create unique jellyfish personalities! Sometimes I make gradient jellyfish by working the first few rounds in one color and gradually transitioning to another shade, creating a beautiful ombre effect that mimics real sea creatures.

I've also discovered that adding a tiny bit of metallic thread worked alongside the main yarn gives the jellyfish a magical, underwater shimmer that catches the light beautifully. For special occasions, I sometimes embroider tiny stars or dots on the body using contrasting colors to create constellation jellyfish.

Another variation I enjoy is making the tentacles in alternating colors - perhaps three in the main color and three in a complementary shade. This creates a lovely striped effect that adds visual interest without complicating the construction process.

Common Mistakes & How to Fix Them

βœ— Overstuffing the body which causes the stuffing to show through the stitches - stuff lightly so it can be squeezed when pinched firmly βœ— Not marking rounds properly which leads to uneven shaping - always use stitch markers to track your progress through each round βœ— Pulling tentacles too tightly when gathering which distorts the body shape - gather gently and secure with small consistent stitches βœ— Placing eyes too far apart or in wrong position - eyes should be 3 stitches apart and 2 rows up from the half double crochet row

Jellyfish Keychain Pattern

Create these charming miniature jellyfish keychains that bring ocean magic to your everyday accessories. These delightful sea creatures feature flowing tentacles and sweet embroidered eyes, perfect for adding a whimsical touch to your keys, bags, or as thoughtful handmade gifts. With their compact size and quick construction, these jellyfish are ideal for using up yarn scraps while creating something truly special.

Beginner Friendly 1-1.5 Hours

Materials Needed for Jellyfish Keychain Pattern

β€” Main Fabric

  • 01
    Hayfield Bonus DK weight yarn in main color - approximately 7g per jellyfish
  • 02
    Hayfield Bonus DK Black 0965 for embroidered eyes - small amount needed

β€” Tools Required

  • 01
    3mm crochet hook
  • 02
    Keychain rings
  • 03
    Hi-Loft quality toy stuffing
  • 04
    Wool needle for sewing
  • 05
    Stitch markers
  • 06
    Scissors

Progress Tracker

0% Complete

β€” Body :

Row 1 :

ch2, sc 6 into 2nd st from hook (alternatively sc 6sts into magic ring) (6)

Row 2 :

inc x6 (12)

Row 3 :

(sc into next st, inc) x6 (18)

Row 4-6 :

sc (18) (3 rows)

Row 7 :

hdc (18) sl st to join in FLO only

Row 8 :

FLO Row: (ch2, miss 1, sl st into next st) x9 (9 loops)

Row 9 :

BLO Row: sl st into BLO directly behind the 1st FLO sl st, (sc into next st, dec) x6 (12)

Info :

Stuff body

Row 10 :

dec x6 (6) sl st to join

Row 11 :

(ch6, starting in 2nd ch from hook, inc x5, sl st into next st from previous row, ch12, starting in 2nd ch from hook, sl st into next 11sts, sl st in next st from previous row) x3 (3 spiral+ 3 straight tentacles)

Info :

F/O leaving a 25cm end

Assembly Instructions

  • Using a small running stitch, sew around the base of each tentacle next to the body, then pull tight to gather
  • Sew around the tentacle base once more, then secure with a couple of small stitches
  • Weave the end up to the starting circle at the top of the body, being careful not to pull out of shape, and secure with small stitches
  • Attach the keychain to the top of the body using 5 small back stitches
  • Secure the end before weaving through the body and cutting flush
  • Using black yarn, weave the end up through the body and embroider eyes 3 stitches apart and 2 rows up from the half double crochet row
  • Weave all ends through the body and cut flush to finish

Important Notes

  • πŸ’‘Work in continuous rounds unless stated otherwise, marking the last stitch of each row with a stitch marker
  • πŸ’‘Don't overstuff the body - each part should be filled just enough to be easily squeezed when pinched firmly
  • πŸ’‘Use a 25cm tail when fastening off to have enough length for assembly and finishing
  • πŸ’‘Place eyes carefully - they should be 3 stitches apart and 2 rows up from the hdc row for proper positioning
  • πŸ’‘Gather tentacles gently to avoid distorting the body shape during assembly

These enchanting jellyfish keychains bring the wonder of the ocean to your everyday accessories! With their flowing tentacles and sweet embroidered eyes, each tiny creature has its own personality and charm. The quick construction time makes them perfect for gift-giving or whenever you need a delightful creative escape. I love how these miniature sea creatures capture the graceful movement of real jellyfish in such an adorable, portable form. 🌊 Happy crocheting! 🧢✨

You ask,

we answer.

FAQs

What size will my finished jellyfish keychain be?

Each completed jellyfish measures approximately 3 inches from the top of the body to the tips of the tentacles, making them the perfect size for keychains or bag charms.

Can I use different types of yarn for this pattern?

Yes! While the pattern calls for DK weight yarn, you can use any yarn weight as long as you adjust your hook size accordingly. Just remember that different yarn weights will create different sized jellyfish.

How do I prevent my tentacles from looking messy or uneven?

The key is in the gathering technique - use small, consistent running stitches around the base of each tentacle and gather gently. Don't pull too tightly as this can distort the body shape.

Can I make these without keychains for other uses?

Absolutely! These jellyfish make wonderful bag charms, ornaments, or even small toys. Simply skip the keychain attachment step and add whatever closure or attachment method works for your intended use.

Why does my jellyfish body look lumpy after stuffing?

This usually happens from overstuffing. The body should be filled lightly - just enough so it can be easily squeezed when pinched firmly. Too much stuffing will cause it to show through the stitches and create an uneven appearance.