Create this charming mother and baby kangaroo duo with this comprehensive amigurumi pattern! Perfect for intermediate crocheters looking to craft something truly special. This detailed 50-page pattern includes 161 step-by-step photos to guide you through creating both the mother kangaroo (55cm tall) and her adorable baby (19cm tall) complete with a functional pouch.
Progress Tracker
0% Complete
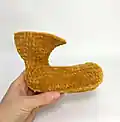
— Legs :
Round 1 :
make a foundation chain 21ch, work 2 sc into the second chain from the hook, work 9 sc more, next 9 hdc, work 4 hdc into one chain, turn and work on the other side 9 hdc more, 9 sc, work 2 sc into one ch (44)
Round 2 :
2 inc (sc), 9 sc, 9 hdc, 4 inc (hdc), 9 hdc, 9 sc, 2 inc (sc) (52)
Round 3 :
(1 sc, 1 inc (sc))*2, 9 sc, 9 hdc, (1 hdc, 1 inc (hdc))*4, 9 hdc, 9 sc, (1 sc, 1 inc (sc))*2 (60)
Round 5 :
60 sc in BLO (60)
Round 6-8 :
60 sc (60) – repeat 3 times
Round 9 :
crochet hook №3 (US D), 24 sc, (1 sc, 1 dec)*4, 24 sc (56)
Round 10 :
crochet hook №3 (US D), 24 sc, 4 dec, 24 sc (52)
Info :
Proceed to fill the toy with stuffing material at this point
Round 11-12 :
use the crochet hook №3.5 (US E) starting from this round and for the next rounds, 18 sc (18)
Round 13 :
(5 sc, 1 inc)*3 (21)
Round 14 :
(6 sc, 1 inc)*3 (24)
Round 15 :
(3 sc, 1 inc)*6 (30)
Round 16 :
(4 sc, 1 inc)*6 (36)
Round 17 :
15 sc, 2 inc, 19 sc (38)
Round 18 :
15 sc, (1 sc, 1 inc)*2, 19 sc (40)
Round 19 :
12 sc, (1 sc, 1 inc)*6, 16 sc (46)
— Tail :
Info :
Continue pattern increasing by 1 stitch every other round until round 42: 26 sc (26). Stuff as you go every 3-4 cm
— The Crotch :
Round 3 :
(1 sc, 1 inc)*8 (24)
Round 4 :
(2 sc, 1 inc)*8 (32)
Round 5 :
(3 sc, 1 inc)*8 (40)
Round 6 :
(4 sc, 1 inc)*8 (48)
— Connecting Body Parts :
Info :
Connect legs to crotch using brown Kamtex thread, joining 8 stitches on each side
Round 7-9 :
108 sc (108) repeat 3 times
Round 10 :
32 sc, (1 sc, 1 dec)*6, 16 sc, (1 sc, 1 dec)*6, 24 sc (96)
— Head :
Round 47 :
(2 sc, 1 inc)*8 (32)
Round 48 :
(3 sc, 1 inc)*8 (40)
Round 49 :
(4 sc, 1 inc)*8 (48)
Round 50 :
(5 sc, 1 inc)*8 (56)
Round 51 :
(6 sc, 1 inc)*8 (64)
Round 52 :
(7 sc, 1 inc)*8 (72)
Round 53 :
(8 sc, 1 inc)*8 (80)
Round 54-57 :
80 sc (80) – repeat 4 times
Round 58 :
38 sc, (1 sc, 1 dec)*14 (66)
— Facial Features & Assembly :
Info :
Complete all facial features including muzzle, nose, eyes, and ears following detailed photo instructions
Info :
Attach pouch to body and embroider claws on feet
— Baby Kangaroo :
Body Round 1 :
8 sc in MR (8)
Body Round 3 :
(1 sc, 1 inc)*8 (24)
Head Round 11 :
8 inc (16)
Head Round 12 :
(1 sc, 1 inc)*8 (24)
Head Round 13 :
(2 sc, 1 inc)*8 (32)
Info :
Complete baby with simplified features and attach to mother's pouch
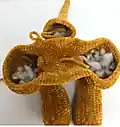
This adorable kangaroo family pattern brings the magic of Australian wildlife into your home! The mother kangaroo's functional pouch perfectly cradles her sweet baby joey, creating an interactive toy that's both beautiful and engaging. With detailed needle sculpting techniques and expressive crocheted eyes, these marsupials are full of personality and charm. The comprehensive instructions and abundant photos make this intermediate project achievable and rewarding. 🦘✨