๐Ÿงถ Beautiful โœจ Detailed ๐Ÿ’ Adorable

Seal Amigurumi Pattern

Seal Amigurumi Pattern
3.9โ˜… Rating
3-4 Hours Time Needed
3.1K Made This
โœ‚๏ธ

Intermediate Level

Ideal for those with basic knitting experience, featuring slightly more advanced stitches and techniques to expand your skills.

โฑ๏ธ

Weekend Treat

Takes 5-7 hours, making it an enjoyable project to finish over a couple of days.

๐Ÿพ

Pocket Pal

A mini friend to carry anywhere, providing comfort and companionship in a perfectly portable size.

About This Seal Amigurumi Pattern

This charming seal pattern features realistic proportions and adorable facial details. The unique construction method creates natural-looking dents around the muzzle and eyes using yarn techniques. The seal's body is worked in multiple colors to create the distinctive grey and white coloring. Special attention is given to the flippers and tail fins for authentic shape.

Seal Amigurumi Pattern crochet pattern - detailed view of completed project

The pattern includes detailed instructions for embroidering facial features including the nose, whiskers, and French knot details. Perfect for intermediate crocheters ready to try new shaping techniques.

Why You'll Love This Seal Amigurumi Pattern

I love how this seal pattern teaches you advanced shaping techniques that you can use in other projects! The method for creating the muzzle dents is so clever and really brings the seal to life. Working with the color changes and the realistic proportions makes you feel like you're sculpting rather than just crocheting. The final result is incredibly lifelike and cuddly at the same time.

Seal Amigurumi Pattern step 1 - construction progress Seal Amigurumi Pattern step 2 - assembly progress Seal Amigurumi Pattern step 3 - details and accessories Seal Amigurumi Pattern step 4 - final assembly and finishing

Switch Things Up

I love experimenting with different seal species by changing the color combinations! Instead of the traditional grey and white, I've created harbor seals using warmer brown tones, or even spotted seals with a mottled grey pattern. You can easily customize the facial features too - some seals have darker whisker spots, while others have more subtle markings.

The blowfish accessory opens up so many creative possibilities! I've made versions with different colored stripes, polka dots, or even rainbow patterns. You could also scale up the pattern to make a larger blowfish that the seal can actually 'swim' inside of, which looks amazing as a display piece.

For a more advanced challenge, I sometimes add wire armature to the flippers to make them poseable, which really brings the seal to life. You can pose it clapping, waving, or in different swimming positions. The pattern is wonderfully adaptable while maintaining that irresistible seal charm that makes everyone smile!

Common Mistakes & How to Fix Them

โœ— Not pulling the yarn tight enough when creating the muzzle dents, resulting in a less defined facial structure โœ— Forgetting to separate the pink thread into single strands for embroidering the nose, making it too thick โœ— Incorrectly placing the safety eyes - they should be between rounds 7&8 for the proper seal expression โœ— Over-stuffing the flippers and tail fins, making them too rigid instead of naturally floppy like a real seal

Seal Amigurumi Pattern

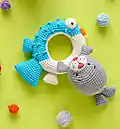
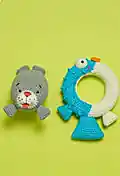
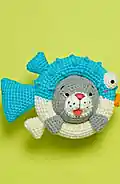
Create an adorable seal with a charming spotted face and whiskers! This delightful marine mammal features a realistic body shape with flippers and tail fins. The pattern includes special techniques for creating the seal's distinctive muzzle with embroidered details and French knot whiskers. Perfect for ocean lovers and anyone who enjoys cute sea creature amigurumi.

Intermediate 3-4 Hours

Materials Needed for Seal Amigurumi Pattern

โ€” Main Fabric

  • 01
    Color A: white YarnArt Jeans 01 (50g, 160m)
  • 02
    Color B: grey YarnArt Jeans 46 (50g, 160m)
  • 03
    Color C: blue YarnArt Jeans 33 (50g, 160m)
  • 04
    Color D: pink Gazzal Baby Cotton 3435 (50g, 165m)
  • 05
    Color E: orange Gazzal Baby Cotton 3416 (50g, 165m)

โ€” Tools Required

  • 01
    Crochet hook size 2.5mm
  • 02
    2 pairs of safety eyes size 5mm
  • 03
    Tapestry needles
  • 04
    Brown thread
  • 05
    Pins
  • 06
    Stitch markers
  • 07
    Scissors
  • 08
    Polyester fiberfill

Progress Tracker

0% Complete

โ€” Body (yarn A) :

Round 1 :

ch 5, start on the 2nd ch from the hook, inc, sc 2, inc 2 on the last st, continue to crochet on the other side, sc 2, inc (12)

Round 2 :

[sc 1, inc] 6x (18)

Round 3 :

sc 18 (18)

Round 4 :

[sc 1, inc, sc 1] 6x (24)

Round 5 :

sc 24, break yarn A, change to yarn B (24)

Round 6 :

[sc 3, inc] 6x (30)

Round 7 :

sc 30 (30)

Round 8 :

sc 1, [sc 1, inc] 3x, sc 3, [inc, sc 1] 3x, sc 14 (36)

Round 9 :

sc 1, [sc 1, inc, sc 1] 3x, sc 3, [sc 1, inc, sc 1] 3x, sc 14 (42)

Round 10 :

sc 1, [sc 3, inc] 3x, sc 3, [inc, sc 3] 3x, sc 14 (48)

Round 11-22 :

sc 48 (12 rnds) (48)

Round 23 :

[sc 7, dec] 4x, sc 12 (44)

Round 24 :

[sc 3, dec, sc 3] 4x, sc 12 (40)

Info :

Use a piece of yarn Aโ€“15cm to pull through the middle st of rnd 3, stuff slightly, pull the yarn slowly to make the dent on the muzzle, then tighten the string. Repeat the same with the 2 eye dents, insert safety eyes between rnd 7&8

Round 25 :

[sc 5, dec] 4x, sc 12 (36)

Round 26 :

[sc 2, dec, sc 2] 4x, sc 12 (32)

Round 27 :

[sc 3, dec] 4x, sc 12 (28)

Round 28 :

[sc 1, dec, sc 1] 4x, sc 12 (24)

Round 29 :

[sc 1, dec] 4x, sc 12, stuff firmly (20)

Round 30 :

[sc 8, dec] 2x (18)

Round 31 :

sc 18 (18)

Round 32 :

[sc 1, dec] 6x (12)

Round 33 :

sc 12 (12)

Round 34 :

dec 6 (6)

โ€” Tongue (yarn D) :

Round 1 :

sc 6 into a magic loop (6)

โ€” Flippers (yarn B, X2) :

Round 1 :

ch 6, start on the 2nd ch from the hook, inc, sc 3, inc 2 on the last st, continue to crochet on the other side, sc 3, inc (14)

Round 2 :

sc 14 (14)

Round 3 :

[dec, sc 5] 2x (12)

Round 4 :

[dec, sc 4] 2x (10)

Round 5 :

[dec, sc 3] 2x (8)

Round 6 :

[dec, sc 2] 2x (6)

โ€” Tail Fins (yarn B, X2) :

Round 1 :

ch 7, start on the 2nd ch from the hook, inc, sc 4, inc 2 on the last st, continue to crochet on the other side, sc 4, inc (16)

Round 2 :

sc 16 (16)

Round 3 :

[dec, sc 6] 2x (14)

Round 4-7 :

Repeat rnd 3-6 of the Flippers (6)
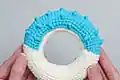
โ€” Blowfish (yarn A) :

Round 1 :

ch 52, slst on the 1st ch to make a ring, sc 52 (52)

Round 2-7 :

sc 52 (6 rnds) (52)

Round 8 :

(blo) sc 25, inc, sc 25, inc (54)

Round 9 :

sc 4, inc, [sc 8, inc] 2x, sc 4, sc 3, Dc Tr, inc, sc 4, Dc Tr, sc 3, inc, sc 1, Dc Tr, sc 5, Dc Tr, inc, sc 4 (60)

Round 10 :

[sc 9, inc] 3x, [sc 9, inc] 3x (66)

Round 11 :

sc 5, inc, [sc 10, inc] 2x, sc 5, sc 5, inc, sc 1, Dc Tr, sc 7, Dc Tr, inc, sc 5, Dc Tr, sc 4, inc, sc 1, Dc Tr, sc 3 (72)

Round 12 :

sc 36, sc 36 (72)

Round 13 :

sc 36, sc 3, Dc Tr, sc 8, Dc Tr, sc 7, Dc Tr, sc 8, Dc Tr, sc 6 (72)

Round 14 :

sc 36, sc 36 (72)

Round 15 :

sc 36, sc 8, [Dc Tr, sc 7] 3x, Dc Tr, sc 3 (72)

Round 16 :

sc 36, sc 36 (72)

Round 17 :

sc 36, sc 3, Dc Tr, sc 8, Dc Tr, sc 7, Dc Tr, sc 8, Dc Tr, sc 6 (72)

Round 18 :

sc 5, dec, [sc 10, dec] 2x, sc 5, sc 5 dec, [sc 10, dec] 2x, sc 5 (66)

Round 19 :

[sc 9, dec] 3x, sc 7, Dc Tr, sc 1, dec, sc 4, Dc Tr, sc 4, dec, Dc Tr, sc 8, dec (60)

Round 20 :

sc 4, dec, [sc 8, dec] 2x, sc 4, sc 4, dec, [sc 8, dec] 2x, sc 4 (54)

Round 21 :

sc 25, dec, sc 3, Dc Tr, sc 5, Dc Tr, sc 5, Dc Tr, sc 6, Dc Tr, sc 2, dec (52)

Assembly Instructions

  • Use brown thread to sew the nose and black thread to sew the eyebrows on the muzzle
  • Embroider 3 French Knots on each cheek using pink thread for whisker spots
  • Sew the tongue on the dent created in the muzzle area
  • Break the yarn and sew 2 edges together for both flippers and tail fins
  • Sew flippers and tail fins to the body as shown in the pattern images
  • Use the scissors to cut the inside yarn of the blowfish and fold the white part inside
  • Stuff the blowfish firmly along sewing and place the seal inside the blowfish

Important Notes

  • ๐Ÿ’กUse stitch markers to keep track of rounds, especially when working the blowfish section
  • ๐Ÿ’กSeparate the pink yarn into single threads for embroidering the nose for a more delicate look
  • ๐Ÿ’กMake sure to create proper dents in the muzzle and eye areas using the yarn-pulling technique
  • ๐Ÿ’กStuff the body firmly but keep flippers and tail fins softer for natural movement
  • ๐Ÿ’กThe blowfish should be stuffed firmly along the seaming process to maintain its shape
  • ๐Ÿ’กSearch Youtube for French Knot tutorials if you're unfamiliar with this embroidery stitch

This adorable seal pattern combines realistic shaping with charming details to create the perfect marine companion! The special muzzle-shaping technique gives your seal an incredibly lifelike expression, while the blowfish accessory adds a playful touch. Perfect for ocean lovers and anyone who enjoys amigurumi with character and personality. The French knot whisker details really bring this little seal to life! ๐Ÿงถ Happy crocheting! ๐Ÿฆญ๐Ÿ’™โœจ

You ask,

we answer.

FAQs

How do I create the realistic muzzle dents without making holes?

Use a 15cm piece of yarn A and gently pull it through the middle stitch of round 3. Stuff lightly first, then pull slowly while tightening to create a natural-looking dent. The key is gentle, gradual pressure.

What's the best way to embroider the French knot whiskers?

Separate your pink thread into single strands for delicate knots. Wrap the thread around your needle 2-3 times and pull through gently. Practice on a scrap piece first if you're new to French knots.

How do I make the blowfish look realistic around the seal?

The key is in the stuffing technique - stuff firmly as you sew the edges together. Cut the inside yarn carefully and fold the white part inside to create the hollow effect where the seal sits.

Why don't my flippers look right?

Make sure you're sewing the 2 edges together after breaking the yarn, and don't overstuff them. Flippers should be soft and naturally droopy, not rigid like the body.