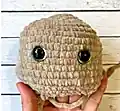
🧢 Beautiful ✨ Detailed πŸ’ Adorable

Adorable Deer Amigurumi Pattern

Adorable Deer Amigurumi Pattern
4.8β˜… Rating
8-10 Hours Time Needed
4.1K Made This
βœ‚οΈ

Beginner Friendly Level

Perfect for those just starting their sewing journey, with clear instructions and simple techniques

⏱️

All-Day Adventure

Requires 8-10 hours, ideal for a full day of immersive knitting.

🧸

Cute Companion

An adorable friend to cherish, handcrafted with love to bring comfort and joy for years to come.

About This Adorable Deer Amigurumi Pattern

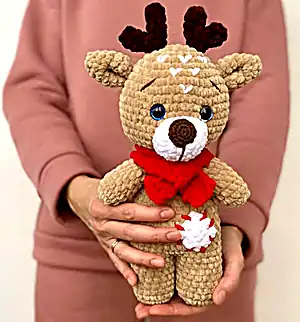
This delightful deer pattern combines simple amigurumi techniques with charming details to create a woodland friend full of personality. The 12-inch finished size makes it perfect for cuddling, while the included red scarf and customizable belly patches add special touches. Working from the body up, you'll create each piece separately before assembling your sweet deer companion.

Adorable Deer Amigurumi Pattern crochet pattern - detailed view of completed project

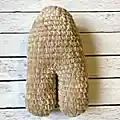
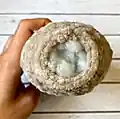
The pattern includes helpful step-by-step photos and clear instructions for beginners. You can choose between a square or heart-shaped belly patch to personalize your creation.

Why You'll Love This Adorable Deer Amigurumi Pattern

I absolutely love how this deer pattern brings together simplicity and charm in one adorable package! The way the plush yarn creates such a soft, huggable texture reminds me why amigurumi is so special. There's something magical about watching those antlers take shape and seeing the personality emerge as you add the embroidered details. I find myself smiling every time I look at that sweet little muzzle and those gentle eyes. This pattern has become one of my favorites because it's relaxing to work yet creates such a meaningful finished piece.

Adorable Deer Amigurumi Pattern step 1 - construction progress Adorable Deer Amigurumi Pattern step 2 - assembly progress Adorable Deer Amigurumi Pattern step 3 - details and accessories Adorable Deer Amigurumi Pattern step 4 - final assembly and finishing

Switch Things Up

I love experimenting with color combinations for this deer pattern! Instead of the traditional brown, I've tried making winter white deer with silver antlers for a magical holiday feel, or even pastel versions in soft pink and lavender for a whimsical nursery piece.

Sometimes I switch up the scarf colors to match seasons - deep burgundy for autumn, fresh green for spring, or classic red and white stripes for Christmas. The belly patch offers another fun customization opportunity - I've used different shaped patches like stars, flowers, or even tiny snowflakes embroidered directly onto the belly.

For gift giving, I often personalize the deer by adding small embroidered initials on the scarf or using the recipient's favorite colors throughout the pattern. The antlers can be made slightly larger for a more majestic look, or you could even add tiny bells to the antler tips for a festive jingle.

One of my favorite variations was creating a family of deer in graduated sizes by adjusting hook sizes and yarn weights - a parent deer with baby deer makes an adorable set that tells a sweet story together.

Common Mistakes & How to Fix Them

βœ— F βœ— o βœ— r βœ— g βœ— e βœ— t βœ— t βœ— i βœ— n βœ— g βœ— βœ— t βœ— o βœ— βœ— s βœ— t βœ— u βœ— f βœ— f βœ— βœ— t βœ— h βœ— e βœ— βœ— l βœ— e βœ— g βœ— s βœ— βœ— b βœ— e βœ— f βœ— o βœ— r βœ— e βœ— βœ— c βœ— o βœ— n βœ— t βœ— i βœ— n βœ— u βœ— i βœ— n βœ— g βœ— βœ— w βœ— i βœ— t βœ— h βœ— βœ— t βœ— h βœ— e βœ— βœ— b βœ— o βœ— d βœ— y βœ— βœ— c βœ— o βœ— n βœ— s βœ— t βœ— r βœ— u βœ— c βœ— t βœ— i βœ— o βœ— n βœ— βœ— - βœ— βœ— a βœ— l βœ— w βœ— a βœ— y βœ— s βœ— βœ— s βœ— t βœ— u βœ— f βœ— f βœ— βœ— a βœ— s βœ— βœ— y βœ— o βœ— u βœ— βœ— g βœ— o βœ— βœ— f βœ— o βœ— r βœ— βœ— b βœ— e βœ— s βœ— t βœ— βœ— r βœ— e βœ— s βœ— u βœ— l βœ— t βœ— s βœ— . βœ— βœ— P βœ— l βœ— a βœ— c βœ— i βœ— n βœ— g βœ— βœ— s βœ— a βœ— f βœ— e βœ— t βœ— y βœ— βœ— e βœ— y βœ— e βœ— s βœ— βœ— t βœ— o βœ— o βœ— βœ— c βœ— l βœ— o βœ— s βœ— e βœ— βœ— t βœ— o βœ— g βœ— e βœ— t βœ— h βœ— e βœ— r βœ— βœ— - βœ— βœ— r βœ— e βœ— m βœ— e βœ— m βœ— b βœ— e βœ— r βœ— βœ— t βœ— o βœ— βœ— l βœ— e βœ— a βœ— v βœ— e βœ— βœ— 7 βœ— βœ— s βœ— t βœ— i βœ— t βœ— c βœ— h βœ— e βœ— s βœ— βœ— b βœ— e βœ— t βœ— w βœ— e βœ— e βœ— n βœ— βœ— t βœ— h βœ— e βœ— m βœ— βœ— f βœ— o βœ— r βœ— βœ— p βœ— r βœ— o βœ— p βœ— e βœ— r βœ— βœ— d βœ— e βœ— e βœ— r βœ— βœ— p βœ— r βœ— o βœ— p βœ— o βœ— r βœ— t βœ— i βœ— o βœ— n βœ— s βœ— . βœ— βœ— M βœ— a βœ— k βœ— i βœ— n βœ— g βœ— βœ— t βœ— h βœ— e βœ— βœ— m βœ— u βœ— z βœ— z βœ— l βœ— e βœ— βœ— t βœ— o βœ— o βœ— βœ— f βœ— i βœ— r βœ— m βœ— βœ— w βœ— h βœ— e βœ— n βœ— βœ— s βœ— t βœ— u βœ— f βœ— f βœ— i βœ— n βœ— g βœ— βœ— - βœ— βœ— i βœ— t βœ— βœ— s βœ— h βœ— o βœ— u βœ— l βœ— d βœ— βœ— b βœ— e βœ— βœ— l βœ— i βœ— g βœ— h βœ— t βœ— l βœ— y βœ— βœ— s βœ— t βœ— u βœ— f βœ— f βœ— e βœ— d βœ— βœ— t βœ— o βœ— βœ— m βœ— a βœ— i βœ— n βœ— t βœ— a βœ— i βœ— n βœ— βœ— t βœ— h βœ— e βœ— βœ— g βœ— e βœ— n βœ— t βœ— l βœ— e βœ— βœ— c βœ— u βœ— r βœ— v βœ— e βœ— d βœ— βœ— s βœ— h βœ— a βœ— p βœ— e βœ— . βœ— βœ— N βœ— o βœ— t βœ— βœ— s βœ— e βœ— c βœ— u βœ— r βœ— i βœ— n βœ— g βœ— βœ— a βœ— n βœ— t βœ— l βœ— e βœ— r βœ— βœ— p βœ— a βœ— r βœ— t βœ— s βœ— βœ— p βœ— r βœ— o βœ— p βœ— e βœ— r βœ— l βœ— y βœ— βœ— b βœ— e βœ— f βœ— o βœ— r βœ— e βœ— βœ— j βœ— o βœ— i βœ— n βœ— i βœ— n βœ— g βœ— βœ— - βœ— βœ— m βœ— a βœ— k βœ— e βœ— βœ— s βœ— u βœ— r βœ— e βœ— βœ— f βœ— i βœ— r βœ— s βœ— t βœ— βœ— p βœ— a βœ— r βœ— t βœ— βœ— i βœ— s βœ— βœ— f βœ— a βœ— s βœ— t βœ— e βœ— n βœ— e βœ— d βœ— βœ— o βœ— f βœ— f βœ— βœ— c βœ— o βœ— m βœ— p βœ— l βœ— e βœ— t βœ— e βœ— l βœ— y βœ— βœ— b βœ— e βœ— f βœ— o βœ— r βœ— e βœ— βœ— c βœ— o βœ— n βœ— n βœ— e βœ— c βœ— t βœ— i βœ— n βœ— g βœ— .

Adorable Deer Amigurumi Pattern

Create your own cuddly deer friend with this charming amigurumi pattern! This sweet woodland creature features adorable antlers, a soft muzzle, and a cozy red scarf that makes it perfect for holiday gifting. Standing at 12 inches tall, this deer is the ideal size for snuggling and displaying. The pattern includes options for both square and heart-shaped belly patches, letting you customize your creation. With clear step-by-step instructions and helpful photos, you'll enjoy every stitch of bringing this gentle forest friend to life.

Beginner Friendly 8-10 Hours

Materials Needed for Adorable Deer Amigurumi Pattern

β€” Main Fabric

  • 01
    Plush yarn Dolce YarnArt 120m(131 yds)/100g in light brown - 1 ball 100g
  • 02
    Plush yarn Dolce YarnArt in dark brown for antlers and white for muzzle, patch and tail
  • 03
    Cotton yarn Yarnart Jeans 159m(174yads)/50g in dark brown for nose and eyebrows
  • 04
    Red plush yarn for scarf

β€” Tools Required

  • 01
    Crochet hook US size G/6 (4 mm)
  • 02
    Crochet hook size C/2 (3 mm)
  • 03
    Glitter safe eyes 16 mm
  • 04
    Fiber fill stuffing
  • 05
    Brown thread for assembling
  • 06
    Tapestry needle

Progress Tracker

0% Complete

β€” Legs & Body :

Round 1 :

6 sc in magic ring = 6 sts

Round 2 (INC) :

sc 2 in each st around = 12 sts

Round 3 (INC) :

(sc in next st, 2 sc in next st)*6 times = 18 sts

Rounds 4-10 :

sc in each st around = 18 sts

Info :

Fasten off, leave the tail about 10 cm and cut the yarn. One leg is done. Rep rnds 1-10 for the second leg. Do not cut yarn when the second leg is finished.

Round 11 :

18 sc around the 1st leg' sts, then make 18 sc around the 2nd leg's sts (this is how legs are attached to each other) = 36 sts

Info :

Then with the tail of the first leg yarn you should do 1 sl st inside the legs to prevent hole between the legs.

Rounds 12-18 :

sc in each st around = 36 sts

Info :

Now you need to stuff the legs. Otherwise it will be uncomfortably later.

Round 19 (DEC) :

(sc in next 4 sts, sc dec)*6 times = 30 sts

Round 20 :

sc in each st around = 30 sts

Round 21 (DEC) :

(sc in next 3 sts, sc dec)*6 times = 24 sts

Round 22 :

sc in each st around = 24 sts

Round 23 (DEC) :

(sc in next 2 sts, sc dec)*6 times = 18 sts

Info :

Now stuff the body and continue:

Round 24 (DEC) :

(sc in next st, sc dec)*6 times = 12 sts

Round 25 :

sc in each st around = 12 sts

Info :

Fasten off.

β€” Head :

Round 1 :

6 sc in magic ring = 6 sts

Round 2 (INC) :

2 sc in each st around = 12 sts

Round 3 (INC) :

(sc in next st, 2 sc in next st)*6 times = 18 sts

Round 4 (INC) :

(sc in next 2 sts, 2 sc in next st)*6 times = 24 sts

Round 5 (INC) :

(sc in next 3 sts, 2 sc in next st)*6 times = 30 sts

Round 6 (INC) :

(sc in next 4 sts, 2 sc in next st)*6 times = 36 sts

Round 7 (INC) :

(sc in next 5 sts, 2 sc in next st)*6 times = 42 sts

Round 8 (INC) :

(sc in next 6 sts, 2 sc in next st)*6 times = 48 sts

Rounds 9-15 :

sc in each st around = 48 sts

Info :

Important!!!! If you use safe eyes (16 mm) insert them now between rounds 11 and 12 with 7 sts in between.

Round 16 (DEC) :

(sc in next 6 sts, sc dec)*6 times = 42 sts

Round 17 (DEC) :

(sc in next 5 sts, sc dec)*6 times = 36 sts

Round 18 (DEC) :

(sc in next 4 sts, sc dec)*6 times = 30 sts

Round 19 (DEC) :

(sc in next 3 sts, sc dec)*6 times = 24 sts

Round 20 (DEC) :

(sc in next 2 sts, sc dec)*6 times = 18 sts

Info :

Stuff the head.

Round 21 (DEC) :

(sc in next st, sc dec)*6 times = 12 sts

Round 22 (DEC) :

sc dec*6 times = 6 sts

Info :

Fasten off.

β€” Arms (Make 2) :

Round 1 :

6 sc in magic ring = 6 sts

Round 2 (INC) :

2 sc in each st around = 12 sts

Rounds 3-8 :

sc in each st around = 12 sts

Round 9 (DEC) :

(sc in next 4 sts, sc dec)*2 times = 10 sts

Info :

Stuff the arm, do not stuff it too tight.

Round 10 (DEC) :

(sc in next 3 sts, sc dec)*2 times = 8 sts

Round 11 (DEC) :

(sc in next 2 sts, sc dec)*2 times = 6 sts

Info :

Close the piece using sc, work 2 sc along the edge of the piece. Fasten off, cut yarn and weave in ends. One arm is done. Rep rnds 1-11 for the second arm.

β€” Muzzle :

Round 1 :

6 sc in magic ring = 6 sts

Round 2 (INC) :

sc 2 in each st around = 12 sts

Round 3 (INC) :

(sc in next st, 2 sc in next st)*6 times = 18 sts

Round 4 :

sc in each st around = 18 sts

Info :

Fasten off.

β€” Nose :

Round 1 :

6 sc in magic ring = 6 sts

Round 2 (INC) :

sc 2 in each st around = 12 sts

Round 3 (INC) :

(sc in next st, 2 sc in next st)*6 times = 18 sts

Info :

Fasten off. Leave the long tail for sewing.

β€” Ears (Make 2) :

Round 1 :

6 sc in magic ring = 6 sts

Round 2 :

sc in each st around = 6 sts

Round 3 (INC) :

2 sc in each st around = 12 sts

Round 4 :

sc in each st around = 12 sts

Round 5 (INC) :

(sc in next st, 2 sc in next st)*6 times = 18 sts

Round 6 :

sc in each st around = 18 sts

Round 7 (DEC) :

(sc in next st, sc dec)*6 times = 12 sts

Info :

Fasten off, cut yarn and weave in ends. One ear is done. Rep rnds 1-7 for the second ear.

β€” Antlers (Make 2) :

First antler part :

6 sc in magic ring = 6 sts. Round 2: sc in each st around = 6 sts. Fasten off and cut yarn.

Second antler part :

6 sc in magic ring = 6 sts. Rounds 2-3: sc in each st around = 6 sts. Do not cut yarn!!!

Join antler parts :

Round 4 (DEC): with the working yarn of 2nd antler part crochet around first antler part. Make 1 sc, sc dec, 1 sc, sc dec until reaching 2nd antler part. Continue on 2nd part with 1 sc, sc dec, 1 sc, sc dec = 8 sts

Round 5 (DEC) :

1 st, sc dec, 2 st, sc dec, 1 st = 6 sts

Info :

Fasten off, cut yarn and weave in ends. One antler is done. Rep rnds 1-5 for the second antler.

β€” Tail :

Round 1 :

6 sc in magic ring = 6 sts

Round 2 (INC) :

(sc in next st, 2 sc in next st)*3 times = 9 sts

Round 3 :

sc in each st around = 9 sts

Info :

Fasten off, cut yarn and weave in ends.

β€” Square Patch :

Row 1 :

sc in 2nd chain from hook and in next 3 sts, ch1 = 4 sts, turn

Row 2 :

sc in next 4 sts, ch 1 = 4 sts, turn

Row 3 :

sc in next 4 sts, ch 1 = 4 sts, turn

Row 4 :

sc in next 4 sts = 4 sts

Info :

Fasten off.

β€” Heart Patch :

Round 1 :

sc in next st, 3 dc in next st, 2 sc in next st, 1 hdc in next st, 2 sc in next st, 3 dc in next st, sl st = 12 sts

Info :

Fasten off.

β€” Scarf :

Row 1 :

sc in 2nd chain from hook and in next 3 sts, ch1 = 4 sts, turn

Rows 2-39 :

sc in next 4 sts, ch 1 = 4 sts, turn

Row 40 :

sc in next 4 sts = 4 sts

Info :

Fasten off, cut yarn and weave in ends.

Assembly Instructions

  • Insert safety eyes between rounds 11 and 12 with 7 stitches in between, or sew eyes in place if using alternatives
  • Sew the head to the body by attaching linking stitches from round 20 of the head to stitches from round 25 of the body
  • Sew arms to the body between rounds 24 and 25, keeping needle placement consistent for flexible movement
  • Use needle sculpting with brown thread to shape the head according to the photo guide
  • Stuff and sew the muzzle to the head between rounds 13 and 18
  • Sew the nose to the top of the muzzle and embroider mouth stitches with brown thread
  • Attach antlers between rounds 2 and 5 of the head and embroider eyebrows between rounds 7 and 10
  • Fold ears in half lengthwise and sew between rounds 7 and 8 of the head
  • Embroider small white stitches on the deer's forehead for spots
  • Sew the tail to the back and attach the belly patch, adding decorative stitches with contrast yarn

Important Notes

  • πŸ’‘Use stitch markers to keep track of your rounds, especially when working with plush yarn that can be difficult to see
  • πŸ’‘Stuff pieces firmly but not too tightly to maintain proper shape and allow for gentle squeezing
  • πŸ’‘Insert safety eyes before completing the head - it's much harder to add them after stuffing
  • πŸ’‘Work with plush yarn carefully as it can split easily - use a smooth, consistent tension
  • πŸ’‘Pin all parts in place before sewing to ensure correct positioning and proportions
  • πŸ’‘Keep your stitches tight enough to prevent stuffing from showing through the fabric

This sweet deer amigurumi pattern brings the magic of woodland creatures into your home with its gentle expression and cozy red scarf. The combination of soft textures and charming details makes it perfect for gifting or keeping as your own special companion. Whether you choose the square or heart belly patch, your finished deer will radiate warmth and handmade love. The clear instructions and helpful photos guide you through each step, making this an enjoyable project from start to finish. 🦌 Happy crocheting! 🧢✨

You ask,

we answer.

FAQs

Can I use a different yarn weight for this pattern?

Yes! If you use a smaller hook and thinner yarn, your deer will be proportionally smaller. Just make sure to maintain tight stitches to prevent stuffing from showing through.

What if I can't find plush yarn?

The pattern suggests several substitutes including regular bulky weight yarn. Himalaya Dolphin Baby, Baby Bee Adore, or Velvet by Bernat all work well as alternatives.

How do I prevent holes between the legs when joining them?

Use the tail from the first leg to make a slip stitch inside where the legs meet. This closes any gap and creates a smooth connection.

Can I make this deer without safety eyes?

Absolutely! You can use buttons or crochet the eyes with black yarn. Just embroider them in the same position as indicated for safety eyes.

Why do my antlers look different from the pattern?

Make sure you're fastening off the first antler part completely before joining it to the second part. The decreases in the joining round create the branched antler shape.