🧢 Beautiful ✨ Detailed πŸ’ Adorable

Adorable Crocheted Bumblebee Amigurumi Pattern

Adorable Crocheted Bumblebee Amigurumi Pattern
4.5β˜… Rating
2-3 Hours Time Needed
2.0K Made This
βœ‚οΈ

Beginner Friendly Level

Perfect for those just starting their sewing journey, with clear instructions and simple techniques

⏱️

Bite-Sized Project

Complete in under 2 hoursβ€”quick, fun, and perfect for a little creative escape.

🧸

Cute Companion

An adorable friend to cherish, handcrafted with love to bring comfort and joy for years to come.

About This Adorable Crocheted Bumblebee Amigurumi Pattern

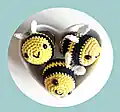
This sweet bumblebee pattern brings the garden's most beloved pollinator to life in miniature form. With its classic yellow and black striped body, tiny white wings, and cheerful expression, this little bee captures all the charm of its real-life counterpart. The pattern uses basic amigurumi techniques, making it accessible for beginners while still creating a detailed and delightful finished piece. Optional lavender stuffing adds a lovely natural scent that makes this bee extra special.

Adorable Crocheted Bumblebee Amigurumi Pattern crochet pattern - detailed view of completed project

The finished bumblebee makes a perfect keychain, car accessory, or sweet addition to any space that needs a touch of handmade charm. Its compact size and sturdy construction ensure it will withstand daily use while spreading joy wherever it goes.

Why You'll Love This Adorable Crocheted Bumblebee Amigurumi Pattern

I absolutely love how this pattern combines simplicity with such incredible charm! The way the black stripes create that classic bee look never fails to make me smile, and I find the process of switching colors so satisfying. What really gets me excited is how quickly this little beauty comes together - there's something magical about watching a simple ball of yarn transform into this buzzing companion in just a couple of hours. The optional lavender stuffing is my secret favorite touch because it adds such a lovely sensory element that makes each bee feel extra special and unique.

Adorable Crocheted Bumblebee Amigurumi Pattern step 1 - construction progress Adorable Crocheted Bumblebee Amigurumi Pattern step 2 - assembly progress Adorable Crocheted Bumblebee Amigurumi Pattern step 3 - details and accessories Adorable Crocheted Bumblebee Amigurumi Pattern step 4 - final assembly and finishing

Switch Things Up

I love how versatile this little bee pattern can be with just a few creative tweaks! Sometimes I'll make the stripes wider by working more rounds in each color, creating a completely different look that's just as adorable. For special occasions, I've experimented with metallic threads woven through the yellow sections to give my bees a subtle shimmer that catches the light beautifully.

One of my favorite variations is making a whole family of bees in different sizes by adjusting the hook size - a 2mm hook creates tiny baby bees while a 4mm hook makes mama bees that are perfect for nursery decorations. I've also played with wing shapes, sometimes making them slightly larger or adding delicate embroidered details with white thread to mimic real bee wing patterns.

The face expressions are where I really let my creativity shine! Instead of the classic smile, I'll sometimes embroider sleeping eyes with long lashes for a sleepy bee, or add tiny heart-shaped blush marks for an extra sweet look. During holidays, I'll incorporate themed elements like tiny Santa hats for Christmas bees or small flower crowns for spring versions that make the most charming seasonal decorations.

Common Mistakes & How to Fix Them

βœ— Forgetting to place safety eyes before stuffing - always insert eyes between rounds 5-6 before continuing βœ— Making color changes too abruptly - carry yarn loosely behind work to avoid puckering at stripe transitions βœ— Overstuffing the body which can distort the classic bee shape and make assembly difficult βœ— Sewing wings too low on the body - position them between black stripes with proper spacing for best appearance

Adorable Crocheted Bumblebee Amigurumi Pattern

Create your own buzzing companion with this delightful bumblebee amigurumi pattern! This charming little bee features classic yellow and black stripes, sweet pink cheeks, and delicate white wings that make it absolutely irresistible. Perfect as a keychain, nursery decoration, or thoughtful handmade gift, this pattern combines simple techniques with adorable details. The finished bee is small enough to fit in your palm yet packed with personality that will bring smiles wherever it goes.

Beginner Friendly 2-3 Hours

Materials Needed for Adorable Crocheted Bumblebee Amigurumi Pattern

β€” Main Fabric

  • 01
    Crochet yarn Natura Just Cotton in Tournesol (yellow), Noir (black), Ibiza (white), and Rose Layette (pink)

β€” Tools Required

  • 01
    Crochet hook size 2.5mm
  • 02
    Yarn needle
  • 03
    Scissors
  • 04
    6mm black safety eyes
  • 05
    Stuffing material
  • 06
    Optional: dried lavender for scented stuffing

Progress Tracker

0% Complete

β€” Body :

Round 1 :

Using colour A work 6 sc in magic ring (6)

Round 2 :

2 inc (12)

Round 3 :

*1 sc, 1 inc**, repeat from *to ** 6 times (18)

Round 4 :

*2 sc, 1 inc**, repeat from *to ** 6 times (24)

Round 5 :

*3 sc, 1 inc**, repeat from *to ** 6 times (30)

Round 6 :

Sc in each st

Rounds 7-10 :

Change to colour B and continue in sc

Info :

Stop crocheting and place safety eyes between round 5 and 6, considering 8 stitches between the eyes

Rounds 11-13 :

Change to colour A and continue in sc

Rounds 14-17 :

Change to colour B and continue in sc

Round 18 :

Change to colour A and continue in sc

Round 19 :

*3 sc, 1 dec**, repeat from *to ** 6 times (24)

Round 20 :

*2 sc, 1 dec**, repeat from *to ** 6 times (18)

Info :

Stop crocheting and start stuffing the bee firmly, optional to fill with dried lavender

Round 21 :

*1 sc, 1 dec**, repeat from *to ** 6 times (12)

Round 22 :

6 dec (6)

Info :

Fasten off leaving a long tail for sewing the last stitches together

β€” Wings (make 2) :

Round 1 :

Using colour C work 6sc in magic ring (6)

Round 2 :

2 inc (12)

Info :

Work a slip stitch and fasten off leaving a long tail for sewing the wings to the bee

Assembly Instructions

  • Sew the wings to the top of the body, positioning them between the 2 black stripes with 2 rows of space in between to allow room for the hanging chain
  • Create a hanging loop by making a chain of 40 stitches, leaving tails long enough to pass through the bee body
  • Finish the chain by joining the first stitch with a slip stitch, then sew the hanging loop securely to the body using the long tails
  • Using 3 strands of pink thread (colour D), embroider 2 small pink dots on each side of the face, positioned 2 rows down from the safety eyes
  • Create the mouth using 3 strands of black thread (colour B) by embroidering a small V shape at the front of the face

Important Notes

  • πŸ’‘Place safety eyes between rounds 5 and 6 with exactly 8 stitches between them for proper positioning
  • πŸ’‘Change colors smoothly by carrying yarn loosely behind your work to avoid puckering at color transitions
  • πŸ’‘Stuff the body firmly but not overly tight to maintain the proper bee shape and proportions
  • πŸ’‘Optional dried lavender can be added to stuffing for a natural pleasant scent
  • πŸ’‘Leave long tails when fastening off pieces as they will be needed for assembly and embroidery details

This delightful bumblebee pattern brings garden magic right into your hands! With its cheerful yellow and black stripes, sweet pink cheeks, and delicate white wings, this little bee is guaranteed to buzz its way into your heart. The simple construction makes it perfect for beginners, while the charming details ensure a truly special finished piece. Whether you're making it as a keychain, decoration, or gift, this buzzing buddy is sure to spread smiles wherever it goes! 🐝 Happy crocheting! 🧢✨

You ask,

we answer.

FAQs

What size will the finished bumblebee be?

The finished bumblebee will be approximately 3-4 inches tall, making it perfect for keychains or small decorations.

Can I use different yarn colors for my bee?

Absolutely! While the pattern uses traditional yellow and black, you can experiment with any color combination you prefer for a unique bee.

Is the lavender stuffing necessary?

No, the lavender stuffing is completely optional. Regular polyester stuffing works perfectly fine if you prefer an unscented bee.

How do I make sure my color changes look neat?

Change colors at the end of the round and carry your yarn loosely behind your work to prevent puckering and maintain even tension.

Can I make this bee without the hanging chain?

Yes! Simply skip the chain instructions if you prefer your bee without a hanging loop. It will work perfectly as a standalone decoration.