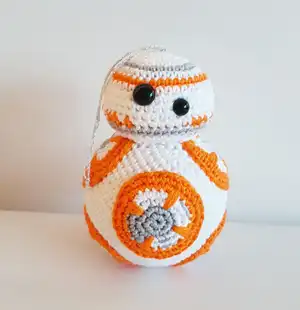
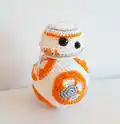
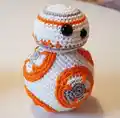
Create your own adorable BB-8 droid with this detailed crochet pattern! This charming Star Wars character comes to life through careful color work and distinctive circular details. Perfect for fans of the galaxy far, far away, this pocket-sized companion features the iconic white and orange color scheme with intricate decorative circles that make BB-8 instantly recognizable.
Progress Tracker
0% Complete
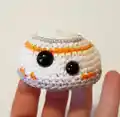
— HEAD :
Round 1 :
6 sc into the magic ring (6)
Round 3 :
[1 sc, 1 inc] x6 (18)
Round 4 :
1 sc, 1 inc [2 sc, 1 inc] x5, 1 sc (24)
Round 5 :
Change to grey yarn. [3 sc, 1 inc] x6 (30)
Round 6 :
Change to White yarn. 2 sc, 1 inc [4 sc, 1 inc] x5, 2 sc (36)
Round 7 :
Change to Orange yarn. 36 sc (36)
Round 8 :
Change to White yarn. [5 sc, 1 inc] x6 (42)
Round 9-11 :
42 sc (3 rounds, 42)
Round 12 :
orange 1 sc, white 1 sc, orange 3 sc, white 1 sc, orange 1 sc, white 1 sc, orange 3 sc, white 1 sc, orange 1 sc, white 1 sc, orange 3 sc, white 1 sc, orange 1 sc, white 7 sc, orange 3 sc, white 1 sc, orange 1 sc, white 1 sc, orange 3 sc, white 1 sc, orange 1 sc, white 1 sc, orange 3 sc, white 1 sc = (42)
Round 13 :
With grey yarn, 42 sc (42)
Info :
Place the 9 mm eye between rounds 8 and 9 and place the 8 mm eye between rounds 10 and 11
Round 14 :
Change to white yarn. In back loops only, [5 sc, 1 dec] x6 (36)
Round 15 :
[4 sc, 1 dec] x6 (30)
Round 16 :
[3 sc, 1 dec] x6 (24)
Info :
Start stuffing with polyester stuffing and keep doing that as the hole becomes smaller
Round 17 :
[2 sc, 1 dec] x6 (18)
Round 18 :
[1 sc, 1 dec] x6 (12)
Info :
Sew the hole together. Cut yarn but leave a long yarn tail for sewing
— BODY :
Round 1 :
6 sc into the magic ring (6)
Round 3 :
[1 sc, 1 inc] x6 (18)
Round 4 :
1 sc, 1 inc [2 sc, 1 inc] x5, 1 sc (24)
Round 5 :
[3 sc, 1 inc] x6 (30)
Round 6 :
2 sc, 1 inc [4 sc, 1 inc] x5, 2 sc (36)
Round 7 :
[5 sc, 1 inc] x6 (42)
Round 8 :
3 sc, 1 inc [6 sc, 1 inc] x5, 3 sc (48)
Round 10 :
[7 sc, 1 inc] x6 (54)
Round 11-20 :
54 sc (10 rounds, 54)
Round 21 :
[7 sc, 1 dec] x6 (48)
Round 23 :
3 sc, 1 dec [6 sc, 1 dec] x5, 3 sc (42)
Round 24 :
[5 sc, 1 dec] x6 (36)
Round 25 :
2 sc, 1 dec [4 sc, 1 dec] x5, 2 sc (30)
Round 26 :
[3 sc, 1 dec] x6 (24)
Info :
Start stuffing and keep doing that as the hole becomes smaller
Round 27 :
1 sc, 1 dec [2 sc, 1 dec] x5, 1 sc (18)
Round 28 :
[1 sc, 1 dec] x6 (12)
Info :
Sew the hole together and cut yarn
— CIRCLE TYPE 1 (make 2) :
Round 1 :
6 sc into the magic ring (6)
Round 3 :
[1 sc, 1 inc] x6 (18)
Round 4 :
1 sc, 1 inc [2 sc, 1 inc] x5, 1 sc (24)
Round 5 :
Change to orange. [3 sc, 1 inc] x6 (30)
Round 6 :
2 sc, 1 inc [4 sc, 1 inc] x5, 2 sc (36)
Info :
Finish with 1 sl. Cut yarn but leave a long yarn tail for sewing
— CIRCLE TYPE 2 (make 2) :
Round 1 :
With grey yarn. 6 sc into the magic ring (6)
Round 3 :
Change to white yarn. [1 sc, 1 inc] x6 (18)
Round 4 :
1 sc, 1 inc [2 sc, 1 inc] x5, 1 sc (24)
Round 5 :
Change to orange. [3 sc, 1 inc] x6 (30)
Round 6 :
2 sc, 1 inc [4 sc, 1 inc] x5, 2 sc (36)
Info :
Finish with 1 sl. Cut yarn but leave a long yarn tail for sewing
— CIRCLE TYPE 3 (make 2) :
Round 1 :
With grey yarn. 6 sc into the magic ring (6)
Round 3 :
With Grey 1 sc, 1 inc, 1 sc, Change to White 1 inc [1 sc, 1 inc] x5 (18)
Round 4 :
With Grey 1 sc, 1 inc, 2 sc, 1 inc, Change to White [2 sc, 1 inc] x4, 1 sc (24)
Round 5 :
Change to orange. [3 sc, 1 inc] x6 (30)
Round 6 :
2 sc, 1 inc [4 sc, 1 inc] x5, 2 sc (36)
Info :
Finish with 1 sl. Cut yarn but leave a long yarn tail for sewing
Info :
On every circle do a few stitches using orange yarn to make it look like a cross inside the circle
This delightful BB-8 pattern brings the beloved Star Wars droid into your hands as a perfect pocket-sized companion! With detailed photo instructions and careful attention to the character's iconic design, you'll create an authentic-looking droid that captures all of BB-8's charm. The combination of simple stitches with clever color work makes this an engaging project that results in a truly special finished piece. Whether for display, play, or as a gift for any Star Wars fan, this BB-8 will surely bring smiles and spark imagination! 🤖✨