🧢 Beautiful ✨ Detailed πŸ’ Adorable

Pizza Blanket Pattern

Pizza Blanket Pattern
4.6β˜… Rating
25-30 Hours Time Needed
3.6K Made This
βœ‚οΈ

Intermediate Level

Ideal for those with basic knitting experience, featuring slightly more advanced stitches and techniques to expand your skills.

⏱️

All-Day Adventure

Requires 8-10 hours, ideal for a full day of immersive knitting.

🏑

Cozy Accent

A warm touch for your space that transforms ordinary corners into inviting nooks filled with handmade charm.

About This Pizza Blanket Pattern

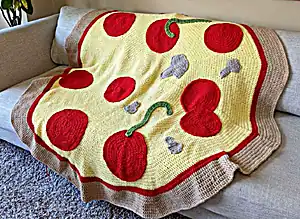
This Pizza Blanket pattern is the ultimate conversation starter and comfort companion rolled into one delightful project. Starting with a large circular base worked in double crochet, you'll create the cheese layer using warm yellow yarn, add a red sauce border, and finish with a brown crust edge. The magic really happens when you craft all the individual toppings - from classic pepperoni circles to detailed mushrooms with caps and stems. Each topping is carefully designed to look realistic and dimensional when sewn onto your pizza base.

Pizza Blanket Pattern crochet pattern - detailed view of completed project

The pattern uses worsted weight yarn and requires both 5mm and 4.5mm hooks for different components. With over 2000 yards of yarn total, this is definitely a substantial project that results in a full-sized blanket perfect for snuggling.

Why You'll Love This Pizza Blanket Pattern

I absolutely love how this pattern combines practicality with pure whimsy - you get a functional blanket that's also an incredible piece of art! The detailed toppings make it feel like you're crafting a real pizza, and I find the repetitive rounds of the base surprisingly meditative. What really gets me excited is seeing people's reactions when they first spot this blanket - the double-take and delighted laughter never gets old. Plus, it's such a unique gift that no one expects but everyone absolutely adores once they see it.

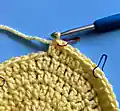
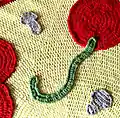
Pizza Blanket Pattern step 1 - construction progress Pizza Blanket Pattern step 2 - assembly progress Pizza Blanket Pattern step 3 - details and accessories Pizza Blanket Pattern step 4 - final assembly and finishing

Switch Things Up

I love experimenting with different pizza styles when making this blanket! Sometimes I create a Hawaiian version with extra pineapple pieces, or go wild with a supreme pizza loaded with every topping imaginable. You could even make seasonal variations - maybe autumn colors for a harvest pizza or pastels for a whimsical spring version.

I've also found that changing up the toppings entirely can create completely different themes. Try making it into a breakfast pizza with yellow scrambled egg toppings and brown bacon strips, or create a dessert pizza with chocolate chips and colorful fruit toppings.

The beauty of this pattern is that once you master the base technique, you can let your creativity run wild with the toppings and color combinations!

Common Mistakes & How to Fix Them

βœ— Not using stitch markers to track increases can lead to uneven pizza shape and incorrect stitch counts βœ— Changing colors too abruptly without proper technique creates messy transitions between cheese, sauce, and crust layers βœ— Making toppings too loose or tight compared to the base blanket causes puckering when sewn on βœ— Forgetting to leave long tails on toppings makes assembly difficult and creates weaker attachment points

Pizza Blanket Pattern

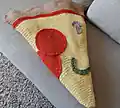
Transform your cozy nights into a delicious adventure with this incredibly fun Pizza Blanket pattern! This unique design creates a realistic-looking pizza slice that doubles as a warm, comfortable blanket. Complete with pepperoni, mushrooms, peppers, olives, and pineapple toppings, you'll be amazed at how realistic this pizza looks. Perfect for movie nights, camping trips, or as a conversation starter in any living room. The pattern includes detailed instructions for the base pizza and all the delightful toppings that make this blanket truly special.

Intermediate 25-30 Hours

Materials Needed for Pizza Blanket Pattern

β€” Main Fabric

  • 01
    Worsted weight yarn in yellow (approximately 1800 yards)
  • 02
    Worsted weight yarn in red (approximately 720 yards)
  • 03
    Worsted weight yarn in brown (approximately 550 yards)

β€” Tools Required

  • 01
    5mm crochet hook
  • 02
    4.5mm crochet hook
  • 03
    Yarn needle
  • 04
    Stitch markers
  • 05
    Scissors
  • 06
    Pins

Progress Tracker

0% Complete

β€” Pizza Base :

Start R1 :

With 5mm hook and yellow yarn Mc, Ch 3, and then work 11 Dc into the Mc. (12)

Info :

At the end of each round: insert your hook into the top of the Ch 3, Sl St, Ch 3, and then Dc into the same stitch. *The Ch 3 will act as a stitch thus making the Ch3 + Dc= an Inc*

R2 :

Inc in each stitch around (24)

R3 :

Dc 1 (Inc 1, Dc 1) x11 (36)

R4 :

Dc 2 (Inc 1, Dc 2) x11 (48)

R5 :

Dc 3 (Inc 1, Dc 3) x11 (60)

R6 :

Dc 4 (Inc 1, Dc 4) x11 (72)

R7 :

Dc 5 (Inc 1, Dc 5) x11 (84)

R8 :

Dc 6 (Inc 1, Dc 6) x11 (96)

R9 :

Dc 7 (Inc 1, Dc 7) x11 (108)

R10 :

Dc 8 (Inc 1, Dc 8) x11 (120)

R11 :

Dc 9 (Inc 1, Dc 9) x11 (132)

R12 :

Dc 10 (Inc 1, Dc 10) x11 (144)

R13 :

Dc 11 (Inc 1, Dc 11) x11 (156)

R14 :

Dc 12 (Inc 1, Dc 12) x11 (168)

R15 :

Dc 13 (Inc 1, Dc 13) x11 (180)

R16 :

Dc 14 (Inc 1, Dc 14) x11 (192)

R17 :

Dc 15 (Inc 1, Dc 15) x11 (204)

R18 :

Dc 16 (Inc 1, Dc 16) x11 (216)

R19 :

Dc 17 (Inc 1, Dc 17) x11 (228)

R20 :

Dc 18 (Inc 1, Dc 18) x11 (240)

R21 :

Dc 19 (Inc 1, Dc 19) x11 (252)

R22 :

Dc 20 (Inc 1, Dc 20) x11 (264)

R23 :

Dc 21 (Inc 1, Dc 21) x11 (276)

R24 :

Dc 22 (Inc 1, Dc 22) x11 (288)

R25 :

Dc 23 (Inc 1, Dc 23) x11 (300)

R26 :

Dc 24 (Inc 1, Dc 24) x11 (312)

R27 :

Dc 25 (Inc 1, Dc 25) x11 (324)

R28 :

Dc 26 (Inc 1, Dc 26) x11 (336)

R29 :

Dc 27 (Inc 1, Dc 27) x11 (348)

R30 :

Dc 28 (Inc 1, Dc 28) x11 (360)

R31 :

Dc 29 (Inc 1, Dc 29) x11 (372)

R32 :

Dc 30 (Inc 1, Dc 30) x11 (384)

R33 :

Dc 31 (Inc 1, Dc 31) x11 (396)

R34 :

Dc 32 (Inc 1, Dc 32) x11 (408)

R35 :

Dc 33 (Inc 1, Dc 33) x11 (420)

R36 :

Dc 34 (Inc 1, Dc 34) x11 (432)

R37 :

Dc 35 (Inc 1, Dc 35) x11 (444)

R38 :

Dc 36 (Inc 1, Dc 36) x11 (456)

R39 :

Dc 37 (Inc 1, Dc 37) x11 (468)

R40 :

Dc 38 (Inc 1, Dc 38) x11 (480)

R41 :

Dc 39 (Inc 1, Dc 39) x11 (492)

R42 :

Dc 40 (Inc 1, Dc 40) x11 (504)

R43 :

Dc 41 (Inc 1, Dc 41) x11 (516)

R44 :

Dc 42 (Inc 1, Dc 42) x11 (528)

R45 :

Dc 43 (Inc 1, Dc 43) x11 (540)

R46 :

Dc 44 (Inc 1, Dc 44) x11 (552)

R47 :

Dc 45 (Inc 1, Dc 45) x11 (564)

R48 :

Dc 46 (Inc 1, Dc 46) x11 (576)

R49 :

Dc 47 (Inc 1, Dc 47) x11 (588)

R50 :

Dc 48 (Inc 1, Dc 48) x11 (600)

R51 :

Dc 49 (Inc 1, Dc 49) x11 (612)

Info :

Change to Red yarn

R52 :

Dc 50 (Inc 1, Dc 50) x11 (624)

R53 :

Dc 51 (Inc 1, Dc 51) x11 (636)

Info :

Change to Brown yarn before you Ch 3

R54 :

Dc 52 (Inc 1, Dc 52) x11 (648)

R55 :

Dc 53 (Inc 1, Dc 53) x11 (660)

R56 :

Dc 54 (Inc 1, Dc 54) x11 (672)

R57 :

Dc 55 (Inc 1, Dc 55) x11 (684)

R58 :

Dc 56 (Inc 1, Dc 56) x11 (696)

R59 :

Dc 57 (Inc 1, Dc 57) x11 (708)

R60 :

Dc 58 (Inc 1, Dc 58) x11 (720)

Info :

To Finish off: Don't Ch 3, make a Sl St in the first stitch and finish off. Now to make toppings!

β€” Pepperonis :

R1 :

With red yarn and a 5 mm hook: Mc, Ch 3, and then work 11 Dc into the Mc. (12)

R2 :

Inc in each stitch (24)

R3 :

Dc 1 (Inc 1, Dc 1) x11 (36)

R4 :

Dc 2 (Inc 1, Dc 2) x11 (48)

R5 :

Dc 3 (Inc 1, Dc 3) x11 (60)

R6 :

Dc 4 (Inc 1, Dc 4) x11 (72)

R7 :

Dc 5 (Inc 1, Dc 5) x11 (84)

R8 :

Dc 6 (Inc 1, Dc 6) x11 (96)

R9 :

Dc 7 (Inc 1, Dc 7) x11 (108)

Info :

Sl St into the first stitch and finish off, leave a long tail for sewing

β€” Olives :

Start :

With black yarn and a 4.5 mm hook: Ch 15, insert your hook into the first Ch and Sl St to make a circle.

R1 :

Ch 1, Sc in the same stitch as the Sl St, ScInc in the reaming Chs (30)

Info :

Sl St into the first stitch and finish off, leave a long tail for sewing

β€” Peppers :

R1 :

With green yarn and a 4.5 mm hook, Ch 60. Starting in the 3rd ch from the hook, Dc 57 across, Dc 3 in the last Ch.

Info :

Rotate the pepper 180Β°. Sc in each Ch, place Sc 2 in the last Ch, Sl St in the first Dc

Info :

Finish off and leave a long tail for sewing

β€” Small Mushrooms :

Row 1 :

Ch 6, starting in the 2nd Ch from the hook, Sc across (5)

R2-8 :

Sc across (5) *7 rows*

R9 :

Ch 6, turn, Starting in the 2nd Ch from the hook, Sc 5 across Chs, Sc 5 across the stem, Ch 6 (15)

R10 :

Starting in the 2nd Ch from the hook, Sc across (15)

R11 :

Sc 4, Dec, Sc 3, Dec, Sc 4 (13)

R12 :

Sc 3, Dec, Sc 3, Dec, Sc 3, (11)

R13 :

Sc 4, Dec, Sc 5, (10)

R14 :

Sc across (10)

R15 :

Sc 4, Dec, Sc 4 (9)

R16 :

Sc 4, Dec, Sc 3 (8) Ch 1

R17 :

Sc around the sides of the mushroom, place 2 Sc in the two cap corners, and the two bottom stem corners, Sl St in the first stitch

β€” Large Mushrooms :

Row 1 :

Ch 14, starting in the 3rd Ch from the hook, Dc across (12)

R2-R3 :

Dc across (12) *2 rows*

R4 :

Ch 10, turn, starting in the 3rd Ch from the hook,, Dc 8 across the Chs, Dc 6 across the stem, Ch 10

R5 :

Turn, Dc in the 3rd Ch from the hook, Dc across (22)

R6 :

(Dc 4, dcdec) x3, Dc 4 (19)

R7 :

(Dc 5, dcdec) x2, Dc 5 (17)

R8 :

Dc across (17)

R9 :

(Dc 3, dcdec) x3, Dc 2 (14)

R10 :

(Dc 2, dcdec) x3, Dc 2 (11)

R11 :

dcdec, Dc 7, dcdec, (9) Ch 1

R12 :

Sc around the sides of the mushroom, place 2 Sc in the cap corners and 2 Sc in the stem corners

β€” Pineapple :

Row 1 :

With darker yellow yarn and a 4.5 mm hook: Ch 9, start in the 3rd Ch from the hook, Dc across (7)

R2 :

Dc 3, Inc 1, Dc 3 (8)

R3 :

Dc 4, Inc 1, Dc 3 (9)

R4 :

Dc 4, Inc 1, Dc 4 (10)

R5 :

Dc across (10)

R6 :

Dc 5, Inc 1, Dc 4 (11)

R7 :

Dc across (11)

R8 :

Dc 5, Inc 1, Dc 5 (12)

R9 :

Dc 6, Inc 1, Dc 5 (13)

R10 :

Dc 6, Inc 1, Dc 6 (14)

R11 :

Dc 7, Inc 1, Dc 6 (15) Ch 1

Info :

Sc around all 4 sides of the pineapple. Start by placing 2 Sc in the first corner. Place 3 Sc in the 3 remaining corners. When we Sc across the top, Sl st into the last 3 stitches. Finish off and leave a long tail for sewing

Assembly Instructions

  • Create all toppings first before beginning assembly of the pizza blanket
  • Lay the completed pizza base flat on the ground and randomly toss toppings onto the surface
  • Pin each topping in place before sewing to ensure proper positioning and spacing
  • Sew toppings by stitching between the stitches of the cheese base, keeping needle mostly hidden from back side
  • Overlap some toppings naturally to create a realistic pizza appearance
  • Shape peppers into slight J-curves to mimic sliced bell pepper appearance
  • Secure all loose ends by weaving them through the back of the work

Important Notes

  • πŸ’‘Use stitch markers consistently to track increases and maintain proper pizza shape throughout construction
  • πŸ’‘Change colors carefully using proper technique to avoid messy transitions between cheese, sauce, and crust
  • πŸ’‘Leave long tails on all toppings for easier assembly and stronger attachment to the base
  • πŸ’‘Pin all toppings in place before sewing to ensure balanced and realistic pizza appearance
  • πŸ’‘Work with consistent tension throughout to ensure toppings lay flat against the blanket base

This incredible Pizza Blanket pattern transforms your crafting skills into culinary art! With its realistic cheese base, vibrant red sauce border, and golden brown crust, plus an array of detailed toppings, you'll create a conversation piece that's both functional and absolutely delightful. The pattern challenges you with interesting techniques while rewarding you with a truly unique finished piece. πŸ• Happy crocheting! 🧢✨

You ask,

we answer.

FAQs

How much yarn do I need for the complete pizza blanket?

You'll need approximately 3070 yards total: 1800 yards yellow, 720 yards red, 550 yards brown, plus 360 yards each of black, green, darker yellow, and grey for toppings.

Can I make this blanket smaller or larger?

Yes! Simply add or subtract rounds from the base pattern. Remember to adjust your yarn quantities accordingly and maintain the proportion of cheese to sauce to crust layers.

Do I have to make all the toppings?

Not at all! Feel free to customize your pizza with only your favorite toppings. You can also create multiples of certain toppings or skip others entirely.

What if my pizza base isn't lying flat?

This usually indicates uneven increases. Check your stitch count after each round and use stitch markers to ensure consistent placement of increases.

How do I wash the finished pizza blanket?

Machine wash on gentle cycle in cold water and lay flat to dry. The toppings are securely sewn on, but gentle care will help maintain the blanket's shape and appearance.