๐Ÿงถ Beautiful โœจ Detailed ๐Ÿ’ Adorable

Bee-utiful Summer Bag Cover Crochet Pattern

Bee-utiful Summer Bag Cover Crochet Pattern
4.0โ˜… Rating
8-10 Hours Time Needed
2.7K Made This
โœ‚๏ธ

Intermediate Level

Ideal for those with basic knitting experience, featuring slightly more advanced stitches and techniques to expand your skills.

โฑ๏ธ

All-Day Adventure

Requires 8-10 hours, ideal for a full day of immersive knitting.

โ˜€๏ธ

Summer Bloom

Light and fresh designs for warmer days, capturing the renewal and brightness of the season.

About This Bee-utiful Summer Bag Cover Crochet Pattern

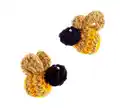
This charming bee-themed bag cover brings nature's sweetest creatures to life with intricate 3D elements and vibrant colors. The pattern combines classic single crochet techniques with decorative bobbles, creating texture and visual interest. You'll craft adorable little bees with golden wings, delicate white flowers with yellow centers, and green leaves that add a natural touch to your summer accessory.

Bee-utiful Summer Bag Cover Crochet Pattern crochet pattern - detailed view of completed project

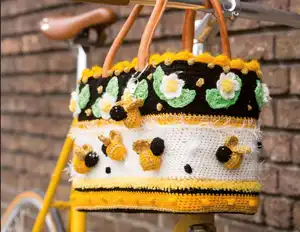
The striped design in cheerful yellows, whites, and black creates a sunny disposition that's perfect for warm weather outings. This intermediate-level pattern offers great practice with color changes and 3D embellishments.

Why You'll Love This Bee-utiful Summer Bag Cover Crochet Pattern

I absolutely love how this pattern transforms something ordinary into extraordinary! The combination of practical functionality with whimsical design makes every outing feel special. There's something magical about seeing those tiny bees come to life under your hook, and the way the flowers dance around the bag creates such joy. The bobble stitches add that perfect textural element that makes people want to reach out and touch your beautiful creation.

Bee-utiful Summer Bag Cover Crochet Pattern step 1 - construction progress Bee-utiful Summer Bag Cover Crochet Pattern step 2 - assembly progress Bee-utiful Summer Bag Cover Crochet Pattern step 3 - details and accessories Bee-utiful Summer Bag Cover Crochet Pattern step 4 - final assembly and finishing

Switch Things Up

I love how versatile this pattern can be with just a few creative tweaks! You could easily swap the bee theme for butterflies using the same basic construction but with different wing shapes and colors. Try making the flowers in different sizes by adding or reducing petal rounds, or create a whole garden theme with additional leaves in various green shades.

For a more sophisticated look, I sometimes work this pattern in monochromatic colors - imagine soft creams and taupes for an elegant beach bag, or bold navy and white for a nautical theme. The bobbles could become pearls with the right color choices!

Another fun variation I've experimented with is making the bees larger by adding extra rounds to the body, or creating a whole bee family with different sized members. You could even add antennae using black embroidery thread or thin wire covered in yarn.

Common Mistakes & How to Fix Them

โœ— Making the foundation chain too tight or too loose - measure against your actual bag circumference first โœ— Forgetting to change colors at the specified rounds - keep track with stitch markers โœ— Overstuffing the bees making them too rigid - stuff lightly for a natural rounded shape โœ— Not securing the decorative elements properly causing them to shift or fall off during use

Bee-utiful Summer Bag Cover Crochet Pattern

Transform an ordinary straw bag into a stunning summer accessory with this delightful bee-themed crochet cover. This vibrant pattern features cheerful yellow and white stripes, adorable 3D bees, delicate flowers, and fun bobble details that will make you the buzz of the town. Perfect for beach days, picnics, or any sunny adventure where you want to carry a piece of handmade sunshine.

Intermediate 8-10 Hours

Materials Needed for Bee-utiful Summer Bag Cover Crochet Pattern

โ€” Main Fabric

  • 01
    Scheepjes Colour Crafter yarn in black Ede 1002, white Barneveld 1005, and yellow ochre Eindhoven 1114
  • 02
    Scheepjes Softy yarn in yellow 489
  • 03
    Scheepjes Panda yarn in white 581
  • 04
    Scheepjes Softfun yarn in denim green 506
  • 05
    Scheepjes Twinkle yarn in gold 941

โ€” Tools Required

  • 01
    5mm crochet hook
  • 02
    Straw bag with 84cm circumference, 21cm tall
  • 03
    Fiberfill stuffing for bees
  • 04
    Gold-colored rocaille beads
  • 05
    Scissors
  • 06
    Tapestry needle
  • 07
    Stitch markers
  • 08
    Keychain with ring (optional)

Progress Tracker

0% Complete

โ€” Bag Cover :

Round 1-13 :

Crochet 6 cm sc with black, change to yellow ochre

Round 14-18 :

Crochet 2 cm sc, change to Barneveld white

Round 19-35 :

Crochet 7 cm sc, change to yellow

Round 36 :

Crochet sc with gold

Round 37-40 :

Crochet 1 cm sc with yellow, change to black

Round 41-42 :

Crochet 1 cm sc, change to yellow ochre

Round 43-47 :

Crochet 2 cm sc, change to black

Round 48-53 :

Crochet 2 cm sc

Info :

Total height should be 21 cm. Fasten off all threads and slide over bag

โ€” Flowers (Make 10) :

Round 1 :

With white, 18 sc in MR, join with sl st

Round 2 :

*3 ch, 1 dc in next sc, 3 ch, 1 sl st in next sc*, rep 5 more times for 6 petals

Center :

With yellow, crochet 1 sc around previous round, skip 1 sc, continue until 9 sc made

โ€” Leaves :

Foundation :

With green, make 9 ch

Side 1 :

1 sc in 2nd ch from hook, 1 hdc, 1 dc, 1 tr, 1 dc, 1 hdc, 1 sc, 2 ch

Side 2 :

Continue on other side: 1 sc, 1 hdc, 1 dc, 1 tr, 1 dc, 1 hdc, 1 sc

โ€” Bee Head :

Round 1 :

With black, 6 sc in MR

Round 2 :

2 sc in every sc (12)

Round 3 :

12 sc

Round 4 :

sc2tog around (6)

Info :

Stuff head before closing

โ€” Bee Body :

Round 1 :

With yellow ochre, 6 sc in MR

Round 2 :

2 sc in every sc (12), change to gold

Round 3 :

1 sc, 2 sc in next sc (18), change to yellow ochre

Round 4 :

18 sc, change to gold

Round 5 :

18 sc, change to yellow ochre

Round 6 :

1 sc, sc2tog, rep (12)

Round 7 :

sc2tog (6), fasten off

โ€” Bee Wings (Make 2) :

Round 1 :

With gold, 6 sc in MR, turn

Round 2 :

2 hdc in every sc, fasten off

โ€” Assembly :

Finishing :

Sew gold beads for bee eyes, attach wings to body, sew leaves under flowers

Decoration :

Attach flowers to black section, bees to white section, add bobbles throughout

Assembly Instructions

  • Slide the completed crocheted cover over your straw bag, ensuring proper fit around the circumference
  • Attach 10 flowers with leaves to the black striped section of the bag cover using small stitches
  • Sew 8 bees onto the white section, distributing them evenly for visual balance
  • Add decorative bobbles around flowers using gold yarn and around bees using black and white
  • Secure the top and bottom edges of the cover to the straw bag with invisible stitches
  • Attach optional keychain with extra bee charm to one of the bag handles

Important Notes

  • ๐Ÿ’กMeasure your straw bag carefully before starting to ensure proper fit of the cover
  • ๐Ÿ’กUse stitch markers to keep track of color changes throughout the striped pattern
  • ๐Ÿ’กStuff bees lightly to maintain their shape without making them too rigid
  • ๐Ÿ’กSecure all decorative elements firmly as they will receive handling during regular bag use

This bee-utiful bag cover pattern brings summer sunshine wherever you go! The combination of cheerful stripes, adorable 3D bees, and delicate flowers creates a truly special accessory that transforms any ordinary straw bag into a conversation starter. Perfect for beach trips, farmers market visits, or sunny day adventures. ๐Ÿ Happy crocheting! ๐ŸŒปโœจ

You ask,

we answer.

FAQs

What size straw bag works best with this pattern?

The pattern is designed for a straw bag with 84cm circumference and 21cm height. You can adjust the foundation chain length for different sized bags.

Can I use different yarn weights for this project?

While the pattern specifies DK weight yarns, you can substitute with similar weight yarns. Adjust hook size accordingly and test gauge first.

How do I prevent the cover from sliding on the bag?

Sew the cover to the bag at key points, especially at the top and bottom edges, using small invisible stitches.

Can I make this without the 3D elements?

Yes! You can create just the striped cover and add surface embroidery or appliques instead of the dimensional bees and flowers.