๐Ÿงถ Beautiful โœจ Detailed ๐Ÿ’ Adorable

Bunny Lovey Crochet Amigurumi Pattern

Bunny Lovey Crochet Amigurumi Pattern
4.3โ˜… Rating
8-10 Hours Time Needed
3.3K Made This
โœ‚๏ธ

Intermediate Level

Ideal for those with basic knitting experience, featuring slightly more advanced stitches and techniques to expand your skills.

โฑ๏ธ

All-Day Adventure

Requires 8-10 hours, ideal for a full day of immersive knitting.

๐Ÿฐ

Whimsical Buddy

Playful characters full of personality, designed to spark imagination and become cherished playtime favorites.

About This Bunny Lovey Crochet Amigurumi Pattern

This enchanting bunny lovey pattern creates a perfect combination of comfort and cuteness. The design features a detailed bunny head with embroidered face details, long floppy ears, and a soft blanket body that's perfect for snuggling. The two-color design in gray and teal blue creates a modern, gender-neutral aesthetic that's perfect for any nursery.

Bunny Lovey Crochet Amigurumi Pattern crochet pattern - detailed view of completed project

Using spiral technique for most components, this pattern teaches you advanced shaping and assembly skills. The lovey design makes it perfect for babies and toddlers to carry around for comfort.

Why You'll Love This Bunny Lovey Crochet Amigurumi Pattern

I absolutely love this pattern because it creates such a meaningful, practical gift that will be treasured for years. The combination of detailed amigurumi work with the comfort blanket design makes every stitch worthwhile, and watching a child bond with your handmade creation is incredibly rewarding.

Bunny Lovey Crochet Amigurumi Pattern step 1 - construction progress Bunny Lovey Crochet Amigurumi Pattern step 2 - assembly progress Bunny Lovey Crochet Amigurumi Pattern step 3 - details and accessories Bunny Lovey Crochet Amigurumi Pattern step 4 - final assembly and finishing

Switch Things Up

I love experimenting with different color combinations for this bunny lovey pattern! Instead of the classic gray and teal, try soft pastels like lavender and cream for a dreamy nursery vibe, or go bold with navy and gold for a more modern look. You could even add texture by using a fuzzy yarn for the ears while keeping the body smooth. I've found that changing the embroidery colors can completely transform the bunny's personality - coral nose with sage green accents creates such a sweet, earthy feel.

For a more personalized touch, consider adding the baby's initials embroidered on the blanket portion or creating seasonal versions with autumn oranges and browns. The beauty of this pattern is how adaptable it is to your creative vision while maintaining that essential comfort factor that makes loveys so special.

Common Mistakes & How to Fix Them

โœ— Not maintaining tight enough stitches which can cause stuffing to show through the fabric โœ— Forgetting to stuff parts before closing can result in floppy, shapeless limbs and body sections โœ— Placing ears too close together or at wrong angle affects the bunny's adorable facial expression โœ— Embroidering facial features too large or in wrong position can alter the sweet bunny appearance

Bunny Lovey Crochet Amigurumi Pattern

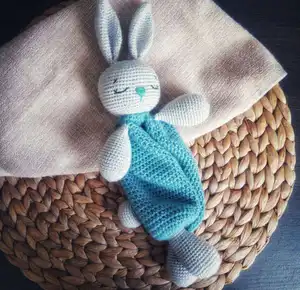
Create the most adorable bunny lovey that will become your little one's best friend! This charming crochet pattern combines a cuddly bunny head with a soft, comforting blanket body in beautiful gray and teal colors. Perfect for baby gifts, nursery decor, or anyone who loves sweet handmade treasures that bring comfort and joy.

Intermediate 8-10 Hours

Materials Needed for Bunny Lovey Crochet Amigurumi Pattern

โ€” Main Fabric

  • 01
    Gray yarn - Himalaya Deluxe BAMBOO color 124-19 (275 yards/250m, 100g)
  • 02
    Teal blue yarn - Himalaya Deluxe BAMBOO color 124-24 (275 yards/250m, 100g)

โ€” Tools Required

  • 01
    Crochet hook 2.5mm
  • 02
    Crochet hook 3.0mm
  • 03
    Black DMC floss (color 310) for embroidering eyes
  • 04
    Teal blue DMC floss (color 597) for embroidering nose
  • 05
    Stuffing material
  • 06
    Sewing needle
  • 07
    Sewing pins
  • 08
    Scissors

Progress Tracker

0% Complete

โ€” Head :

Row 1 :

6 sc in Magic Ring (6)

Row 2 :

6 inc (12)

Row 3 :

(Inc, 1 sc) rep 6 times around (18)

Row 4 :

(2 sc, inc) rep 6 times around (24)

Row 5 :

1 sc, (Inc, 3 sc) rep 5 times around, Inc, 2 sc (30)

Row 6 :

(4 sc, inc) rep 6 times around (36)

Row 7 :

2 sc, (Inc, 5 sc) rep 5 times around, Inc, 3 sc (42)

Row 8 :

(6 sc, Inc) rep 6 times around (48)

Row 9 :

3 sc, (Inc, 7 sc) rep 5 times around, Inc, 4 sc (54)

Row 10 :

(8 sc, Inc) rep 6 times around (60)

Rows 11-20 :

60 sc (10 rows should be without changes) (60)

Row 21 :

(8 sc, dec) rep 6 times around (54)

Row 22 :

3 sc, (dec, 7 sc) rep 5 times around, dec, 4 sc (48)

Row 23 :

(6 sc, dec) rep 6 times around (42)

Row 24 :

2 sc, (dec, 5 sc) rep 5 times around, dec, 3 sc (36)

Row 25 :

(4 sc, dec) rep 6 times around (30)

Row 26 :

1 sc, (dec, 3 sc) rep 5 times around, dec, 2 sc (24)

Info :

Stuff detail with stuffing material.

Row 27 :

(2 sc, dec) rep 6 times around (18)

Row 28 :

(1 sc, dec) rep 6 times around (12)

Row 29 :

6 dec, sl st (6)

โ€” Ears (make 2) :

Row 1 :

6 sc in Magic Ring (6)

Row 2 :

6 inc (12)

Row 3 :

12 sc (1 row should be without changes) (12)

Row 4 :

(1 sc, inc) rep 6 times around (18)

Row 5 :

18 sc (1 row should be without changes) (18)

Row 6 :

(2 sc, inc) rep 6 times around (24)

Row 7 :

24 sc (1 row should be without changes) (24)

Row 8 :

(3 sc, inc) rep 6 times around (30)

Rows 9-18 :

30 sc (10 rows should be without changes) (30)

Row 19 :

(3 sc, dec) rep 6 times around (24)

Row 20 :

24 sc (1 row should be without changes) (24)

Row 21 :

(2 sc, dec) rep 6 times around (18)

Row 22 :

18 sc (1 row should be without changes) (18)

Row 23 :

(1 sc, dec) rep 6 times around (12)

Row 24 :

Fold the ear and we tie two sides together 6 sc - all the way, to close. (6)

โ€” Forelegs (make 2) :

Row 1 :

6 sc in Magic Ring (6)

Row 2 :

6 inc (12)

Row 3 :

(1 sc, inc) rep 6 times around (18)

Row 4 :

(2 sc, inc) rep 6 times around (24)

Row 5 :

24 sc (1 row should be without changes) (24)

Row 6 :

(3 sc, inc) rep 6 times around (30)

Row 7 :

30 sc (1 row should be without changes) (30)

Row 8 :

(4 sc, inc) rep 6 times around (36)

Rows 9-10 :

36 sc (2 rows should be without changes) (36)

Row 11 :

(4 sc, dec) rep 6 times around (30)

Rows 12-14 :

30 sc (3 rows should be without changes) (30)

Row 15 :

(3 sc, dec) rep 6 times around (24)

Rows 16-18 :

24 sc (3 rows should be without changes) (24)

Row 19 :

(2 sc, dec) rep 6 times around (18)

Rows 20-22 :

18 sc (3 rows should be without changes) (18)

Info :

Fill the detail with the stuffing material. Then fold the foreleg and attach the two sides together making 9 stitches at the same time. (9)

โ€” Hind legs (make 2) :

Row 1 :

6 sc in Magic Ring (6)

Row 2 :

6 inc with sc (12)

Row 3 :

(1 sc, inc) rep 6 times around (18)

Row 4 :

(2 sc, inc) rep 6 times around (24)

Row 5 :

(3 sc, inc) rep 6 times around (30)

Row 6 :

30 sc (1 row should be without changes) (30)

Row 7 :

(4 sc, inc) rep 6 times around (36)

Rows 8-10 :

36 sc (3 rows should be without changes) (36)

Row 11 :

14 sc, dec, sc, dec, sc, dec, 14 sc (33)

Row 12 :

33 sc (1 row should be without changes) (33)

Row 13 :

12 sc, dec, sc, dec, sc, dec, 13 (30)

Row 14 :

30 sc (1 row should be without changes) (30)

Row 15 :

(3 sc, dec) rep 6 times around (24)

Rows 16-18 :

24 sc (3 rows should be without changes) (24)

Row 19 :

(2 sc, dec) rep 6 times around (18)

Rows 20-22 :

18 sc (3 rows should be without changes) (18)

Info :

Sl st, fasten off, cut the yarn. Fill the detail with the stuffing material.

โ€” Tail :

Row 1 :

6 sc in Magic Ring (6)

Row 2 :

6 inc (12)

Row 3 :

(1 sc, inc) rep 6 times around (18)

Row 4 :

(2 sc, inc) rep 6 times around (24)

Row 5 :

(3 sc, inc) rep 6 times around (30)

Rows 6-9 :

30 sc (4 rows should be without changes) (30)

Row 10 :

(3 sc, dec) rep 6 times around (24)

Info :

Fill the detail with the stuffing material.

Row 11 :

(2 sc, dec) rep 6 times around (18)

Row 12 :

(1 sc, dec) rep 6 times around (12)

Row 13 :

6 dec, sl st (6)

โ€” Body :

Trouser leg 1 Row 1 :

6 sc in Magic Ring, sl st (6)

Row 2 :

ch, 2 sc in the same st (6 inc with sc), sl st (12)

Row 3 :

ch, (1 sc, inc) rep 6 times around, sl st (18)

Info :

We need to take a hind leg, attach it to the detail, and join these pieces together by crocheting.

Row 4 :

ch, 2 sc in the same st (18 inc with sc), sl st (36)

Info :

Change the hook to 3.0 mm

Rows 5-7 :

ch, 36 hdc, sl st (3 rows should be without changes) (36)

Row 8 :

Fasten off and cut the yarn.

Info :

Trouser leg 2: Repeat the same the second pant leg, but do not cut the yarn on it. Use the end of the yarn from the first pant leg and connect both legs together.

Rows 9-27 :

ch, 72 hdc, sl st (19 rows should be without changes) (72)

Row 28 :

ch, (6 hdc, dec) rep 9 times around, sl st (63)

Row 29 :

ch, 63 hdc, sl st (1 row should be without changes) (63)

Row 30 :

ch, (5 hdc, dec) rep 9 times around, sl st (54)

Row 31 :

ch, 54 hdc, sl st (1 row should be without changes) (54)

Row 32 :

ch, (4 hdc, dec) rep 9 times around, sl st (45)

Row 33 :

ch, 45 hdc, sl st (1 row should be without changes) (45)

Row 34 :

ch, (3 hdc, dec) rep 9 times around, sl st (36)

Row 35 :

ch, (2 hdc, dec) rep 9 times around, sl st (27)

Row 36 :

ch, (1 hdc, dec) rep 9 times around,sl st (18)

Row 37 :

ch, 9 dec hds , sl st (9)

Assembly Instructions

  • Attach head to body by joining the third from the end row of the head and the second last row of the body using 18 double stitches.
  • Attach forelegs to the body on the sides, at the distance of one row from the head using 9 double stitches each.
  • Attach the ears to the fourth row of the head with 9 sc distance between them across the face.
  • Embroider the teal blue nose between rows 16 and 17 in a triangle shape 3 sc wide and 2 rows high.
  • Create the mouth by pulling needle down 2 rows from the nose and making connecting stitches.
  • Embroider black eyes using DMC floss in the appropriate positions on the face.
  • Attach the tail to the back of the body using the yarn end left from construction.

Important Notes

  • ๐Ÿ’กCrochet with tight stitches so stuffing doesn't show through when filling and stretching the material
  • ๐Ÿ’กUse a hook smaller than recommended on yarn label to achieve proper density
  • ๐Ÿ’กLeave yarn ends of 7.9 inches (20 cm) when fastening off pieces for easier assembly
  • ๐Ÿ’กStuff firmly but not too tightly for best shape and structure
  • ๐Ÿ’กUse spiral technique for most components - do not join rounds with slip stitches unless specified
  • ๐Ÿ’กChange hook size from 2.5mm to 3.0mm when working the body as instructed

This precious bunny lovey pattern creates the perfect comfort companion that combines the sweetness of amigurumi with the practicality of a security blanket. With its gentle gray and teal color scheme and adorable embroidered features, this lovey will quickly become a treasured keepsake. The detailed instructions guide you through every step of creating this huggable friend that will bring comfort and joy for years to come. ๐Ÿฐ๐Ÿ’™

You ask,

we answer.

FAQs

What yarn weight should I use for this pattern?

The pattern uses DK/Light Worsted weight yarn (Category 3). Himalaya Deluxe Bamboo is recommended, but any similar weight yarn will work.

Can I make this lovey in different colors?

Absolutely! While the pattern shows gray and teal, you can use any color combination you prefer. Pastels work beautifully for baby gifts.

Is this safe for babies?

Yes, when made properly with embroidered features instead of small parts, this lovey is safe for babies. Always supervise infants with any soft toys.

How do I keep my stitches tight enough?

Use a smaller hook than recommended on your yarn label and maintain consistent tension. The stuffing should not show through your stitches.

Can I wash the finished lovey?

Yes, if you use machine-washable yarn and secure all embroidered elements well, the lovey can be gently machine washed on delicate cycle.