🧢 Beautiful ✨ Detailed πŸ’ Adorable

Rose Turtle Amigurumi Pattern

Rose Turtle Amigurumi Pattern
4.8β˜… Rating
4-5 Hours Time Needed
1.8K Made This
βœ‚οΈ

Intermediate Level

Ideal for those with basic knitting experience, featuring slightly more advanced stitches and techniques to expand your skills.

⏱️

Weekend Treat

Takes 5-7 hours, making it an enjoyable project to finish over a couple of days.

🐒

Charming Critter

Delightful animal designs with sweet details that capture the essence of your favorite woodland and farmyard friends.

About This Rose Turtle Amigurumi Pattern

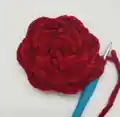
This enchanting Rose Turtle pattern brings together the elegance of a blooming rose with the adorable charm of a turtle. The distinctive shell is crafted using a special back loops only technique that creates beautiful dimensional rose petals. The turtle measures approximately 6 inches long and 6.5 inches wide, making it the perfect size for display or gifting.

Rose Turtle Amigurumi Pattern crochet pattern - detailed view of completed project

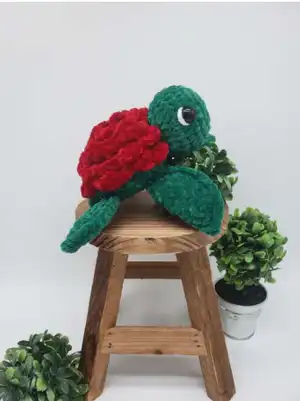
The pattern uses bulky yarn in emerald green, red, and white colors, creating a striking contrast. Safety eyes add personality while the sturdy construction makes this turtle both beautiful and durable.

Why You'll Love This Rose Turtle Amigurumi Pattern

I absolutely love how this pattern transforms simple crochet techniques into something truly magical. The way the rose petals emerge from working in back loops only never fails to amaze me, and the color combination of deep red roses against emerald green is simply stunning. This turtle has such personality with its sweet expression and unique floral shell that makes it an instant conversation starter.

Rose Turtle Amigurumi Pattern step 1 - construction progress Rose Turtle Amigurumi Pattern step 2 - assembly progress Rose Turtle Amigurumi Pattern step 3 - details and accessories Rose Turtle Amigurumi Pattern step 4 - final assembly and finishing

Switch Things Up

I love experimenting with different color combinations for this rose turtle pattern! While the classic red rose with emerald green body is stunning, you could create a whole garden of possibilities. Imagine a soft pink rose with sage green for a vintage feel, or a bright yellow sunflower-inspired version with chocolate brown. You could even make seasonal variations - deep purple and orange for autumn, or white and silver for a winter wonderland effect.

The beauty of this pattern lies in its versatility. I've seen crafters add small embroidered details like tiny leaves around the rose, or even create a family of turtles in graduating sizes by adjusting hook sizes. Some have experimented with metallic threads woven through the rose petals for a magical shimmer effect.

For those who want to challenge themselves further, try working with variegated yarns for the rose petals to create a multi-tonal bloom, or add small pearl beads to the center for extra elegance. The possibilities are truly endless with this adaptable design!

Common Mistakes & How to Fix Them

βœ— Missing front loops when creating rose petals - use stitch markers to mark unworked loops βœ— Attaching legs incorrectly - ensure curves face the right direction as shown in photos βœ— Overstuffing the body which can distort the rose shell shape and leg placement βœ— Not maintaining consistent tension with bulky yarn leading to uneven stitches throughout

Rose Turtle Amigurumi Pattern

Create this adorable Rose Turtle amigurumi with its stunning red rose shell and emerald green body. This charming pattern combines the beauty of a blooming rose with the sweetness of a turtle, making it perfect for nature lovers and crochet enthusiasts alike. The unique design features dimensional rose petals worked in back loops only, creating a gorgeous textured shell that's sure to impress.

Intermediate 4-5 Hours

Materials Needed for Rose Turtle Amigurumi Pattern

β€” Main Fabric

  • 01
    Premier Parfait Chunky yarn (Size 6) in Emerald and White colors
  • 02
    Yarn Bee Velvety Smooth yarn (Size 5) in Red color
  • 03
    Size 5-6 Bulky weight yarn suitable for 4.5mm hook

β€” Tools Required

  • 01
    4.5mm crochet hook
  • 02
    14mm safety eyes
  • 03
    Tapestry needle
  • 04
    Scissors
  • 05
    Poly-fil stuffing
  • 06
    Stitch markers

Progress Tracker

0% Complete

β€” Front Legs :

Info :

Using Emerald (Make 2)

R1 :

8SC in MR

R2 :

Inc (16)

R3 :

SC, Inc (24)

R4 :

3SC, Inc (30)

Info :

Fold your circle in half to make a half circle. Working around the half circle and through both sides, SC through both stitches. Continue until you reach the end of the half circle. FO, there is no need to leave a tail for sewing

β€” Back Legs :

Info :

Using Emerald (Make 2)

R1 :

8SC in MR

R2 :

Inc (16)

R3 :

SC, Inc (24)

Info :

Working around the half circle and through both sides, SC through both stitches. Continue until you reach the end of the half circle. FO, there is no need to leave a tail for sewing

β€” Tail :

Info :

Using Emerald

R1 :

6SC in MR

R2-4 :

SC (6)

Info :

SS, FO, there is no need to leave a tail for sewing

β€” Head :

Info :

Using Emerald

R1 :

8SC in MR

R2 :

Inc (16)

R3 :

SC, Inc (24)

R4 :

3SC, Inc (30)

R5-7 :

SC (30)

R8 :

3SC, Dec (24)

R9 :

SC, Dec (16)

Info :

SS, leave a long tail for sewing. Add eyes and stuff the head. Eyes placed at rows 5-6, about 9-10 stitches apart

β€” Shell/Body :

Info :

Using Red. The top of the shell is worked in BLO (back loops only)

R1 :

8 SC in MR

R2 :

Working in BLO: Inc (16)

R3 :

Working in BLO: SC, Inc (24)

R4 :

Working in BLO: (SC, Inc, SC)*8 (32)

R5 :

Working in BLO: 3SC, Inc (40)

R6 :

Working in BLO: (5SC, Inc, 2SC)*5 (45)

R7 :

Color change to green. Working in BLO: SC (45)

Info :

Drop working yarn to make petals. Grab red yarn and attach with SC in first unworked front loop of row 2. Working into remaining front loops repeat: HDC, DC, TC, DC, HDC, SS until last front loop. FO, weave in ends

R8 :

Continue with green yarn: 3SC, Dec (36)

R9 :

Attach legs and tail: 4SC, attach first big leg with 3SC, 5SC, attach first small leg with 2SC, 3SC, attach tail with 3SC, 3SC, attach second small leg with 2SC, 5SC, attach second big leg with 3SC, 3SC (36)

R10 :

SC, Dec (24)

Info :

Stuff the body to desired firmness

R11 :

SC, Dec (16)

Info :

Add any additional stuffing

R12 :

Dec (8)

Info :

SS, cut yarn leaving short tail to sew hole closed

β€” Finishing Details :

Assembly :

Sew head onto body in middle of front two legs, half over rose and half over bottom portion

Eye Detail :

Optional: Embroider white line from middle bottom to top middle of safety eye for highlight

Assembly Instructions

  • Sew the head onto the body positioning it in the middle of the front two legs, half way over the rose shell and half over the bottom green portion
  • Ensure all legs are properly attached with curves facing the correct direction as shown in pattern photos
  • Add optional white eye detail by embroidering a curved line from bottom to top of each safety eye
  • Weave in all remaining yarn tails securely to prevent unraveling
  • Stuff the body firmly but not too tightly to maintain the rose shell shape

Important Notes

  • πŸ’‘Use stitch markers to mark front loops when working the shell, especially the first stitch of each round
  • πŸ’‘The pattern is forgiving with the rose petals - if you miss or add stitches, it's okay as no two flowers are identical
  • πŸ’‘Bulky yarn can be tricky to work with - feel for your stitches if you can't see them clearly
  • πŸ’‘Stuff firmly but not too tightly to prevent distorting the shell shape and leg placement
  • πŸ’‘Take photos for reference when attaching legs to ensure correct curve direction

This enchanting Rose Turtle pattern is a true showstopper that combines elegant floral design with adorable animal charm. The unique technique of working rose petals in unworked front loops creates a stunning dimensional effect that's both impressive and achievable. Whether you're making it as a special gift or adding to your own collection, this turtle brings together the beauty of nature in the most delightful way. 🌹🐒 Happy crocheting! 🧢✨

You ask,

we answer.

FAQs

What yarn weight should I use for this pattern?

Use size 5-6 bulky yarn. The pattern specifically recommends Premier Parfait Chunky (Size 6) and Yarn Bee Velvety Smooth (Size 5), which work similarly despite different weight labels.

How do I create the rose petals on the shell?

Work all shell rounds in back loops only, leaving front loops unworked. After completing the shell, use red yarn to work rose petals in these unworked front loops using the sequence: HDC, DC, TC, DC, HDC, SS.

What if I miss some stitches when making the rose petals?

The rose petal sequence is very forgiving! If you miss or add stitches, simply adjust by ending with whatever stitch you have left or continue the sequence. No two flowers are identical in nature.

How should I position the legs when attaching them?

Follow the photo references carefully. The curves of the legs should face right for the first set and left for the second set. Attach during round 9 by placing pieces in front of body stitches.

What size will my finished turtle be?

The finished turtle measures approximately 6 inches long, 6.5 inches wide, and 3 inches tall when made with the recommended yarn and hook size.