๐Ÿงถ Beautiful โœจ Detailed ๐Ÿ’ Adorable

Butterfly Crochet Toy Amigurumi Pattern

Butterfly Crochet Toy Amigurumi Pattern
4.7โ˜… Rating
8-10 Hours Time Needed
4.0K Made This
โœ‚๏ธ

Intermediate Level

Ideal for those with basic knitting experience, featuring slightly more advanced stitches and techniques to expand your skills.

โฑ๏ธ

All-Day Adventure

Requires 8-10 hours, ideal for a full day of immersive knitting.

๐Ÿงธ

Cute Companion

An adorable friend to cherish, handcrafted with love to bring comfort and joy for years to come.

About This Butterfly Crochet Toy Amigurumi Pattern

This delightful Butterfly pattern creates a magical 24cm tall amigurumi doll with removable wings and dress. The butterfly features intricate details including embroidered facial features, decorative bubbles on the wings, and poseable arms with optional wire armature. The pattern combines multiple techniques including color changes, embroidery work, and detailed assembly instructions for a truly enchanting finished piece.

Butterfly Crochet Toy Amigurumi Pattern crochet pattern - detailed view of completed project

The dress and wings are completely removable, making this butterfly perfect for imaginative play. The pattern includes detailed photographs and clear instructions for every step of the creation process.

Why You'll Love This Butterfly Crochet Toy Amigurumi Pattern

I absolutely love how this pattern combines technical skill with pure whimsy - there's something magical about watching those delicate wings come to life stitch by stitch. The removable dress and wings make it so versatile, and the detailed embroidery work gives it such personality. Every time I see those sweet turquoise antennae and the intricate wing bubbles, it reminds me why I fell in love with amigurumi in the first place.

Butterfly Crochet Toy Amigurumi Pattern step 1 - construction progress Butterfly Crochet Toy Amigurumi Pattern step 2 - assembly progress Butterfly Crochet Toy Amigurumi Pattern step 3 - details and accessories Butterfly Crochet Toy Amigurumi Pattern step 4 - final assembly and finishing

Switch Things Up

I love experimenting with color combinations for this butterfly pattern - imagine how stunning she'd look with sunset oranges and pinks, or even in elegant purples and silvers for a more mystical feel. You could easily swap the turquoise for any accent color that speaks to you.

The embroidery details offer endless creative possibilities too. Instead of simple French knots on the dress, try adding small flowers or hearts for a more whimsical touch. The wing patterns could be modified with different bubble arrangements or even small beads sewn on for extra sparkle.

For a seasonal twist, I've seen makers create autumn versions with warm browns and golden yellows, complete with tiny leaf embroidery. Winter butterflies in whites and blues with snowflake patterns are absolutely magical too.

The removable dress opens up so many outfit possibilities - why not crochet a whole wardrobe? A little sundress for summer, a cozy sweater for winter, or even a tiny tutu for dress-up play.

Common Mistakes & How to Fix Them

โœ— Forgetting to stuff pieces as you go leading to uneven shapes and difficult assembly later โœ— Not maintaining consistent tension throughout causing size variations between different colored sections โœ— Skipping the wire insertion for arms resulting in floppy limbs that won't hold poses โœ— Placing safety eyes incorrectly without checking alignment before securing permanently making the face look uneven

Butterfly Crochet Toy Amigurumi Pattern

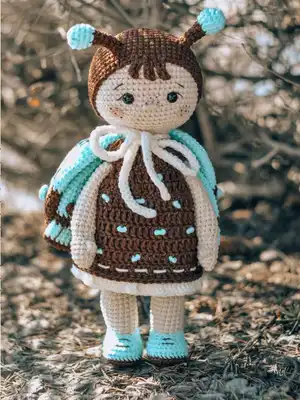
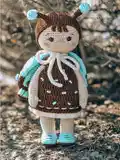
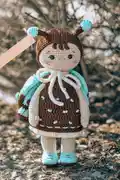
Create this enchanting butterfly amigurumi doll with removable wings and adorable details. This comprehensive pattern includes step-by-step instructions for a charming 24cm tall butterfly character wearing a brown dress with turquoise accents. Perfect for intermediate crocheters looking to make a magical friend that will bring joy and whimsy to any collection.

Intermediate 8-10 Hours

Materials Needed for Butterfly Crochet Toy Amigurumi Pattern

โ€” Main Fabric

  • 01
    YarnArt Jeans yarn in light beige (main color), cream, brown, and light turquoise colors
  • 02
    Alternative: Any yarn with similar meterage (160m/50g) can be substituted

โ€” Tools Required

  • 01
    Crochet hook 2mm for toy (US B)
  • 02
    Crochet hook 2.5mm for dress (US C)
  • 03
    Soft toy filling
  • 04
    8mm safety eyes
  • 05
    Needle
  • 06
    Stitch markers
  • 07
    Scissors
  • 08
    Pins
  • 09
    Brown felt pen for freckles
  • 10
    Beauty blush for cheeks
  • 11
    2 pieces of wire 1mm diameter, 15cm long
  • 12
    Masking tape or adhesive woven tape bandage
  • 13
    Black sewing thread for details

Progress Tracker

0% Complete

โ€” Head (in main color) :

Rnd 1 :

6 sc in mr (6)

Rnd 2 :

6 inc (12)

Rnd 3 :

(1 sc, inc) ั… 6 (18)

Rnd 4 :

(2 sc, inc) ั… 6 (24)

Rnd 5 :

(3 sc, inc) ั… 6 (30)

Rnd 6 :

(4 sc, inc) ั… 6 (36)

Rnd 7 :

(5 sc, inc) ั… 6 (42)

Rnd 8 :

(6 sc, inc) ั… 6 (48)

Rnd 9 :

(7 sc, inc) ั… 6 (54)

Rnd 10 :

(8 sc, inc) ั… 6 (60)

Rnd 11-20 :

(60) 10 rounds

Info :

Insert safety eyes between rnds 17/18, 7 sts apart

Rnd 21 :

(8 sc, dec) ั… 6 (54)

Rnd 22 :

(7 sc, dec) ั… 6 (48)

Rnd 23 :

(6 sc, dec) ั… 6 (42)

Rnd 24 :

(5 sc, dec) ั… 6 (36)

Rnd 25 :

(4 sc, dec) ั… 6 (30)

Info :

Start to stuff the head

Rnd 26 :

(3 sc, dec) ั… 6 (24)

Rnd 27 :

(6 sc, dec) ั… 3 (21)

Rnd 28 :

21 sc, sl st (21)

โ€” Sewn cap (in brown color) :

Rnd 1 :

6 sc in mr (6)

Rnd 2 :

6 inc (12)

Rnd 3 :

(1 sc, inc) ั… 6 (18)

Rnd 4 :

(2 sc, inc) ั… 6 (24)

Rnd 5 :

(3 sc, inc) ั… 6 (30)

Rnd 6 :

(4 sc, inc) ั… 6 (36)

Rnd 7 :

(5 sc, inc) ั… 6 (42)

Rnd 8 :

(6 sc, inc) ั… 6 (48)

Rnd 9 :

(7 sc, inc) ั… 6 (54)

Rnd 10 :

(8 sc, inc) ั… 6 (60)

Rnd 11 :

(19 sc, inc) x 3 (63)

Rnd 12-19 :

(63) 8 rounds

Rnd 20 :

29 sc, (ch4, from the second ch from the hook crochet 3 sc along the chain, sc) ั… 3, 30 sc, sl st

โ€” Antennae :

Rnd 1 :

Step 1 st from the pin to both sides and crochet 6 sc in a round (6)

Rnd 2-6 :

(6) 5 rounds

Info :

Change the brown thread to light turquoise

Rnd 7 :

6 inc (12)

Rnd 8-10 :

(12) 3 rounds

Info :

Add some stuffing

Rnd 11 :

6 dec (6)

โ€” Arms (make 2, in main color) :

Rnd 1 :

6 sc in mr (6)

Rnd 2 :

(1 sc, inc) ั… 3 (9)

Rnd 3 :

(2 sc, inc) ั… 3 (12)

Rnd 4 :

(12)

Rnd 5 :

2 sc, 3 DC bubble, 9 sc (12)

Rnd 6 :

(12)

Rnd 7 :

(2 sc, dec) ั… 3 (9)

Rnd 8 :

(2 sc, inc) ั… 3 (12)

Rnd 9-14 :

(12) 6 rounds

Info :

Insert the wire, stuff the arm

Rnd 15-23 :

(12) 9 rounds

โ€” Legs and body :

Rnd 1 :

Ch5, from the second ch from the hook: inc, 2 sc, 6 sc into one st, then on the other side of the chain: 2 sc, inc (14)

Rnd 2 :

Inc, 3 sc, 6 inc, 3 sc, inc (22)

Rnd 3 :

Inc, 3 sc, (1 sc, inc) ั… 6, 5 sc, inc (30)

Info :

Change to light turquoise color

Rnd 4 :

Into BLO (30)

Rnd 5 :

9 sc, (dec, 2 sc) ั… 3, 9 sc (27)

Rnd 6 :

(27)

Rnd 7 :

7 sc, (1 sc, dec) ั… 5, 5 sc (22)

Rnd 8 :

7 sc, dec, crochet 3 sc together, dec, 8 sc (18)

Info :

Change to main color

Rnd 9 :

Into BLO (4 sc, dec) ั… 3 (15)

Rnd 10 :

(4 sc, inc) ั… 3 (18)

Info :

Stuff firmly

Rnd 11-17 :

(18) 7 rounds

Rnd 18 :

(4 sc, dec) ั… 3 (15)

Rnd 19 :

(4 sc, inc) ั… 3 (18)

Rnd 20-22 :

(18) 3 rounds

Info :

Change to cream color

Rnd 23 :

(5 sc, inc) ั… 3 (21)

Rnd 24 :

21 sc, sl st (21)

Rnd 25 :

21 sc around the first leg, 3 sc along the chain, 21 sc around the second leg, 3 sc along the chain (48)

Rnd 26-32 :

(48) 7 rounds

Rnd 33 :

(14 sc, dec) ั… 3 (45)

Info :

Change to main color

Rnd 34-36 :

(45) 3 rounds

Rnd 37 :

(13 sc, dec) ั… 3 (42)

Rnd 38-40 :

(42) 3 rounds

Rnd 41 :

(12 sc, dec) ั… 3 (39)

Rnd 42-44 :

(39) 3 rounds

Rnd 45 :

(11 sc, dec) ั… 3 (36)

Rnd 46 :

8 sc, crochet next 6 sc through inner part of the arm and the body, 13 sc, crochet next 6 sc through inner part of the second arm and the body, 3 sc (36)

Rnd 47 :

(36) When crocheting where arms are attached, crochet 6 sc along their outer part

Rnd 48 :

(4 sc, dec) ั… 6 (30)

Rnd 49 :

(30)

Rnd 50 :

(3 sc, dec) ั… 6 (24)

Rnd 51 :

(24)

Rnd 52 :

(6 sc, dec) ั… 3 (21)

Rnd 53 :

21 sc, sl st (21)

โ€” Bubbles (make 20) :

Pattern :

Ch3, into the third ch from the hook crochet 3 DC bubble
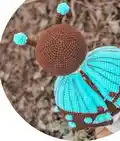
โ€” Lower wings (make 2) :

Rnd 1 :

Make a ch19, from the second ch from the hook: inc, 16 sc, 3 sc into one st, then on the other side of the chain: 16 sc, inc (39)

Rnd 2 :

(39)

Info :

Change to light turquoise

Rnd 3-6 :

(39) 4 rounds

Info :

Change to brown

Rnd 7-8 :

(39) 2 rounds

Info :

Change to light turquoise

Rnd 9-13 :

(39) 5 rounds

Rnd 14-15 :

(39) 2 rounds

Rnd 16 :

1 sc, dec, 15 sc, dec, 1 sc, dec, 14 sc, dec (35)

Rnd 17 :

(35)

Rnd 18 :

1 sc, dec, 13 sc, dec, 1 sc, dec, 12 sc, dec (31)

Rnd 19 :

(31)

Rnd 20 :

1 sc, dec, 11 sc, dec, 1 sc, dec, 10 sc, dec (27)

Rnd 21 :

(27)

Rnd 22 :

1 sc, dec, 9 sc, dec, 1 sc, dec, 8 sc, dec (23)

Rnd 23 :

(23)

Rnd 24 :

1 sc, dec, 7 sc, dec, 1 sc, dec, 6 sc, dec (19)

Rnd 25 :

(19)

Rnd 26 :

1 sc, dec, 5 sc, dec, 1 sc, dec, 4 sc, dec (15)

Rnd 27 :

(15)

Rnd 28 :

(3 sc, dec) ั… 3 (12)

Rnd 29 :

1 sc, fold the wing in half and work 6 sc through two layers

โ€” Upper wings (make 2) :

Rnd 1 :

6 sc in mr (6)

Rnd 2 :

(1 sc, inc) ั… 3 (9)

Rnd 3 :

(2 sc, inc) ั… 3 (12)

Rnd 4 :

(1 sc, inc) ั… 6 (18)

Rnd 5 :

(18)

Rnd 6 :

(2 sc, inc) ั… 6 (24)

Rnd 7 :

(24)

Rnd 8 :

(3 sc, inc) ั… 6 (30)

Rnd 9 :

(4 sc, inc) ั… 6 (36)

Rnd 10 :

(5 sc, inc) ั… 6 (42)

Rnd 11 :

(42)

Rnd 12 :

(6 sc, inc) ั… 6 (48)

Rnd 13 :

(48)

Rnd 14 :

(7 sc, inc) ั… 6 (54)

Rnd 15 :

(54)

Info :

Change to light turquoise

Rnd 16 :

(54)

Rnd 17 :

25 sc, dec, 27 sc (53)

Rnd 18 :

24 sc, dec, 27 sc (52)

Rnd 19 :

24 sc, dec, 26 sc (51)

Rnd 20 :

24 sc, dec, 25 sc (50)

Rnd 21 :

23 sc, dec, 25 sc (49)

Rnd 22 :

23 sc, dec, 24 sc (48)

Rnd 23 :

21 sc, dec, 1 sc, dec, 22 sc (46)

Rnd 24 :

20 sc, dec, 1 sc, dec, 21 sc (44)

Rnd 25 :

19 sc, dec, 1 sc, dec, 20 sc (42)

Rnd 26 :

(5 sc, dec) ั… 6 (36)

Rnd 27 :

(36)

Rnd 28 :

(4 sc, dec) ั… 6 (30)

Rnd 29 :

(30)

Rnd 30 :

(3 sc, dec) ั… 6 (24)

Rnd 31 :

(2 sc, dec) ั… 6 (18)

Rnd 32 :

(1 sc, dec) ั… 6 (12)

Rnd 33 :

1 sc, fold the wing in half and work 6 sc through two layers

โ€” Dress :

R 1 :

Make a ch27, from the third ch from the hook crochet 25 DC (26)

R 2 :

2 turning ch, inc, (1 DC, inc) ั… 12 (39)

R 3 :

2 turning ch, 7 DC, ch6, skip 6 st, beginning from the 7th st crochet 11 DC, ch6, skip 6 st, beginning from the 7th st crochet 8 DC (39)

R 4 :

2 turning ch, 1 DC, inc, (2 DC, inc) ั… 12 (52)

R 5 :

2 turning ch, 51 DC (52) Connect with sl st

R 6-10 :

2 turning ch, 51 DC, sl st (52) 5 rows

R 11 :

In cream color into BLO 2 turning ch, inc, (1 DC, inc) ั… 25, sl st (78)

Assembly Instructions

  • Sew the head to the body by inserting the bottom opening of the head over the top of the body, adding extra stuffing between for secure attachment
  • Attach the sewn cap to the head positioning it above the first round from the bottom and above the 18th round from the bottom in front
  • Embroider facial features including nose, eye whites, eyelids, eyebrows, and add freckles and blush to complete the face
  • Attach bubbles to wings using crochet hook and add embroidery details to create the decorative wing patterns
  • Join upper and lower wings together using cream chain fasteners, ensuring upper wings are symmetrical
  • Complete dress embroidery with horizontal stitches and French knots, then sew on button and create buttonhole
  • Add final embroidery details to shoes to complete the butterfly doll

Important Notes

  • ๐Ÿ’กUse stitch markers to keep track of rounds, especially during color changes between different sections
  • ๐Ÿ’กStuff pieces firmly but not too tightly as you go to maintain proper shape and structure
  • ๐Ÿ’กBe careful when working with wire for arms - wrap ends with tape and stuff carefully if making for children
  • ๐Ÿ’กPin all pieces in place before sewing to ensure correct positioning and symmetry of wings
  • ๐Ÿ’กThe dress and wings are removable, so ensure proper fit during assembly for easy removal
  • ๐Ÿ’กPay attention to needle sculpting for eyes to create the proper facial expression and character

This enchanting Butterfly amigurumi pattern brings together technical skill and pure magic to create a 24cm tall companion with removable wings and dress. The intricate details from embroidered facial features to decorative wing bubbles make this pattern a true labor of love. Perfect for creating a special gift or adding whimsy to your own collection, this butterfly will flutter its way into hearts everywhere. ๐Ÿงถ Happy crocheting! ๐Ÿฆ‹โœจ

You ask,

we answer.

FAQs

Can I make this butterfly without using wire in the arms?

Yes, you can absolutely make the butterfly without wire. Simply stuff the arms to the middle instead of inserting wire. The arms won't be poseable but will still look beautiful and be safer for young children.

What if I can't find YarnArt Jeans yarn in my area?

You can substitute any yarn with similar meterage (160m/50g). Popular alternatives include Cotton Kings 8/4, Schachenmayr Catania, or any worsted weight cotton yarn. Just ensure consistent weight across all colors.

Are the wings and dress really removable?

Yes! The wings attach with chain fasteners and the dress has a button closure at the back, making both completely removable for versatile play and display options.

How difficult is the embroidery work in this pattern?

The embroidery uses basic techniques like straight stitches and French knots. Detailed photo instructions guide you through each step, making it manageable even for those new to embroidery work.

Can I adjust the size of the finished butterfly?

Yes, you can use different hook sizes and yarn weights to create larger or smaller versions. Just remember that changing materials will affect the final measurements from the stated 24cm height.

What's the most challenging part of this pattern?

The wing assembly and bubble attachment require patience and precision. Take your time with positioning and use the detailed photos as your guide for best results.