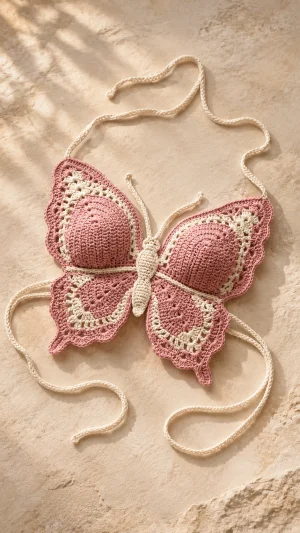
Create a butterfly-inspired crochet crop top with dusty-rose cups, scalloped wings, and cream accents. You will make the upper and lower wings separately, then join them around a simple butterfly body and add adjustable ties. This original pattern gives you a starting point for a playful summer layer that you can fit as you work.
Progress Tracker
0% Complete
— Before You Begin :
Info :
Use US crochet terms. Turning chains do not count as stitches. Work both upper panels and both lower wings alike, then mirror them during assembly. The given stitch counts are a starting size; check coverage as you work.
— Upper Wings and Cups :
Info :
Make 2 in dusty rose. Work Row 1 around both sides of the foundation chain. In later rows, the three stitches worked into the center stitch form the curved top of the cup.
Row 1 :
Ch 12. Sc in the second ch from the hook and in each of the next 9 ch. Work 3 sc in the last ch. Rotate the work and sc in the unused loop of each of the next 10 foundation ch. Turn. (23 sc)
Row 2 :
Ch 2. Dc in each of the first 11 sts, 3 dc in the next st, dc in each of the last 11 sts. Turn. (25 dc)
Row 3 :
Ch 2. Dc in each of the first 12 sts, 3 dc in the next st, dc in each of the last 12 sts. Turn. (27 dc)
Row 4 :
Ch 2. Dc in each of the first 13 sts, 3 dc in the next st, dc in each of the last 13 sts. Turn. (29 dc)
Row 5 :
Ch 2. Dc in each of the first 14 sts, 3 dc in the next st, dc in each of the last 14 sts. Turn. (31 dc)
Row 6 :
Ch 2. Dc in each of the first 15 sts, 3 dc in the next st, dc in each of the last 15 sts. Turn. (33 dc)
Row 7 :
Ch 2. Dc in each of the first 16 sts, 3 dc in the next st, dc in each of the last 16 sts. Fasten off. (35 dc)
Fitting note :
Hold the panel against your intended underlayer. For more coverage, add the same number of rows to both panels: in each additional row, ch 2, dc in each st to the center st, work 3 dc in the center st, then dc in each remaining st. Each added row increases the count by 2. Check the shape and coverage again before edging.
Contrast edging :
With the right side facing, join cream with a sl st in the first st of the final curved row. Ch 1, sc in each st across the row. Turn. For the standard panel, this is 35 sc. Fasten off.
Scalloped edging :
With the right side facing, join dusty rose in the first cream sc. Ch 1, sc in the same st; repeat [sk 1 st, 5 dc in the next st, sk 1 st, sc in the next st] across as many complete repeats as fit. Sc in each remaining st and fasten off. For the standard 35-st edge, make 8 shells and finish with 2 sc.
— Lower Wings :
Info :
Make 2 in dusty rose. The foundation edge forms the inner point; the last row will be joined beneath a cup.
Row 1 :
Ch 4. Work 3 dc in the fourth ch from the hook. Turn. (3 dc)
Row 2 :
Ch 2. Work 2 dc in the first st, dc in the next st, and 2 dc in the last st. Turn. (5 dc)
Row 3 :
Ch 2. Work 2 dc in the first st, dc in each of the next 3 sts, and 2 dc in the last st. Turn. (7 dc)
Row 4 :
Ch 2. Work 2 dc in the first st, dc in each of the next 5 sts, and 2 dc in the last st. Turn. (9 dc)
Row 5 :
Ch 2. Work 2 dc in the first st, dc in each of the next 7 sts, and 2 dc in the last st. Turn. (11 dc)
Row 6 :
Ch 2. Work 2 dc in the first st, dc in each of the next 9 sts, and 2 dc in the last st. Turn. (13 dc)
Row 7 :
Ch 2. Work 2 dc in the first st, dc in each of the next 11 sts, and 2 dc in the last st. Fasten off. (15 dc)
Optional sizing :
To enlarge both lower wings equally, add rows before fastening off: ch 2, work 2 dc in the first st, dc in each st to the last st, and work 2 dc in the last st. Each row adds 2 sts. Check the wings against the cups before adding edging.
Contrast edging :
With the right side facing, join cream at one end of the final row. Ch 1, sc in each st across the row and fasten off. The standard wing has 15 sc. This edge remains available for sewing to the cup.
Outer edging :
With the right side facing, join dusty rose at one end of the cream edge. Work sc evenly down the first sloping side, 3 sc in the foundation point, and sc evenly up the other sloping side. Keep the edge flat and use the same number of stitches on both wings. Fasten off.
— Butterfly Body :
Row 1 :
With cream, ch 7. Sc in the second ch from the hook and in each remaining ch. Turn. (6 sc)
Rows 2–16 :
Ch 1, sc in each st across, and turn. (6 sc per row)
Finishing :
Fasten off, leaving a long tail for sewing. The rectangle will cover the center joins; adjust its length by adding or removing rows if needed.
— Ties and Antennae :
Neck and back ties :
Make 4 in cream. For each tie, ch 101 or enough chains to reach comfortably around the intended tying area. Sc in the second ch from the hook and in each remaining ch. Fasten off, leaving a sewing tail. The 101-chain version has 100 sc.
Antennae :
Make 2 in cream. For each, ch 21, sl st in the second ch from the hook and in each remaining ch. Fasten off, leaving a sewing tail. (20 sl sts)
I love how this butterfly crop top brings rose-colored wings and cream details together in a playful summer layer. Make each panel at your own pace, checking the cups for coverage before you add the edging. Pin the wings and ties in place and try the top on before sewing so you can adjust their positions. Once the seams are secure, gently shape the scallops and let the top dry completely after blocking. 🦋