๐Ÿงถ Beautiful โœจ Detailed ๐Ÿ’ Adorable

Captain Jack Sparrow Amigurumi Pattern

Captain Jack Sparrow Amigurumi Pattern
4.0โ˜… Rating
15-20 Hours Time Needed
2.0K Made This
โœ‚๏ธ

Intermediate Level

Ideal for those with basic knitting experience, featuring slightly more advanced stitches and techniques to expand your skills.

โฑ๏ธ

All-Day Adventure

Requires 8-10 hours, ideal for a full day of immersive knitting.

๐Ÿงธ

Cute Companion

An adorable friend to cherish, handcrafted with love to bring comfort and joy for years to come.

About This Captain Jack Sparrow Amigurumi Pattern

This Captain Jack Sparrow amigurumi pattern captures the essence of the legendary pirate with incredible attention to detail. From his signature dreadlocked hair adorned with beads to his layered pirate attire, every element has been carefully designed to bring this beloved character to life. The pattern includes instructions for creating his distinctive red bandana, blue vest, handkerchief, belt, and all the accessories that make Jack Sparrow instantly recognizable.

Captain Jack Sparrow Amigurumi Pattern crochet pattern - detailed view of completed project

Perfect for Pirates of the Caribbean fans and amigurumi enthusiasts alike, this pattern combines traditional crochet techniques with creative character design. The finished piece measures approximately 20cm tall, making it an ideal display piece or cherished collectible.

Why You'll Love This Captain Jack Sparrow Amigurumi Pattern

I absolutely love how this pattern brings together so many intricate details that make Jack Sparrow such an iconic character. The challenge of creating his elaborate dreadlocks with beads and the satisfaction of seeing his personality emerge with each completed piece is incredibly rewarding. The layered clothing construction teaches valuable techniques while the character's charm makes every stitch enjoyable to work.

Captain Jack Sparrow Amigurumi Pattern step 1 - construction progress Captain Jack Sparrow Amigurumi Pattern step 2 - assembly progress Captain Jack Sparrow Amigurumi Pattern step 3 - details and accessories Captain Jack Sparrow Amigurumi Pattern step 4 - final assembly and finishing

Switch Things Up

I love experimenting with this Jack Sparrow pattern by trying different approaches to make each version unique! Sometimes I'll use a slightly different brown shade for the hair to create variety, or add extra beads in different colors to the dreadlocks for a more personalized pirate look. The vest can be made in different shades of blue or even navy for a richer appearance.

What really excites me is playing with the accessories - I've made versions with tiny additional details like a miniature compass or small fabric patches on the clothing. The handkerchief can be embroidered with different patterns or even tiny skull motifs if you're feeling adventurous.

For the hair, I sometimes create a few shorter strands mixed with the longer ones to add more texture and realism. The headband can be adjusted in width or embellished with metallic thread for extra pirate flair. Even small changes like using a slightly different stuffing technique can give the figure a different personality and stance!

Common Mistakes & How to Fix Them

โœ— Not stuffing the head firmly enough which can cause it to lose shape during final decreases โœ— Forgetting to place safety eyes between rounds 13-14 with proper spacing of 12 stitches between them โœ— Rushing through the hair strand creation without maintaining consistent tension leading to uneven dreadlocks โœ— Incorrect color changes in the body section resulting in misaligned clothing transitions

Captain Jack Sparrow Amigurumi Pattern

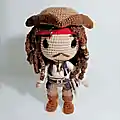
Embark on an adventure with this detailed Captain Jack Sparrow amigurumi pattern! This intermediate-level project brings the beloved Pirates of the Caribbean character to life with authentic details including his iconic dreadlocks, red bandana, blue vest, and distinctive accessories. Complete with step-by-step instructions for creating his signature look, from the elaborate hair styling to the perfectly crafted pirate attire.

Intermediate 15-20 Hours

Materials Needed for Captain Jack Sparrow Amigurumi Pattern

โ€” Main Fabric

  • 01
    Cotton thread in 3 shades of brown, red, cream, and dark beige (Sinfonia brand 6 strands recommended)
  • 02
    Embroidery thread in dark blue (double strand), gray, beige, brown, and wine color (Madame Tricote N8 brand)

โ€” Tools Required

  • 01
    2.5mm crochet hook for body
  • 02
    1.5mm-1mm crochet hook when indicated
  • 03
    9mm or 10mm safety eyes (oval recommended)
  • 04
    Synthetic fiber fill
  • 05
    Beads for hair decoration
  • 06
    Needle
  • 07
    Scissors
  • 08
    Stitch marker
  • 09
    Pins

Progress Tracker

0% Complete

โ€” LEGS X2 :

Round 1 :

6 Chains, in the 2nd Stitch from the hook make, 4Sc + Inc4, 3Sc + Inc3 (14)

Round 2 :

4Sc + 4Inc, 4Sc + 2Inc (20)

Round 3 :

BLO 20Sc (20)

Round 4 :

20Sc (20)

Round 5 :

3Sc + 2Dec, 1Dec HDC, 2Dec + 7Sc (15)

Round 6 :

Sc + 5Dec + 4Sc (10)

Round 7-11 :

10Sc (5R) (10)

Info :

Change to a lighter brown

Round 12 :

BLO (Sc + Inc) *5 (15)

Round 13-14 :

15Sc (2R) (15)

Round 15 :

(Sc + Dec) *5 (10)

Round 16 :

10Sc (10)

โ€” Boot Cuffs :

Info :

Note the orientation of the leg to knit the edge of the boot. In the 10FL of the R12 we will do:

Round 1 :

Hook with 1 Chain (Sc + Inc) *5 (15)

Round 2-3 :

15Sc (2R). (15)

Info :

Cut yarn over, repeat from R1 to R16

โ€” BODY :

Round 17 :

Chain 4, these will serve as the union between both legs, join to the center of the second leg, crochet the 10Sc of that leg + 4Sc of the central chains, continue on the other leg with 10Sc and finally the 4Sc of the center chain (28)

Round 18-19 :

28Sc (2R) (28)

Round 20 :

4Sc + Dec, (5Sc + Dec) *3 + Sc (24)

Round 21 :

24Sc (24)

Info :

Change to cream

Round 22 :

BLO 24Sc put thread on hold, that is, we will not cut it. (24)

Info :

Change to skin tone

Round 23 :

BLO make 4Dec, 1 front โ€“ 1 back, and 1 on each side. (20)

Round 24-28 :

20Sc (5R) (20)

Round 29 :

(2Sc + Dec) *5 (15)

Round 30 :

15Sc (15)

Round 31 :

(Sc + Dec) *5 (10)

Round 32 :

10Sc (10)

Round 33 :

10Inc (20)

Round 34-35 :

20Sc (2R) (20)

Round 36 :

10Dec (10)

Round 37 :

5Dec, Slst (5)

โ€” T-SHIRT :

Round 1 :

1 Chain and turn + 24HDC (24)

Round 2 :

Attach the yarn next to the marker and continue with: 1 Chain stitch + 23 HDC (23)

Round 3 :

1 Chain stitch and turn + 23HDC (23)

Round 4 :

1 Chain stitch and turn + Dec +19HDC + Dec (21)

Round 5 :

1 Chain stitch and turn + Dec +17HDC + Dec (19)

โ€” HEAD :

Round 1 :

MR 6Sc (6)

Round 2 :

6 Inc (12)

Round 3 :

(Sc + Inc) *6 (18)

Round 4 :

Sc + Inc, (2Sc + Inc) *5 + Sc (24)

Round 5 :

(3Sc + Inc) *6 (30)

Round 6 :

2Sc + Inc, (4Sc + Inc) *5 + 2Sc (36)

Round 7 :

(5Sc + Inc) *6 (42)

Round 8 :

3Sc + Inc, (6Sc + Inc) *5 + 3Sc (48)

Round 9 :

(7Sc + Inc) *6 (54)

Round 10-18 :

54Sc (9R) (54)

Round 19 :

(7Sc + Dec) *6 (48)

Round 20 :

3Sc + Dec, (6Sc + Dec) *5 + 3Sc (42)

Round 21 :

(5Sc + Dec) *6 (36)

Round 22 :

2Sc + Dec, (4Sc + Dec) *5 + 2Sc (30)

Round 23 :

(3Sc + Dec) *6 (24)

Round 24 :

Sc + Dec, (2Sc + Dec) *5 + Sc (18)

Round 25 :

(Sc + Dec) *6 (12)

โ€” ARMS X2 :

Round 1 :

MR 5Sc (5)

Round 2 :

4Sc + Inc (6)

Round 3 :

5Sc + (2Chain, Sc + Sc at the base of the point) + Sc (8)

Round 4 :

5Sc, skip finger stitches + Sc (6)

Round 5 :

6Sc (6)

Round 6 :

6Sc (6)

Round 7 :

BLO 6 Inc (12)

Round 8 :

(Sc + Inc) *6 (18)

Round 9-10 :

18Sc (2R) (18)

Round 11 :

(Sc + Dec) *6 (12)

Round 12 :

12Sc (12)

Round 13 :

(2Sc + Dec) *3 (9)

Round 14-16 :

9Sc (3R) (9)

โ€” HANDKERCHIEF :

Round 1 :

Chain 82, beginning on the 3rd chain from the hook, 80HDC (80)

Round 2 :

Chain 2 and turn + 80HDC (80)

Round 3 :

Chain 4, turn, beginning on the 3rd chain from the hook, 10DC + 72HDC (82)

Round 4 :

Chain 2 and turn, 73HDC + 8DC, do not work the last stitch. (81)

Round 5 :

Chain 2 and turn + 81HDC (81)

Round 6 :

Chain 2 and turn, 80HDC + 8DC, do not work the last stitch. (80)

Round 7 :

Chain 2 and turn + 80 HDC (80)

โ€” JACKET :

Round 1 :

Chain 30, beginning in the 3rd Ch from the hook, 28HDC (28)

Round 2 :

Chain 2 turn, 3HDC + Chain 6, skip 6st + 10HDC + Chain 6, skip 6st + 3HDC (28)

Round 3-13 :

Chain 2, turn + 28HC (11R) (28)

โ€” BELT :

Round 1 :

Chain 46, from the 3rd Ch from the hook we will do 44HDC (44)

Round 2 :

Chain 1 turn and continue along the opposite side with 44HDC (45)

โ€” HEAD BAND :

Round 1 :

Ch 50, beginning in the 3rd chain from the hook, 48HDC (48)

Round 2 :

Ch 1 turn + 9Sc + 8HDC + 14DC + 8HDC + 9Sc (48)

Round 3 :

Ch 1 turn + 17HDC + 14DC + 17HDC (48)

โ€” REAR BAND :

Info :

Chain 42, beginning in the 3rd Ch from the hook: 8DC + 7HDC + 8Sc + 9HDC + 6DC + 2Trc (40)

โ€” HAIR :

Round 1 :

MR 8Sc (8)

Round 2 :

8 Inc (16)

Round 3 :

(Sc + Inc) *8 (24)

Round 4 :

FLO (2Sc + Inc) *8 + Slst (32)

โ€” HAT :

Round 1 :

MR 8Sc (8)

Round 2 :

8 Inc (16)

Round 3 :

(Sc + Inc) *8 (24)

Round 4 :

Sc + Inc, (2Sc + Inc) *7 + Sc (32)

Round 5 :

(3Sc + Inc) *8 (40)

Round 6 :

2Sc + Inc, (4Sc + Inc) *7 + 2Sc (48)

Round 7 :

48Sc (48)

Round 8 :

(5Sc + Inc) *8 (56)

Round 9-12 :

56Sc (4R) (56)

Round 13 :

FLO 3Sc + Inc, (6Sc + Inc) *7 + 3Sc (64)

Round 14 :

(7Sc + Inc) *8 (72)

Round 15 :

(5Sc + Inc) *12 (84)

Round 16 :

(Inc + 6Sc) *12 (96)

Round 17 :

(Inc + 7Sc) *12 (108)

Round 18 :

(Inc + 8Sc) *12 (120)

Assembly Instructions

  • Insert the top of the body into the head to create a mobile head, ensuring decreases close around the neck
  • Place safety eyes between rounds 13-14 with 12 stitches between them, embroider eyebrows with brown thread
  • Attach hair layers to head, leaving 4 strands from first layer and 3 from second layer free in front
  • Create braids with 32-chain strands, place remaining strands under headband except front strands
  • Sew red headband over head and tie at the back
  • Embroider mustache and beard using needle with three strands of thread, add beads to beard braids
  • Position vest on body, attach handkerchief around waist with belt, then sew arms to body

Important Notes

  • ๐Ÿ’กFinal amigurumi size is determined by yarn thickness and hook size - pattern creates 20cm high by 9cm wide figure
  • ๐Ÿ’กUse stitch markers when working complex sections like hair strands and color changes
  • ๐Ÿ’กStuff head firmly to maintain shape during final decreases, especially around neck area
  • ๐Ÿ’กPlace safety eyes between rounds 13-14 with proper 12-stitch spacing before closing head
  • ๐Ÿ’กWork hair strands with consistent tension to achieve even dreadlock appearance
  • ๐Ÿ’กUse pins to position all pieces before final sewing for best results

This magnificent Captain Jack Sparrow amigurumi pattern brings the legendary pirate to life with incredible attention to detail! From his signature dreadlocked hair adorned with beads to his layered clothing and accessories, every element captures the essence of this beloved character. The pattern challenges your skills while rewarding you with a truly spectacular finished piece that any Pirates of the Caribbean fan would treasure. Set sail on this creative adventure and create your own pocket-sized pirate captain! ๐Ÿดโ€โ˜ ๏ธ Happy crocheting, savvy? โš“โœจ

You ask,

we answer.

FAQs

What skill level is required for this pattern?

This is an intermediate level pattern that assumes knowledge of basic amigurumi stitches but includes detailed instructions for more complex techniques like hair strand creation and layered assembly.

Can I use different yarn colors or brands?

Yes, you can substitute colors and brands, but maintain similar yarn weight (cotton thread with 6 strands) to achieve the correct size and texture for the character details.

How do I create the dreadlock hair effect?

The pattern includes specific instructions for creating two layers of hair strands using chains of different lengths, with some strands doubled up and finished with slip stitches for the authentic dreadlock look.

What's the most challenging part of this pattern?

The hair construction and assembly are the most complex parts, involving creating 44 individual strands in two layers with specific placement and beading techniques.

Can I make this pattern larger or smaller?

Yes, but you'll need to adjust hook size and yarn weight proportionally. The pattern is written for 20cm height - scaling will require recalculating stitch counts for all pieces.