๐Ÿงถ Beautiful โœจ Detailed ๐Ÿ’ Adorable

Capybara in a Tub Amigurumi Pattern

Capybara in a Tub Amigurumi Pattern
4.2โ˜… Rating
8-10 Hours Time Needed
3.9K Made This
โœ‚๏ธ

Intermediate Level

Ideal for those with basic knitting experience, featuring slightly more advanced stitches and techniques to expand your skills.

โฑ๏ธ

All-Day Adventure

Requires 8-10 hours, ideal for a full day of immersive knitting.

๐Ÿงธ

Cute Companion

An adorable friend to cherish, handcrafted with love to bring comfort and joy for years to come.

About This Capybara in a Tub Amigurumi Pattern

This charming Capybara in a Tub pattern brings the internet's favorite relaxed animal to life in the most adorable way possible. The pattern features a peaceful capybara sitting in its own wooden hot tub, complete with blue water and floating orange slices. Every detail has been carefully designed to capture the serene, zen-like nature that makes capybaras so beloved. The finished piece measures approximately 9 cm (3.5 inches) and makes a perfect decorative item or gift.

Capybara in a Tub Amigurumi Pattern crochet pattern - detailed view of completed project

The pattern includes detailed instructions for creating the capybara's characteristic features, from its gentle expression to its perfectly rounded body. The wooden tub is crafted with realistic ribbed textures that mimic actual wood grain patterns.

Why You'll Love This Capybara in a Tub Amigurumi Pattern

I absolutely love how this pattern captures the essence of pure relaxation and contentment that capybaras represent. There's something so peaceful about working on this project - it's like meditation in crochet form. The combination of the gentle capybara and the detailed wooden tub creates a miniature scene that never fails to make me smile and brings instant calm to any space.

Capybara in a Tub Amigurumi Pattern step 1 - construction progress Capybara in a Tub Amigurumi Pattern step 2 - assembly progress Capybara in a Tub Amigurumi Pattern step 3 - details and accessories Capybara in a Tub Amigurumi Pattern step 4 - final assembly and finishing

Switch Things Up

I love how versatile this capybara pattern can be with just a few creative tweaks. You could easily change the water color to create a sunset hot tub effect using orange and pink yarns, or make it a winter scene with white and light blue for a snowy hot spring vibe. I've experimented with adding tiny crocheted bubbles around the capybara for extra cuteness, and some crafters have told me they've made mini towels or even little rubber duckies to float alongside. The orange slices could be swapped for other fruits like tiny watermelon wedges or strawberries for a fun fruit salad bath theme.

Another variation I adore is making the tub in different wood tones - from light birch to dark walnut - by simply changing your beige yarn to various browns. You could even add tiny details like a small ladder or spa accessories to make it feel like a miniature resort. The possibilities are endless when you let your creativity flow with this peaceful little scene.

Common Mistakes & How to Fix Them

โœ— Forgetting to use stitch markers when working in spirals can cause uneven shaping โœ— Not crocheting tightly enough may create holes where stuffing shows through the fabric โœ— Overstuffing the capybara can distort its gentle, relaxed appearance and proportions โœ— Misplacing the eyes or ears can completely change the capybara's peaceful expression

Capybara in a Tub Amigurumi Pattern

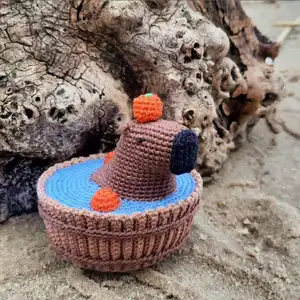
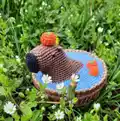
Create the most adorable capybara relaxing in its own little wooden tub with this charming amigurumi pattern. This delightful design features a peaceful capybara surrounded by blue water, complete with cute orange details and a rustic wooden tub. Perfect for capybara lovers and anyone who enjoys creating unique, whimsical amigurumi pieces that bring joy and relaxation vibes to any space.

Intermediate 8-10 Hours

Materials Needed for Capybara in a Tub Amigurumi Pattern

โ€” Main Fabric

  • 01
    Brown, orange, beige, blue and black yarn - YarnArt Begonia yarn (169 m/50 gr) recommended
  • 02
    Some green yarn for orange leaf embroidery details

โ€” Tools Required

  • 01
    Crochet hook size 1.5 mm
  • 02
    Stuffing material
  • 03
    Needle for sewing
  • 04
    Piece of cardboard for structural support
  • 05
    Stitch markers

Progress Tracker

0% Complete

โ€” Head :

Row 1 :

8 ch st, inc in the second stitch from the hook in the back loop, in the back loops of the chain: 5sc, 4sc in the last loop of the chain, keep crocheting on the other side of the chain: 5sc, inc (18)

Row 2 :

(incx2, 5sc, incx2)x2 (26)

Row 3 :

(1sc, incx2, 7sc, incx2, 1sc)x2 (34)

Row 4 :

34sc (34)

Row 5 :

2sc, inc, 28sc, inc, 2sc (36)

Rows 6-8 :

36sc (36)

Row 9 :

2sc, incx2, 28sc, incx2, 2sc (40)

Row 10 :

40sc (40)

Row 11 :

16sc, invdecx4, 16sc (36)

Row 12 :

1sc, inc, 14sc, invdecx2, 14sc, inc, 1sc (36)

Row 13 :

3sc, inc, 12sc, invdecx2, 12sc, inc, 3sc (36)

Info :

1ex st

Row 14 :

4ch st, inc in the second stitch from the hook in the back loop, in the back loops of the chain: 2sc, keep crocheting on the body: 2sc, inc, 30sc, inc, 2sc, on the other side of the chain: 2sc, inc (46)

Row 15 :

inc, 3sc, invdec, 34sc, invdec, 3sc, inc (46)

Row 16 :

incx2, 2sc, invdecx2, 30sc, invdecx2, 2sc, incx2 (46)

Row 17 :

(1sc, inc)x2, 2sc, invdec, 30sc, invdec, 2sc, (inc, 1sc)x2 (48)

Row 18 :

2sc, inc, 42sc, inc, 2sc

Info :

1sl st, fasten off and cut the yarn, leave a long end for sewing

โ€” Ears :

Info :

Attach the thread between 4th and 5th rows as shown in the photo

Instructions :

1ch st, 1hdc, 1ch st, 1sl st, fasten off and cut the yarn, hide the end of the yarn, make the second ear in the same way

โ€” Muzzle :

Row 1 :

6ch st, inc in the second stitch from the hook in the back loop, in the back loops of the chain: 3sc, in the last loop of the chain: incx2, on the other side of the chain: (3sc, inc) (14)

Row 2 :

(1sc, inc, 3sc, inc, 1sc)x2 (18)

Row 3 :

1sl st, inc, 5hdc, inc, 2sc, inc, 5hdc, inc, 1sl st (22)

Info :

Fasten off and cut the yarn, leave a long end for sewing

โ€” Water :

Row 1 :

6sc in MR (6)

Row 2 :

incx6 (12)

Row 3 :

(1sc, inc)x6 (18)

Row 4 :

(1sc, inc, 1sc)x6 (24)

Row 5 :

(3sc, inc)x6 (30)

Row 6 :

(2sc, inc, 2sc)x6 (36)

Row 7 :

(5sc, inc)x6 (42)

Row 8 :

(3sc, inc, 3sc)x6 (48)

Row 9 :

(7sc, inc)x6 (54)

Row 10 :

(4sc, inc, 4sc)x6 (60)

Row 11 :

(9sc, inc)x6 (66)

Row 12 :

(5sc, inc, 5sc)x6 (72)

Row 13 :

(11sc, inc)x6 (78)

Row 14 :

(6sc, inc, 6sc)x6 (84)

Row 15 :

(13sc, inc)x6 (90)

Row 16 :

(7sc, inc, 7sc)x6 (96)

Info :

Fasten off and cut the yarn, leave a long end for sewing

โ€” Wooden Tub :

Row 1 :

15ch st, 1sc in the second stitch from the hook, 13sc (14)

Rows 2-90 :

(in back loops only) 1ch st, turn, 14sc (14)

Row 91 :

(work on the long side of the detail) 1ch st, (4sc, invdec, 4sc)x9, 1sl st in the beginning of the row

Rows 92-102 :

Continue in round to create the bottom part of the tub with decreases as specified

Info :

Pull the hole closed, fasten off and cut the yarn, hide end of the yarn, sew the open sides of the tub

โ€” Tub Hoops :

Upper Hoop :

2ch st, 1sc in the second stitch from the hook, 2-103rows: 1sc in the bottom part of the sc of the previous row

Bottom Hoop :

2ch st, 1sc in the second stitch from the hook, 2-92rows: 1sc in the bottom part of the sc of the previous row
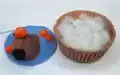
โ€” Orange :

Row 1 :

6sc in MR (6)

Row 2 :

incx6 (12)

Rows 3-6 :

12sc (12)

Info :

Stuff the orange with stuffing material

Row 7 :

invdecx6 (6)

Info :

Fasten off and cut the yarn, leave a long end for sewing, embroider leaf on the orange with green yarn

โ€” Orange Halves :

Bigger Half (2 pcs) :

Row 1: 6sc in MR (6), Row 2: incx6 (12), Row 3: 12sc (12)

Smaller Half (1 pc) :

Row 1: 6sc in MR (6), Row 2: (1sc, inc)x3 (9), Row 3: 9sc(9)

Assembly Instructions

  • Make eyes with black yarn using French knot stitch between 5th and 6th rows, 3 sc distance from ear
  • Make eyelids above eyes with brown yarn and stuff the capybara with stuffing material
  • Sew the muzzle to the head securely
  • Cut a circle out of cardboard slightly smaller than water detail and glue to wrong side
  • Sew the capybara to the water detail as shown in photos, add stuffing if needed
  • Sew the orange to the head and stuff orange halves before attaching near capybara
  • Stuff the tub with material and sew water detail to tub with water edge below tub edge
  • Sew both hoops to the tub to complete the wooden barrel effect

Important Notes

  • ๐Ÿ’กCrochet with tight stitches to prevent holes from showing stuffing material
  • ๐Ÿ’กUse stitch markers when working in spirals to avoid losing track of rounds
  • ๐Ÿ’กWork most details in spiral without slip stitch to avoid visible seams
  • ๐Ÿ’กFinish all details with slip stitch to create even, professional-looking edges
  • ๐Ÿ’กCut cardboard circles slightly smaller than the bottom parts for proper fit

This adorable Capybara in a Tub pattern captures the ultimate zen vibes that make capybaras so beloved worldwide. The detailed wooden tub with realistic hoops and the peaceful capybara surrounded by floating oranges creates a miniature scene of pure relaxation. Every stitch brings you closer to creating your own little piece of tranquility that's perfect for display or gifting to fellow capybara enthusiasts. ๐Ÿงถ Happy crocheting! ๐Ÿงตโœจ

You ask,

we answer.

FAQs

What size will my finished capybara be?

The finished capybara in tub measures approximately 9 cm (3.5 inches) when using the recommended YarnArt Begonia yarn and 1.5mm hook. Using thinner yarn will result in a smaller finished piece.

Can I use different colors for my capybara?

While the pattern calls for brown, you can experiment with different shades of brown or even gray for variety. Just make sure to maintain good contrast between the capybara and the blue water.

How do I prevent holes in my work?

Crochet with tight stitches and use a smaller hook if necessary. The pattern emphasizes tight stitching to ensure no stuffing shows through the fabric.

Is the cardboard necessary?

Yes, the cardboard provides structural support for both the water detail and tub bottom, helping maintain the shape and stability of the finished piece.

Can beginners attempt this pattern?

This is an intermediate pattern due to the multiple components and detailed assembly. Beginners should be comfortable with basic stitches, working in rounds, and following complex instructions.