🧶 Beautiful ✨ Detailed 💝 Adorable

Christmas Bells Crochet Pattern

Christmas Bells Crochet Pattern
4.0★ Rating
3-4 Hours Time Needed
1.5K Made This
✂️

Intermediate Level

Ideal for those with basic knitting experience, featuring slightly more advanced stitches and techniques to expand your skills.

⏱️

Bite-Sized Project

Complete in under 2 hours—quick, fun, and perfect for a little creative escape.

🎄

Holiday Cheer

Festive fun for the season, bringing handmade magic to celebrations and creating new family traditions.

About This Christmas Bells Crochet Pattern

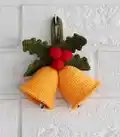
This enchanting Christmas Bells pattern combines traditional holiday symbolism with modern crochet techniques. The design features two beautifully textured golden bells that create authentic ringing sounds thanks to the included tambourines. Accompanied by realistic holly leaves with decorative chain-3 picot edges and plump red berries, this ornament captures the essence of Christmas magic. The pattern uses a special V and X stitch technique that creates a lovely textured surface on the bells.

Christmas Bells Crochet Pattern crochet pattern - detailed view of completed project

Perfect for holiday decorating or as a thoughtful handmade gift, these bells bring warmth and tradition to any space. The detailed step-by-step instructions include helpful photos and finishing techniques like steam blocking for professional results.

Why You'll Love This Christmas Bells Crochet Pattern

I absolutely love how this pattern brings together so many classic Christmas elements in one beautiful piece! The satisfaction of hearing those gentle chimes when the bells move is pure magic, and I'm always amazed at how the simple combination of yellow, green, and red creates such an instantly recognizable holiday symbol. The texture work on the bells gives them such a realistic, dimensional look that makes people think they're store-bought until you tell them you made them yourself!

Christmas Bells Crochet Pattern step 1 - construction progress Christmas Bells Crochet Pattern step 2 - assembly progress Christmas Bells Crochet Pattern step 3 - details and accessories Christmas Bells Crochet Pattern step 4 - final assembly and finishing

Switch Things Up

I love experimenting with different color combinations for these bells - imagine them in elegant silver and white for a winter wonderland theme, or rich burgundy and gold for a more sophisticated holiday look. You could also try making mini versions using sport weight yarn and a smaller hook for adorable tree ornaments, or go larger with worsted weight for a stunning mantel piece.

For a fun twist, I sometimes add tiny beads to the berry centers or use metallic thread to highlight the bell edges. The pattern is so versatile that you could even adapt it for other seasons - think pastels for Easter with different colored 'eggs' instead of berries, or autumn colors with orange 'pumpkins' for fall décor!

Common Mistakes & How to Fix Them

✗ Crocheting too loosely - the stuffing will show through the holes in the bells ✗ Forgetting to stuff the berries properly before closing - they'll look flat and deflated ✗ Not securing the tambourine properly inside - it might rattle around or fall out ✗ Skipping the steam blocking step for leaves - they won't lay flat and look professional

Christmas Bells Crochet Pattern

Create these charming festive Christmas bells that will add a touch of handmade holiday magic to your home décor. This delightful pattern features two golden bells adorned with beautiful holly leaves and bright red berries, complete with jingling tambourines inside for authentic bell sounds. The finished ornament measures approximately 4.7x5.1 inches and makes a perfect gift or seasonal decoration that will bring joy to your Christmas celebrations for years to come.

Intermediate 3-4 Hours

Materials Needed for Christmas Bells Crochet Pattern

— Main Fabric

  • 01
    DK weight yarn - Yarn Art Jeans (55% cotton/45% acrylic; 50 g/160 m)
  • 02
    Yarn Art Jeans № 35 (yellow) for bells
  • 03
    Yarn Art Jeans № 82 (dark green) for leaves and loop
  • 04
    Yarn Art Jeans № 90 (red) for berries

— Tools Required

  • 01
    2.25 mm crochet hook
  • 02
    Stuffing material (fiberfill/polyester)
  • 03
    Tapestry needle
  • 04
    Scissors
  • 05
    Stitch marker (scrap of contrasting yarn)
  • 06
    Tambourine 2 pieces

Progress Tracker

0% Complete

— BELLS (make 2) :

Rnd 1 :

6 into MR

Rnd 2 :

6 inc (12)

Rnd 3 :

(1 sc, inc)*6 (18)

Rnd 4 :

(2 sc, inc)*6 (24)

Rnd 5 :

(3 sc, inc)*6 (30)

Rnds 6-7 :

30 sc (2 rounds)

Rnd 8 :

(4 sc, inc)*6 (36)

Rnds 9-14 :

36 sc (6 rounds)

Rnd 15 :

(5 sc, inc)*6 (42)

Rnds 16-19 :

42 sc (4 rounds)

Info :

Crochet the next row with Crab (Reverse) stitch

Rnd 20 :

42 sc (Crab stitch), 1 sl st

Info :

Break yarn. Pull tightly. Hide the tail inside.

— BELL LANGUAGE :

Step 1 :

Chain 16 with blue yarn. Using a smaller hook, pull the thread into the eye of the bell to grab and pull the thread.

Step 2 :

Start working in the second chain from hook 15 sc. Break yarn.

— LEAF (make 4) :

Foundation :

Chain 15, crochet to the chain foundation. Start working in the second chain from hook - 13 sc, 3 sc in 1 stitch.

Continue :

Continue crocheting on the other side of the chain foundation. – 12 sc, 3 sc in 1 stitch.

Rnd 2 :

(3 sc, chain 3, 1 sc in the previous stitch)*4, 3 sc, chain 3, 1 sc in the previous stitch, (3 sc, chain 3, 1 sc in the previous stitch)*4, 2 sc, 2 sl st.

Info :

Break yarn, leaving a long tail for sewing.

— BERRIES (make 3) :

Rnd 1 :

6 into MR

Rnd 2 :

6 inc (12)

Rnd 3-6 :

12 sc (4 rounds)

Info :

Complete stuffing with fiberfill. Tighten the hole using a tapestry needle.

— LOOP :

Rnd 1 :

Chain 41, turn and continue crocheting on the other side of the chain.

Rnd 2 :

40 sc, 1 cp, turn

Rnd 3 :

40 sc

Assembly Instructions

  • Attach the finished language (clapper) to each bell and tie all threads securely
  • Tie both bells together using the yarn tails
  • Sew four leaves together to form the holly spray
  • Using a needle, remove all threads from the bells to the back of the leaves and tie them together
  • Sew the three red berries onto the holly leaves arrangement
  • Connect the ends of the loop using a needle and remaining thread
  • Sew the loop to the back of the leaves, hiding all protruding threads

Important Notes

  • 💡Make sure you crochet tight enough; otherwise, the stuffing will show through the holes
  • 💡Use the V and X look single crochet technique for proper texture on the bells
  • 💡Iron the leaves with steam if uneven - put a damp cloth on top and steam for a few seconds
  • 💡Crochet the toy in continuous spirals without turning chains
  • 💡The finished size is approximately 4.7x5.1 inches with the loop

These adorable Christmas Bells bring the magic of the holidays right into your hands! The combination of jingling tambourines, textured stitches, and classic holiday colors creates an ornament that's both beautiful and functional. Whether hanging on your tree or gifted to someone special, these bells will ring in the Christmas spirit year after year. The detailed holly leaves and berries add that perfect festive touch that makes this pattern truly special. 🎄 Happy crocheting! 🔔✨

You ask,

we answer.

FAQs

What size hook should I use for best results?

Use a 2.25mm crochet hook as specified. This smaller hook size helps create tight stitches that prevent stuffing from showing through.

Can I substitute different yarn colors?

Yes! While traditional Christmas colors work best, you could try silver and blue for a winter theme, or any colors that match your décor.

Where can I find tambourines for the bells?

Small tambourines or jingle bells can be found at craft stores, online retailers, or in the jewelry-making section of hobby shops.

What is the V and X stitch technique mentioned?

This refers to alternating how you grab the yarn - first over the hook, then under the hook for the next stitch, creating a textured appearance.

How do I steam block the leaves?

Place a damp cloth over the crocheted leaves and steam with an iron for a few seconds to help them lay flat and look professional.