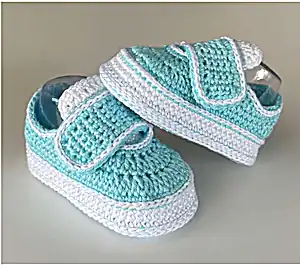
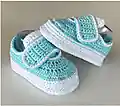
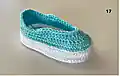
Create adorable miniature sneakers for your little one with this detailed crochet pattern featuring authentic Velcro closures. These charming baby booties come in four sizes from newborn to 9 months, combining comfort with style. Perfect for keeping tiny feet cozy while adding a trendy touch to any baby outfit.
Progress Tracker
0% Complete
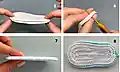
— Step 1: Sole/Bottom (make 4) :
Size Newborn Baby :
Chain 18. Stitches are worked around both sides of foundation chain. PM to indicate beginning of round.
Round 1 :
ch 2, 2 dc in the 18th ch, 16 dc, 5 dc in one st; turn around and work in unused loops on other side: 16 dc, dc inc, sl-st (42)
Round 2 :
ch 1, 2 inc, 7sc, 2 hdc, 7dc, rep(dc inc) *5, 7 dc, 2 hdc, 7sc, 2 inc, 1 sc, sl-st (52)
Round 3 :
ch 2, rep(dc inc)*4, 16 dc, rep(dc inc)*10, 16 dc, rep(dc inc)*4, 1dc, sl-st (70)
Round 4 :
ch 1, 1 hdc in every st by the end of the rnd (70). Break working yarn. Invisible join in the round
Info :
Connect 2 soles together for sole reinforcement. Hold 2 soles wrong side in and crochet slip stitches along edge, joining both soles together. Work slip stitches in foundation chain for connecting two soles in middle.
— Step 2: The Sides of Sole :
Info :
Start crocheting from middle of heel, thread working yarn into slip stitching chain
Round 1 :
crochet FLO of stitching chain: ch 1, sc in next st, 68 sc, sl-st (70)
Round 2 :
ch1, 69 sc, sl-st (70)
Round 3 :
ch1, 69 sc (70). Break working yarn, invisible join in round
— Step 3: Stitching :
Info :
Using main color yarn crochet slip stitches (face loops inside) along last round of sides of sole. Break working yarn, leaving approx. 4 cm.
— Step 4: Shoe Top :
Info :
Use main color yarn. Join for working in round. Start crocheting from middle of heel.
Round 1 :
crochet FLO of stitching chain: ch 1, 1 sc in next st, 68 sc, sl-st (70)
Round 2 :
ch 2, 7 dc, 8 sc, 7 dc, rep(dc2tog)*12, 7 dc, 8 sc, 8 dc, sl-st (58)
Round 3 :
ch 2, 5 dc, 8 sc, 9 dc, rep(dc2tog)*6, 9 dc, 8 sc, 6 dc, sl-st (52)
Round 4 :
ch 2, 3 dc, 1 hdc, 7 sc, 5 dc, 6 sc, 7 sc flo, 5 sc, 5 dc, 8 sc, 1 hdc, 3 dc (52). Break working yarn, leaving approx. 5 cm, make invisible join in round
— Step 5: Tongue of Sneakers :
Info :
Use white color yarn. Work back and forth. Turn booties inside out and start crocheting from half loop of row of top of boot
Row 1 :
ch 1, 7 sc, turn (8)
Row 2 :
ch 2, 3 dc, dc inc, 3 dc, turn (9)
Row 3 :
ch 1, 8 sc, turn (9)
Row 4 :
ch 2, 1 dc, dc inc, 4 dc, dc inc, 1 dc, turn (11)
Row 5 :
ch 1, 10 sc, turn (11)
Row 6 :
ch 2, 1dc, dc inc, 6 dc, dc inc, 1dc, turn (13)
Row 7 :
ch 1, 12 sc, turn (13)
Row 8 :
2 sc, 1 hdc, 6 dc, 1 hdc, 2 sc (12). Break working yarn. Work sc along top edge. Crochet 2 sc in corner stitch.
— Step 6: Velcro Closures :
Info :
Use main color yarn. Work back and forth.
Left Shoe :
Count 19 sts to right from middle of heel and insert hook into 20th st
Row 1 :
ch 1, 2 sc, 1 hdc, 2 dc, turn
Row 2 :
ch 2, 3 hdc, 2 sc, turn
Rows 3-4 :
ch 1, 5 sc, turn (2 rows)
Row 5 :
ch 1, 2 sc, 1 hdc, 2 dc, turn
Rows 6-11 :
ch1, 5 sc, turn (6 rows)
Row 12 :
ch 1, 2 sc, 3 hdc. Break working yarn. Work sc along top edge. Crochet 2 sc in corner stitch. Glue loop parts to closure and hook parts to shoe side.
— Step 7: Final Stitching :
Info :
Using white color yarn crochet slip stitches along top edge of sneakers and straps
These adorable baby Velcro sneakers bring authentic athletic shoe style to the tiniest feet in your family. With their reinforced soles, structured design, and functional closures, they're as practical as they are cute. The pattern's attention to detail ensures a professional finish that will have everyone asking where you bought such perfect little shoes. 🧶 Happy crocheting! 👶✨