๐Ÿงถ Beautiful โœจ Detailed ๐Ÿ’ Adorable

Christmas Bunny Amigurumi Pattern

Christmas Bunny Amigurumi Pattern
4.9โ˜… Rating
8-10 Hours Time Needed
1.2K Made This
โœ‚๏ธ

Intermediate Level

Ideal for those with basic knitting experience, featuring slightly more advanced stitches and techniques to expand your skills.

โฑ๏ธ

All-Day Adventure

Requires 8-10 hours, ideal for a full day of immersive knitting.

๐ŸŽ„

Holiday Cheer

Festive fun for the season, bringing handmade magic to celebrations and creating new family traditions.

About This Christmas Bunny Amigurumi Pattern

This enchanting Christmas Bunny pattern combines classic amigurumi techniques with festive holiday charm. The pattern features a sweet gray and white bunny dressed in traditional Christmas colors with striped stockings and a long pointed cap. With detailed jacquard colorwork on the body and intricate color changes throughout the accessories, this project offers both visual appeal and technical skill-building opportunities for intermediate crocheters.

Christmas Bunny Amigurumi Pattern crochet pattern - detailed view of completed project

The bunny's moveable limbs are attached with button joints, giving it a charming poseable quality. Complete with embroidered facial features and pink-toned cheeks, this project results in a truly special holiday keepsake.

Why You'll Love This Christmas Bunny Amigurumi Pattern

I absolutely love this pattern because it captures the magic of Christmas in such an endearing way. The combination of soft fluffy yarn for the cap with the structured cotton yarn for the body creates wonderful texture contrast. I find the jacquard technique on the bunny's belly adds a professional touch that makes the finished piece look truly special. The striped stockings and hat are so satisfying to create with their rhythmic color changes, and watching the festive character come to life row by row brings such joy. This is the kind of project that becomes a treasured family heirloom, bringing smiles year after year.

Christmas Bunny Amigurumi Pattern step 1 - construction progress Christmas Bunny Amigurumi Pattern step 2 - assembly progress Christmas Bunny Amigurumi Pattern step 3 - details and accessories Christmas Bunny Amigurumi Pattern step 4 - final assembly and finishing

Switch Things Up

I love how versatile this Christmas Bunny pattern can be with just a few creative tweaks. While the traditional red, green, and white color scheme is perfect for Christmas, you could easily adapt this pattern for other occasions throughout the year.

Try working the bunny in soft pastels with a floral color scheme for a beautiful springtime or Easter version. Imagine the stockings and cap in gentle pinks, lavender, and mint green for a sweet spring celebration piece.

For a winter wonderland theme, I'd work the entire outfit in icy blues, silvers, and whites to create a frosty snow bunny. You could even add some sparkly yarn for a magical touch that catches the light.

Another idea I adore is creating a rainbow version with bright, cheerful stripes that would make a perfect birthday gift or room decoration. The repetitive color changes in the accessories make them ideal for using up yarn scraps too.

You could also personalize the bunny by changing the body colors - perhaps a brown bunny instead of gray, or even a pink or blue one for a baby's nursery. The white belly panel would look sweet on any base color.

For an autumn version, work the stripes in warm oranges, burgundy, and golden yellows. This would create a cozy harvest bunny perfect for Thanksgiving displays.

Consider adding small embellishments like tiny bows, felt flowers, or embroidered details to make each bunny unique. A small jingle bell sewn into the tip of the cap would add delightful sound and movement.

I also think this pattern would be wonderful for making a set of bunnies in different color combinations - imagine a whole family displayed together, each with their own personality expressed through color choices.

The possibilities are truly endless, and that's what makes this pattern such a treasure. Each maker can put their own creative spin on it while following the same beloved instructions.

Common Mistakes & How to Fix Them

โœ— Forgetting to place stitch markers when working in continuous rounds, especially during the complex jacquard sections on the body and head โœ— Stuffing the body and limbs too firmly or too loosely, which affects the bunny's shape and the way it sits properly โœ— Mixing up the color sequences in the striped stockings and cap, leading to inconsistent patterns that don't match between pieces โœ— Not securing the button joints tightly enough when attaching the moveable arms and legs, resulting in loose limbs that don't hold poses well

Christmas Bunny Amigurumi Pattern

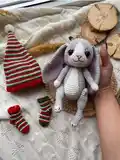
Create an adorable festive bunny perfect for the holiday season with this charming amigurumi pattern. This delightful Christmas-themed rabbit features a cozy striped hat and matching stockings in traditional red, green, and white colors. Standing at 20-22 cm tall, this sweet companion makes a wonderful handmade gift or seasonal decoration that will bring warmth and joy to any space during the most wonderful time of year.

Intermediate 8-10 Hours

Materials Needed for Christmas Bunny Amigurumi Pattern

โ€” Main Fabric

  • 01
    Sport weight 4ply yarn YarnArt Jeans (50g/160m) in colors: N56 red, N53 black, N62 white, N79 minty, N80 gray, N82 green
  • 02
    DK light worsted fluffy yarn Alize Softy (50g/115m) in color N55 white

โ€” Tools Required

  • 01
    1.75 mm crochet hook
  • 02
    Stuffing material, fiberfill
  • 03
    Safety eyes 12mm
  • 04
    Pink pastel for toning
  • 05
    Needle for sewing pieces
  • 06
    4 Buttons
  • 07
    Stitch markers
  • 08
    Scissors

Progress Tracker

0% Complete

โ€” Arms (make 2) :

Round 1 :

6sc in MR

Info :

Place row marker here. Stuff with fiberfill in the process.

Round 2 :

(1sc, inc) *3 (9)

Round 3 :

(2sc, inc) *3 (12)

Round 4 :

12sc (12)

Round 5 :

Change color to Gray. BLO (2sc, dec) *3 (9)

Round 6-11 :

9sc (6 rounds)

Round 12 :

3sc, 3inc, 3sc (12)

Round 13-19 :

12sc (7 rounds)

Round 20 :

6dec

Info :

Fasten off, cut the yarn, weave in the yarn ends.

โ€” Tail :

Round 1 :

6sc in MR

Info :

Place row marker here.

Round 2 :

6inc (12)

Round 3 :

(1sc, inc) *6 (18)

Round 4 :

18sc (18)

Round 5 :

(1sc, dec) *6 (12)

Round 6 :

6dec (6)

Info :

Stuff with fiberfill. Leave a long tail for sewing.

โ€” Legs (make 2) :

Round 1 :

6sc in MR

Info :

Place row marker here.

Round 2 :

6inc (12)

Round 3 :

12sc

Round 4 :

Change color to Gray. 12sc (12)

Round 5-9 :

12sc (5 rounds)

Info :

Stuff with fiberfill in the process. Crochet the heel in rows with Gray yarn:

Row 1 :

5sc, turn (5)

Row 2 :

ch1, 5sc, turn (5)

Row 3 :

ch1, 5sc, turn (5)

Row 4 :

ch1, 5sc, turn (5)

Round 10 :

Return to crochet the legs. Work in a spiral: dec, sc, 3dec, 5sc, 2dec (12)

Round 11 :

12sc (12)

Round 12 :

(2sc, dec) *3 (9)

Round 13-14 :

9sc (2 rounds) (9)

Round 15 :

(2sc, inc) *3 (12)

Round 16 :

12sc (12)

Round 17 :

(3sc, inc) *3 (15)

Round 18-20 :

15sc (3 rounds) (15)

Round 21 :

(4sc, inc) *3 (18)

Round 22-27 :

18sc (6 rounds)

Round 28 :

(1sc, dec) *6 (12)

Round 29 :

6dec

Info :

Stuff the legs with fiberfill. Fasten off, cut the yarn, weave in the ends.

โ€” Body :

Round 1 :

6sc in MR

Info :

Place row marker here.

Round 2 :

6inc (12)

Round 3 :

(1sc, inc) *6 (18)

Round 4 :

(2sc, inc) *6 (24)

Round 5 :

(3sc, inc) *6 (30)

Round 6 :

(4sc, inc) *6 (36)

Round 7 :

(5sc, inc) *6 (42)

Round 8 :

(6sc, inc) *6 (48)

Round 9 :

(7sc, inc) *6 (54)

Round 10 :

54sc (54)

Round 11 :

Attention! Crochet in jacquard technique from Rnd 11 to 27. Add White yarn (these stitches are highlighted in red) 10sc, 8sc, 36sc (54)

Round 12 :

9sc, 10sc, 35sc (54)

Round 13 :

8sc, 12sc, 34sc (54)

Round 14 :

8sc, 12sc, 34sc (54)

Round 15 :

8sc, 12sc, 9sc, (2sc, dec) *6, 1sc (48)

Round 16 :

9sc, 10sc, 29sc (48)

Round 17 :

9sc, 10sc, 29sc (48)

Round 18 :

9sc, 10sc, 29sc (48)

Round 19 :

6sc, dec, 2sc, 8sc, 1sc, dec, 1sc, dec, (6sc, dec) *3 (42)

Round 20 :

9sc, 8sc, 25sc (42)

Round 21 :

9sc, 8sc, 25sc (42)

Round 22 :

9sc, 8sc, 25sc (42)

Round 23 :

5sc, dec, 3sc, 6sc, dec, 1sc, dec, (5sc, dec) *3 (36)

Round 24 :

9sc, 6sc, 21sc (36)

Round 25 :

9sc, 6sc, 21sc (36)

Round 26 :

4sc, dec, 4sc, 2dec, (dec, 4sc) *3, 4sc (30)

Round 27 :

9sc, 2sc, 19sc (30)

Info :

Stuff the body with fiberfill. Leave a long tail for sewing.

โ€” Head :

Round 1 :

6sc in MR

Info :

Place row marker here.

Round 2 :

6inc (12)

Round 3 :

3inc, 3sc, 3inc, 3sc (18)

Round 4 :

(2sc, inc) *6 (24)

Round 5 :

(3sc, inc) *6 (30)

Round 6 :

(4sc, inc) *6 (36)

Round 7-9 :

36sc (3 rounds) (36)

Round 10 :

Change color to Gray. Attention! Crochet in jacquard technique from Rnd 10 to 13. Add white yarn (these stitches are highlighted in red) (5sc, inc) *2, 1sc, inc, 8sc, inc, 1sc, (5sc, inc) *2 (42)

Info :

Insert the eyes between rounds 7-8 at a distance of 10-12 stitches.

Round 11 :

(6sc, inc) *2, 3sc, inc, 6sc, inc, 3sc, (6sc, inc) *2 (48)

Round 12 :

(7sc, inc) *2, 5sc, inc, 4sc, inc, 5sc, (7sc, inc) *2 (54)

Round 13 :

(8sc, inc) *2, 7sc, inc, 2sc, inc, 7sc, (8sc, inc) *2 (60)

Round 14-21 :

With Gray yarn 60sc (8 rounds) (60)

Round 22 :

(8sc, dec) *6 (54)

Round 23 :

(7sc, dec) *6 (48)

Round 24 :

(6sc, dec) *6 (42)

Round 25 :

(5sc, dec) *6 (36)

Round 26 :

(4sc, dec) *6 (30)

Round 27 :

(3sc, dec) *6 (24)

Info :

Stuff the head with fiberfill.

Round 28 :

(2sc, dec) *6 (18)

Round 29 :

(1sc, dec) *6 (12)

Round 30 :

6dec (6)

Info :

Fasten off, cut the yarn, weave in the ends.

โ€” Ears (make 2) :

Round 1 :

6sc in MR

Info :

Place row marker here.

Round 2 :

6inc (12)

Round 3 :

12sc (12)

Round 4 :

(1sc, inc) *6 (18)

Round 5 :

18sc (18)

Round 6 :

(2sc, inc) *6 (24)

Round 7 :

24sc (24)

Round 8 :

(3sc, inc) *6 (30)

Round 9-18 :

30sc (10 rounds) (30)

Round 19 :

(3sc, dec) *6 (24)

Round 20-26 :

24sc (7 rounds) (24)

Round 27 :

(2sc, dec) *6 (18)

Round 28-31 :

18sc (4 rounds) (18)

Round 32 :

(1sc, dec) *6 (12)

Round 33-34 :

12sc (2 rounds)

Info :

Do not stuff. Leave a long tail for sewing.

โ€” Right Stocking :

Round 1 :

6sc in MR

Info :

Place row marker here.

Round 2 :

6inc (12)

Round 3 :

(1sc, inc) *6 (18)

Round 4 :

18sc (18)

Round 5 :

Change color to Minty. 18sc (18)

Round 6 :

Change color to Green. 18sc (18)

Round 7 :

Change color to Red. 18sc (18)

Round 8 :

Change color to Minty. 18sc (18)

Round 9 :

Change color to Green. 18sc (18)

Round 10 :

Change color to Red. 18sc (18)

Round 11 :

Change color to Minty. 18sc (18)

Info :

Change color to Red. Crochet the heel in rows with Red yarn:

Row 1 :

(do not turn) 8sc, turn (8)

Row 2 :

ch1, 8sc, turn (8)

Row 3 :

ch1, 8sc, turn (8)

Row 4 :

ch1, 8sc, turn (8)

Round 12 :

Change color to Green. Return to crochet the stocking. Work in a spiral: dec, 4sc, 4dec, 6sc, 3dec (18)

Round 13 :

Change color to Red. 18sc (18)

Round 14 :

Change color to Minty. 18sc (18)

Round 15 :

Change color to Green. 18sc (18)

Round 16 :

Change color to Red. 18sc (18)

Round 17 :

Change color to Minty. 18sc (18)

Round 18 :

Change color to Green. 18sc (18)

Round 19 :

Change color to Red. 18dc, sl st (18)

Round 20 :

ch2, (FPdc, BPdc) *9, sl st.

Info :

Fasten off, cut the yarn, weave in the yarn ends.

โ€” Left Stocking :

Round 1 :

6sc in MR

Info :

Place row marker here.

Round 2 :

6inc (12)

Round 3 :

(1sc, inc) *6 (18)

Round 4 :

18sc (18)

Round 5 :

Change color to Red. 18sc (18)

Round 6 :

Change color to Minty. 18sc (18)

Round 7 :

Change color to Green. 18sc (18)

Round 8 :

Change color to Red. 18sc (18)

Round 9 :

Change color to Minty. 18sc (18)

Round 10 :

Change color to Green. 18sc (18)

Round 11 :

Change color to Red. 18sc (18)

Info :

Change color to Green. Crochet the heel in rows with Green yarn:

Row 1 :

(do not turn) 8sc, turn (8)

Row 2 :

ch1, 8sc, turn (8)

Row 3 :

ch1, 8sc, turn (8)

Row 4 :

ch1, 8sc, turn (8)

Round 12 :

Change color to Minty. Return to crochet the stocking. Work in a spiral: dec, 4sc, 4dec, 6sc, 3dec (18)

Round 13 :

Change color to Green. 18sc (18)

Round 14 :

Change color to Red. 18sc (18)

Round 15 :

Change color to Minty. 18sc (18)

Round 16 :

Change color to Green. 18sc (18)

Round 17 :

Change color to Red. 18sc (18)

Round 18 :

Change color to Minty. 18sc (18)

Round 19 :

Change color to Green. 18dc, sl st (18)

Round 20 :

ch2, (FPdc, BPdc) *9, sl st.

Info :

Fasten off, cut the yarn, weave in the yarn ends.

โ€” Cap :

Round 1 :

6sc in MR

Info :

Place row marker here.

Round 2 :

6inc (12)

Round 3 :

(1sc, inc) *6 (18)

Round 4-5 :

18sc (2 rounds) (18)

Round 6 :

(1sc, dec) *6 (12)

Round 7 :

6dec (6)

Round 8 :

Change color to Green. 6sc (6)

Round 9 :

Change color to Red. 6sc (6)

Round 10 :

Change color to Minty. (1sc, inc) *3 (9)

Round 11 :

Change color to Green. 9sc (9)

Round 12 :

Change color to Red. (2sc, inc) *3 (12)

Round 13 :

Change color to Minty. 12sc (12)

Round 14 :

Change color to Green. (3sc, inc) *3 (15)

Round 15 :

Change color to Red. 15sc (15)

Round 16 :

Change color to Minty. (4sc, inc) *3 (18)

Round 17 :

Change color to Green. 18sc (18)

Round 18 :

Change color to Red. (5sc, inc) *3 (21)

Round 19 :

Change color to Minty. 21sc (21)

Round 20 :

Change color to Green. (6sc, inc) *3 (24)

Round 21 :

Change color to Red. 24sc (24)

Round 22 :

Change color to Minty. (7sc, inc) *3 (27)

Round 23 :

Change color to Green. 27sc (27)

Round 24 :

Change color to Red. (8sc, inc) *3 (30)

Round 25 :

Change color to Minty. 30sc (30)

Round 26 :

Change color to Green. (9sc, inc) *3 (33)

Round 27 :

Change color to Red. 3sc (33)

Round 28 :

Change color to Minty. (10sc, inc) *3 (36)

Round 29 :

Change color to Green. 36sc (36)

Round 30 :

Change color to Red. (11sc, inc) *3 (39)

Round 31 :

Change color to Minty. 39sc (39)

Round 32 :

Change color to Green. (12sc, inc) *3 (42)

Round 33 :

Change color to Red. 42sc (42)

Round 34 :

Change color to Minty. (13sc, inc) *3 (45)

Round 35 :

Change color to Green. 45sc (45)

Round 36 :

Change color to Red. (14sc, inc) *3 (48)

Round 37 :

Change color to Minty. 48sc (48)

Round 38 :

Change color to Green. (15sc, inc) *3 (51)

Round 39 :

Change color to Red. 51sc (51)

Round 40 :

Change color to Minty. (16sc, inc) *3 (54)

Round 41 :

Change color to Green. 54sc (54)

Round 42 :

Change color to Red. 54sc (54)

Round 43 :

Change color to Minty. (17sc, inc) *3 (57)

Round 44 :

Change color to Green. 57sc (57)

Round 45 :

Change color to Red. 57sc (57)

Round 46 :

Change color to Minty. (18sc, inc) *3 (60)

Round 47 :

Change color to Green. 60sc (60)

Round 48 :

Change color to Red. 60sc (60)

Round 49 :

Change color to Minty. 60sc (60)

Round 50 :

Change color to Green. (19sc, inc) *3 (63)

Round 51 :

Change color to Red. 63sc (63)

Round 52 :

Change color to Minty. 63sc (63)

Round 53 :

Change color to Red. 63sc (63)

Round 54 :

ch2, 62dc, sl st, turn (63)

Round 55 :

ch2, (FPdc, BPdc, FPdc) *21.

Info :

Fasten off, cut the yarn, weave in the yarn ends.

Assembly Instructions

Important Notes

This charming Christmas Bunny pattern brings together classic amigurumi techniques with festive holiday spirit to create a truly special seasonal companion. The pattern features detailed instructions for creating the bunny's sweet expression, long floppy ears, and adorable Christmas outfit complete with striped stockings and a whimsical pointed cap. With button-jointed limbs for poseable fun and beautiful jacquard colorwork, this project offers both technical challenge and heartwarming results that will be treasured for many holidays to come.

You ask,

we answer.

FAQs

What is jacquard technique in crochet and how do I work it?

Jacquard crochet involves working with two colors in the same round by carrying the unused color behind your stitches. When the pattern indicates stitches in a different color (highlighted in red in the instructions), you'll crochet those stitches with the alternate color while carrying the main color along the back. Keep your tension consistent to avoid puckering, and the carried yarn will be hidden inside the amigurumi when stuffed.

How do I create button joints for moveable limbs?

Button joints allow the arms and legs to move and be posed. Thread a long piece of yarn through one limb, then through the body where you want to attach it, through a button, back through the body, through the second limb, through another button, and back again. Pull tight and secure. The buttons should sit flush against the limbs on the outside.

Can I make this bunny larger or smaller?

Yes! To resize, use a thicker or thinner yarn with the appropriate hook size. Keep in mind you'll need to adjust your safety eye size accordingly - larger bunnies need bigger eyes. The finished size with the specified materials is 20-22 cm (8-9 inches) tall.

The striped pattern on the stockings and cap seems complicated - any tips?

The color changes follow a regular pattern, making them easier than they look! Mark your pattern or write down the color sequence. When changing colors, complete the last stitch of the old color until 2 loops remain on your hook, then pull through with the new color. Carry the unused colors up the inside of the work rather than cutting and rejoining each time.

Do I need to stuff the ears?

No, the ears should not be stuffed as indicated in the pattern. Leaving them unstuffed allows them to hang naturally and creates the characteristic floppy bunny ear look. Only the head, body, arms, legs, and tail should be stuffed with fiberfill.

What does 'working in rows' for the heel mean?

When creating the heel for the legs and stockings, you'll temporarily stop working in a continuous spiral and instead work back and forth in rows over a portion of the stitches. This creates the dimensional heel shape. After completing the specified rows, you'll return to working in the round to continue the leg.