🧢 Beautiful ✨ Detailed πŸ’ Adorable

Christmas Pudding Amigurumi Pattern

Christmas Pudding Amigurumi Pattern
4.4β˜… Rating
3-4 Hours Time Needed
2.7K Made This
βœ‚οΈ

Intermediate Level

Ideal for those with basic knitting experience, featuring slightly more advanced stitches and techniques to expand your skills.

⏱️

Weekend Treat

Takes 5-7 hours, making it an enjoyable project to finish over a couple of days.

πŸŽ„

Holiday Cheer

Festive fun for the season, bringing handmade magic to celebrations and creating new family traditions.

About This Christmas Pudding Amigurumi Pattern

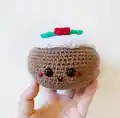
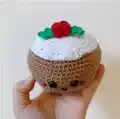
This delightful Christmas Pudding pattern brings traditional holiday magic to life in adorable amigurumi form. The design features a perfectly rounded brown body topped with fluffy white icing and decorated with festive holly leaves and berries. At just 12cm across, it's the perfect size for holiday decorating, gift-giving, or adding a touch of Christmas spirit to any space.

Christmas Pudding Amigurumi Pattern crochet pattern - detailed view of completed project

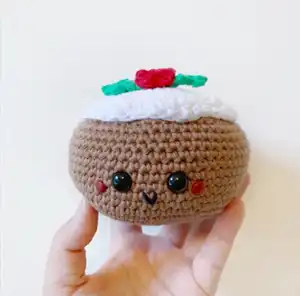
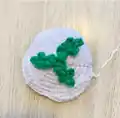
The pattern includes detailed instructions for creating the sweet facial features with safety eyes and an embroidered smile. The decorative elements like the leaves and berries add authentic Christmas pudding details that make this project truly special.

Why You'll Love This Christmas Pudding Amigurumi Pattern

I absolutely love this Christmas Pudding pattern because it captures the essence of holiday tradition in such a cute, manageable size! The combination of textures from the smooth body to the textured icing creates visual interest, while the festive colors instantly bring Christmas joy to any room. It's quick enough to make several for gifts, yet detailed enough to feel satisfying to create.

Christmas Pudding Amigurumi Pattern step 1 - construction progress Christmas Pudding Amigurumi Pattern step 2 - assembly progress Christmas Pudding Amigurumi Pattern step 3 - details and accessories Christmas Pudding Amigurumi Pattern step 4 - final assembly and finishing

Switch Things Up

I love experimenting with different color combinations for this Christmas pudding pattern! While the traditional brown body with white icing is classic, I've tried making versions with chocolate brown, caramel, or even festive red bodies for variety. The icing can be made in cream or light yellow for a custard effect, and I've even created versions with pink icing for a fun twist.

For the decorative elements, I sometimes add small white French knots to mimic powdered sugar on the icing, or create tiny orange carrot pieces alongside the holly for extra detail. I've also made mini versions at half the size using sport weight yarn and a smaller hook - they make perfect ornaments for the Christmas tree!

One of my favorite variations is creating a whole family of puddings in different sizes, which makes a stunning centerpiece display for holiday entertaining.

Common Mistakes & How to Fix Them

βœ— Not stuffing the body firmly enough can result in a flat, pancake-like shape instead of a rounded pudding βœ— Placing the safety eyes too close together or too far apart can affect the cute facial expression βœ— Forgetting to embroider the smile before attaching the icing can make it difficult to access later βœ— Making the leaves too large or too small can throw off the proportional balance of the finished pudding

Christmas Pudding Amigurumi Pattern

Create an adorable Christmas Pudding amigurumi that measures 12cm across! This charming holiday project features a sweet brown body with white icing, festive green leaves, and bright red berries on top. Perfect for spreading Christmas cheer, this delightful pudding includes an embroidered smile and cute safety eyes that give it personality. The pattern combines simple single crochet techniques with decorative elements to create a memorable holiday decoration or gift.

Intermediate 3-4 Hours

Materials Needed for Christmas Pudding Amigurumi Pattern

β€” Main Fabric

  • 01
    Paintbox Yarns One Ball in Paper White for the icing
  • 02
    Paintbox Yarns One Ball in Soft Fudge for the pudding body
  • 03
    Paintbox Yarns One Ball in Grass Green for the holly leaves
  • 04
    Paintbox Yarns One Ball in Pillar Red for the berries

β€” Tools Required

  • 01
    Crochet hook size 3.25mm
  • 02
    Safety eyes 9mm (2 count)
  • 03
    Red brads 5mm (2 count)
  • 04
    Tapestry needle
  • 05
    Glue
  • 06
    Stuffing

Progress Tracker

0% Complete

β€” Body :

Round 1 :

MR 6

Round 2 :

inc around [12]

Round 3 :

(sc, inc) x6 [18]

Round 4 :

(sc 2, inc) x6 [24]

Round 5 :

(sc 3, inc) x6 [30]

Round 6 :

(sc 4, inc) x6 [36]

Round 7 :

(sc 5, inc) x6 [42]

Round 8 :

(sc 6, inc) x6 [48]

Round 9 :

(sc 7, inc) x6 [52]

Round 10 :

(sc 8, inc) x6 [60]

Round 11-20 :

sc around [10 rounds]

Info :

Embroider a smile on R13, add eyes between R14-15, 3-4 stitches above smile. Add red brads between R13-14 next to eyes. Secure with glue.

Round 21 :

(sc 8, dec) x6

Round 22 :

(sc 7, dec) x6 [52]

Round 23 :

(sc 6, dec) x6 [48]

Round 24 :

(sc 5, dec) x6 [42]

Round 25 :

(sc 4, dec) x6 [36]

Info :

Stuff semi firmly as you go

Round 26 :

(sc 3, dec) x6

Round 27 :

(sc 2, dec) x6

Round 28 :

(sc, dec) x6

Round 29 :

dec around

Info :

FO. Weave in all ends. Squish the body by pressing the top and bottom so it is more of a tall pancake shape.

β€” Icing :

Round 1 :

MR 6 [6]

Round 2 :

inc around [12]

Round 3 :

(sc, inc) x6 [18]

Round 4 :

(sc 2, inc) x6 [24]

Round 5 :

(sc 3, inc) x6 [30]

Round 6 :

(sc 4, inc) x6 [36]

Round 7 :

(sc 5, inc) x6 [42]

Round 8-9 :

sc,hdc in next 2 st, sc in next 3st, hdc, sc, hdc, sc, hdc in next 2 st, sc in next 2 st, hdc in next 3 st, sc in next 4 st, hdc in next 5 st, sc in next 6 st, hdc in 8 st, sc in last 2 st. [2 rounds]

Info :

FO leaving long tail for sewing.

β€” Leaves :

Info :

Make three or more using Green Yarn

Instructions :

ch 7, sl st in 2nd ch from hook through bb, (sl st through bb, ch 2, sl st in same bb), sl st in next 2 back bumps, ch 3, sl st in same bb, sl st in next bb, 3 sl st in next bb.

Info :

working on other side of the ch: sl st in next 2 st, ch 3, sl st in current st, sl st in next, ch 2, sl st in same, sl st in last.

Info :

FO leaving long tail for sewing.

β€” Berries :

Info :

Make three or more using Red Yarn

Round 1 :

MR 4

Info :

Clean FO and leave a long tail for sewing.

Assembly Instructions

  • Sew the green leaves onto the top of the white icing piece, arranging them to look like holly
  • Attach the red berries on top of the leaves to complete the festive decoration
  • Place the completed icing piece onto the top of the pudding body around rounds 21-29
  • Secure all pieces with careful stitching and weave in all loose ends for a clean finish

Important Notes

  • πŸ’‘Use safety eyes and brads carefully, securing with glue for extra safety if making for children
  • πŸ’‘Stuff the body semi-firmly to maintain the rounded pudding shape without overstuffing
  • πŸ’‘Embroider the smile before attaching the icing to ensure easy access to the face area
  • πŸ’‘Shape the body by gently pressing top and bottom to create the traditional pudding silhouette
  • πŸ’‘Make multiple leaves and berries for a fuller, more realistic holly decoration on top

This charming Christmas Pudding pattern captures all the warmth and joy of the holiday season in a delightful miniature form. Perfect for decorating your home, giving as gifts, or creating cherished Christmas memories with loved ones. The combination of traditional pudding colors and festive details makes this a truly special seasonal project. πŸŽ„ Happy crocheting! 🧢✨

You ask,

we answer.

FAQs

What size will my finished Christmas Pudding be?

The finished Christmas Pudding measures approximately 12cm across, making it a perfect tabletop decoration or gift.

Can I use different yarn brands for this pattern?

Yes, you can substitute with any worsted weight yarn in the same colors. Just maintain the same hook size for consistent gauge.

How do I attach the safety eyes securely?

Place the safety eyes between rounds 14-15, about 3-4 stitches above the embroidered smile, and secure the backs tightly. Add a drop of glue for extra security.

Can I make this pattern without the face details?

Absolutely! You can create a traditional Christmas pudding decoration by omitting the eyes, smile, and cheek brads for a more realistic look.

How many leaves and berries should I make?

The pattern suggests making three or more of each. I recommend making 4-5 leaves and 3-4 berries for a fuller, more festive appearance.